Introduction
Welcome to your new favorite no-bake dessert recipe—a luxurious Biscoff cookie butter cheesecake that looks like it came straight from a high-end European bakery.
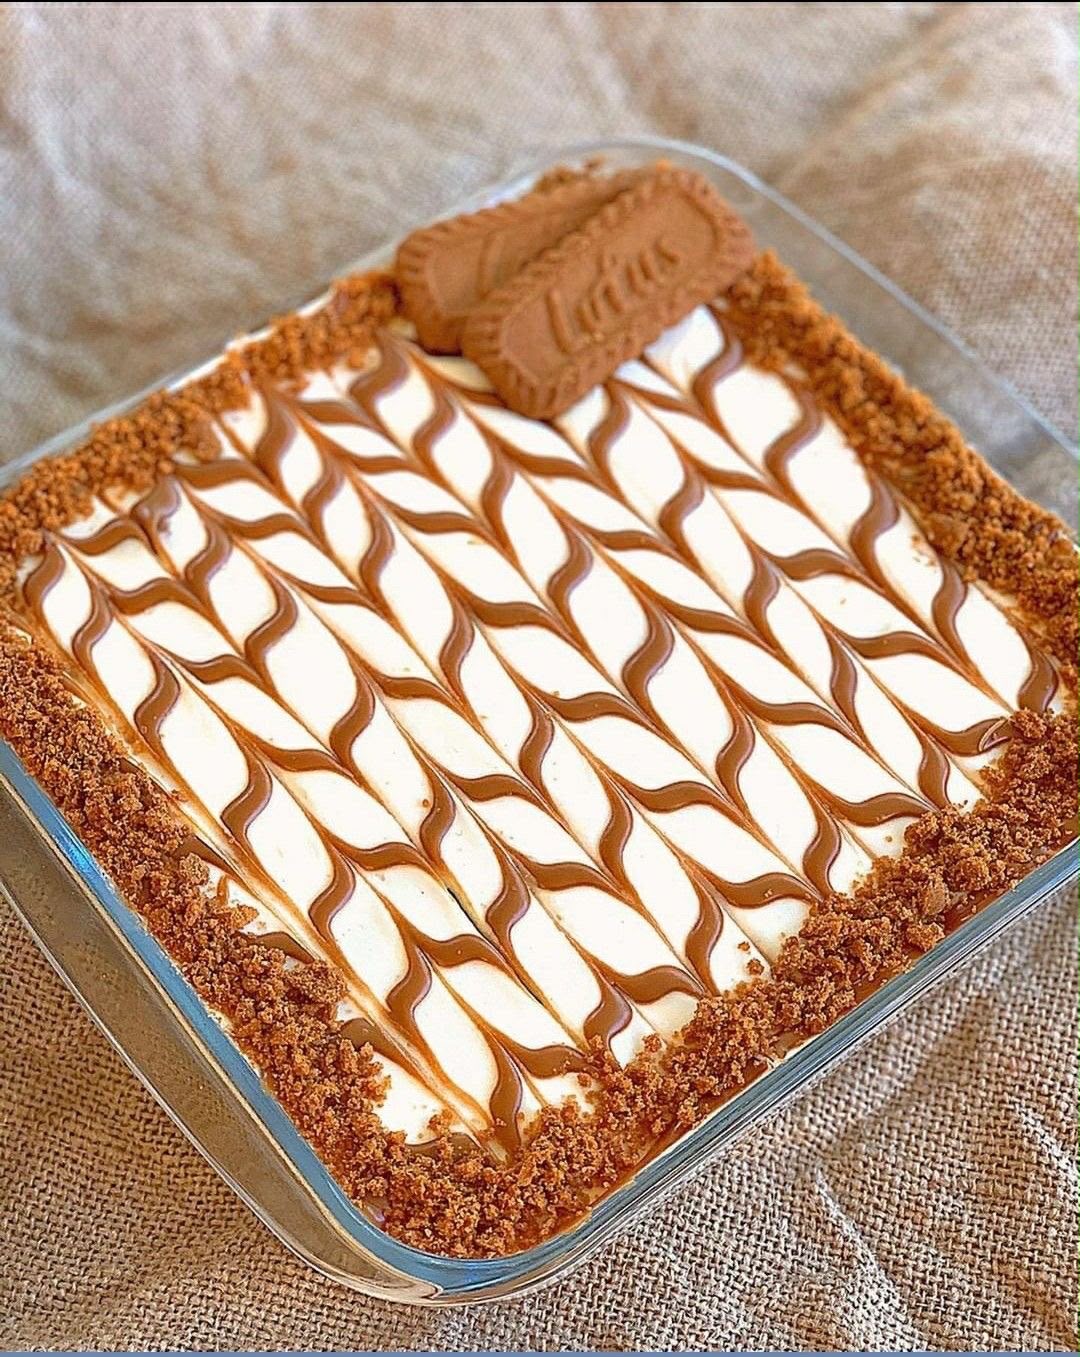
This beautiful cheesecake combines a buttery Biscoff cookie crust with a smooth, creamy cookie butter filling and an elegant caramel-colored decorative pattern on top. A border of crushed biscuits adds an irresistible crunch and makes the finished dessert look especially impressive.
Best of all, there is no oven required. With simple preparation, quality ingredients, and enough chilling time, you can create a bakery-style cheesecake at home with minimal effort.
Whether you’re preparing an elegant dinner-party dessert, a holiday treat, or an easy weekend sweet, this no-bake Biscoff cheesecake is guaranteed to be a memorable choice.
Recipe Overview
| Feature | Details |
| Prep Time | 25 minutes |
| Chill Time | 4 hours |
| Total Time | 4 hours 25 minutes |
| Yield | 9 servings |
| Difficulty | Beginner-Friendly |
| Category | Dessert / Cheesecake |
| Method | No-Bake |
Why You’ll Love This Recipe
You’ll love this cheesecake because it delivers rich caramelized cookie flavor with an incredibly smooth and creamy texture.
The combination of Biscoff cookies and cookie butter creates a deep spiced flavor that feels indulgent without requiring complicated pastry techniques.
Because the cheesecake is completely no-bake, it is particularly convenient during warm weather when you would rather avoid turning on the oven.
The decorative pattern also gives this simple dessert a sophisticated appearance. A few quick movements with a toothpick can transform the melted cookie butter into an elegant feathered design.
Ingredients 🍪✨
Crust Ingredients
| Ingredient | Quantity | Notes |
| 🍪 Lotus Biscoff Cookies | 1½ cups | Finely crushed |
| 🧈 Unsalted Butter | 5 tablespoons | Melted |
| 🧂 Salt | ⅛ teaspoon | Balances sweetness |
Cheesecake Filling
| Ingredient | Quantity | Notes |
| 🧀 Full-Fat Cream Cheese | 16 oz | Softened |
| 🍬 Powdered Sugar | ¾ cup | Sifted |
| 🥛 Heavy Whipping Cream | 1 cup | Very cold |
| 🍦 Vanilla Extract | 1 teaspoon | Pure vanilla preferred |
| 🍪 Biscoff Cookie Butter | ½ cup | Smooth variety |
Topping and Garnish
| Ingredient | Quantity | Notes |
| 🍪 Biscoff Cookie Butter | ⅓ cup | Melted for decoration |
| 🍪 Crushed Biscoff Cookies | ¼ cup | For the border |
| 🍪 Whole Biscoff Cookies | 2 | Optional garnish |
Step-by-Step Instructions
Step 1: Prepare the Crust
Place the finely crushed Biscoff cookies in a medium bowl.
Add the melted butter and salt.
Mix thoroughly until all the crumbs are evenly coated and the mixture resembles wet sand.
Step 2: Form the Cheesecake Base
Transfer the cookie mixture into an 8×8-inch square dish.
Press the crumbs firmly and evenly into the bottom using the flat bottom of a measuring cup or glass.
Refrigerate while preparing the filling.
Step 3: Whip the Heavy Cream
Pour the cold heavy whipping cream into a chilled mixing bowl.
Using an electric mixer, beat on high speed until stiff peaks form.
This generally takes around 2–4 minutes, depending on your mixer.
Set the whipped cream aside.
Step 4: Prepare the Cream Cheese Mixture
In another large bowl, beat the softened cream cheese and sifted powdered sugar until completely smooth.
Add the vanilla extract and ½ cup of Biscoff cookie butter.
Continue mixing until the filling is smooth and evenly combined.
Step 5: Fold in the Whipped Cream
Add the whipped cream to the cream cheese mixture.
Using a rubber spatula, gently fold the ingredients together.
Avoid aggressive stirring because you want to preserve the airiness of the whipped cream.
Continue folding until no visible white streaks remain.
Step 6: Add the Filling
Remove the chilled crust from the refrigerator.
Spoon the cheesecake filling over the crust.
Use an offset spatula or the back of a spoon to spread the filling into an even layer.
Smooth the surface as much as possible before decorating.
Step 7: Create the Biscoff Pattern
Place ⅓ cup of Biscoff cookie butter in a microwave-safe bowl.
Warm it for approximately 15–20 seconds, stirring afterward.
The cookie butter should become fluid enough to drizzle but should not be hot.
Pipe or drizzle thin horizontal lines across the cheesecake.
Run a toothpick vertically through the lines, alternating directions to create a beautiful feathered or chevron-style pattern.
Step 8: Garnish and Chill
Sprinkle crushed Biscoff cookies around the edges to create a decorative border.
Place the whole cookies in the desired position on top.
Cover the cheesecake carefully and refrigerate for at least 4 hours.
For the firmest texture and best flavor, chilling overnight is even better.
Best Tips
Always allow the cream cheese to reach room temperature before mixing. Softened cream cheese creates a much smoother filling and helps prevent lumps.
Keep the heavy whipping cream very cold. Cold cream whips faster and produces a more stable structure for the no-bake cheesecake.
Do not over-whip the cream. Stop as soon as stiff peaks form to prevent the cream from becoming grainy.
When decorating, the melted cookie butter should be warm and fluid but never hot. Excessive heat can soften the cheesecake surface.
For sharper decorative lines, wipe the toothpick clean after each few strokes.
Most importantly, give the cheesecake enough time to chill. Four hours is the minimum, while an overnight rest generally provides an even firmer texture.
Best Ingredient Options
Biscoff Cookies
Authentic Biscoff cookies provide the characteristic caramelized and lightly spiced flavor.
If unavailable, speculoos biscuits, graham crackers, or vanilla wafers can be used.
Cream Cheese
Use full-fat brick-style cream cheese for the best structure.
Avoid low-fat or whipped cream cheese because the additional moisture can produce a softer filling.
Heavy Cream
Choose heavy whipping cream containing approximately 36% or more milk fat.
The higher fat content helps create stable whipped cream and a more reliable cheesecake texture.
Cookie Butter
Smooth cookie butter is ideal for creating a creamy filling and decorative topping.
Crunchy cookie butter can also be used if you want additional texture.
Recipe Variations
Chocolate Biscoff Cheesecake
Replace part of the Biscoff crust with finely crushed chocolate sandwich cookies.
You can also drizzle melted chocolate over the finished cheesecake for a richer dessert.
Caramel Apple Version
Prepare finely diced apples with butter and cinnamon until tender.
Allow them to cool completely before folding a small amount into the cheesecake filling.
The caramelized apple flavor pairs beautifully with Biscoff.
Individual Cheesecake Cups
Instead of using one square dish, divide the crust and filling between small glasses or dessert cups.
Chill individual portions and decorate each one separately for an elegant party presentation.
Chocolate Cookie Butter Cheesecake
Add a thin layer of melted chocolate between the crust and cheesecake filling.
Finish with Biscoff crumbs and a light chocolate drizzle.
What to Serve With
A cup of freshly brewed black coffee or espresso is an excellent pairing for this rich dessert.
The bitterness of coffee balances the sweetness of the cookie butter and creates a café-style dessert experience.
For a summer presentation, serve each slice with fresh raspberries or strawberries.
A small scoop of vanilla bean ice cream can also turn the cheesecake into an especially indulgent dessert.
Make-Ahead Instructions
This cheesecake is an excellent make-ahead dessert.
You can prepare and decorate the entire cheesecake up to 2 days before serving.
Keep it covered and refrigerated until ready to serve.
In fact, preparing it the night before can improve the texture because the filling has more time to firm up and the Biscoff flavor has time to develop.
Storage
Because this cheesecake contains cream cheese and whipped cream, it should remain refrigerated.
Cover the dish tightly with plastic wrap or use an airtight container.
Properly stored, the cheesecake can be kept refrigerated for approximately 5 days.
Reheating
This is a chilled, no-bake dessert and should not be reheated.
Heat will soften the cream cheese and whipped cream filling and can destroy the structure of the cheesecake.
For the best texture, serve directly from the refrigerator.
If the cheesecake is extremely firm, allow it to sit at room temperature for approximately 5–10 minutes before slicing.
Freezing
This cheesecake can be frozen for longer storage.
Wrap the dish tightly with plastic wrap, followed by aluminum foil.
Freeze for up to 2 months for the best quality.
When ready to serve, transfer the cheesecake to the refrigerator and allow it to thaw gradually overnight.
Avoid thawing it at room temperature for extended periods.
Common Mistakes to Avoid
Using Cold Cream Cheese
Cold cream cheese can remain lumpy and prevent the filling from becoming smooth.
Allow it to soften at room temperature before mixing.
Under-Whipping the Cream
Soft whipped cream does not provide enough structure.
Beat the heavy cream until firm peaks form before folding it into the cheesecake mixture.
Over-Whipping the Cream
Whipping for too long can cause the cream to become grainy and eventually turn into butter.
Stop immediately once stiff peaks appear.
Cutting the Cheesecake Too Soon
A no-bake cheesecake needs sufficient chilling time to develop its structure.
Cutting it too early can result in soft, messy slices.
Using Hot Cookie Butter
Very hot cookie butter can melt or disturb the surface of the cheesecake.
Warm it only until it becomes easy to drizzle.
Nutrition Estimate
Values are approximate and can vary depending on the specific brands and ingredients used.
| Nutrient | Amount per Serving |
| Calories | Approximately 450 kcal |
| Total Fat | 32 g |
| Saturated Fat | 18 g |
| Cholesterol | 75 mg |
| Sodium | 210 mg |
| Total Carbohydrates | 38 g |
| Dietary Fiber | 0.5 g |
| Sugars | 26 g |
| Protein | 4 g |
Frequently Asked Questions
Can I use another type of cookie?
Yes. Graham crackers, vanilla wafers, digestive biscuits, or other caramelized spiced cookies can work well as alternatives.
Why didn’t my cheesecake set properly?
The most common reasons are insufficient chilling, using low-fat or spreadable cream cheese, or failing to whip the heavy cream to stiff peaks.
For the best results, use full-fat brick-style cream cheese and refrigerate the cheesecake for at least four hours.
Can I make this cheesecake without an electric mixer?
Yes, although an electric mixer makes the process considerably easier.
A sturdy hand whisk can be used to whip the cream, but it will require more time and effort.
How can I get perfectly clean slices?
Use a sharp knife warmed briefly under hot water.
Dry the blade completely before cutting.
Wipe the knife clean between each slice and repeat the warming process when necessary.
Can I make it in a round pan?
Yes.
A springform pan works particularly well for a traditional cheesecake presentation. Line the base with parchment paper to make removal easier.
Final Thoughts
This No-Bake Biscoff Cookie Butter Cheesecake proves that an impressive gourmet dessert does not require an oven or complicated pastry techniques.
The buttery cookie crust, creamy Biscoff filling, caramelized cookie butter decoration, and crunchy biscuit border create a dessert that looks sophisticated while remaining surprisingly easy to prepare.
With a few quality ingredients and plenty of chilling time, you can create a beautiful bakery-style cheesecake that is perfect for holidays, dinner parties, birthdays, or a luxurious weekend treat.