Introduction
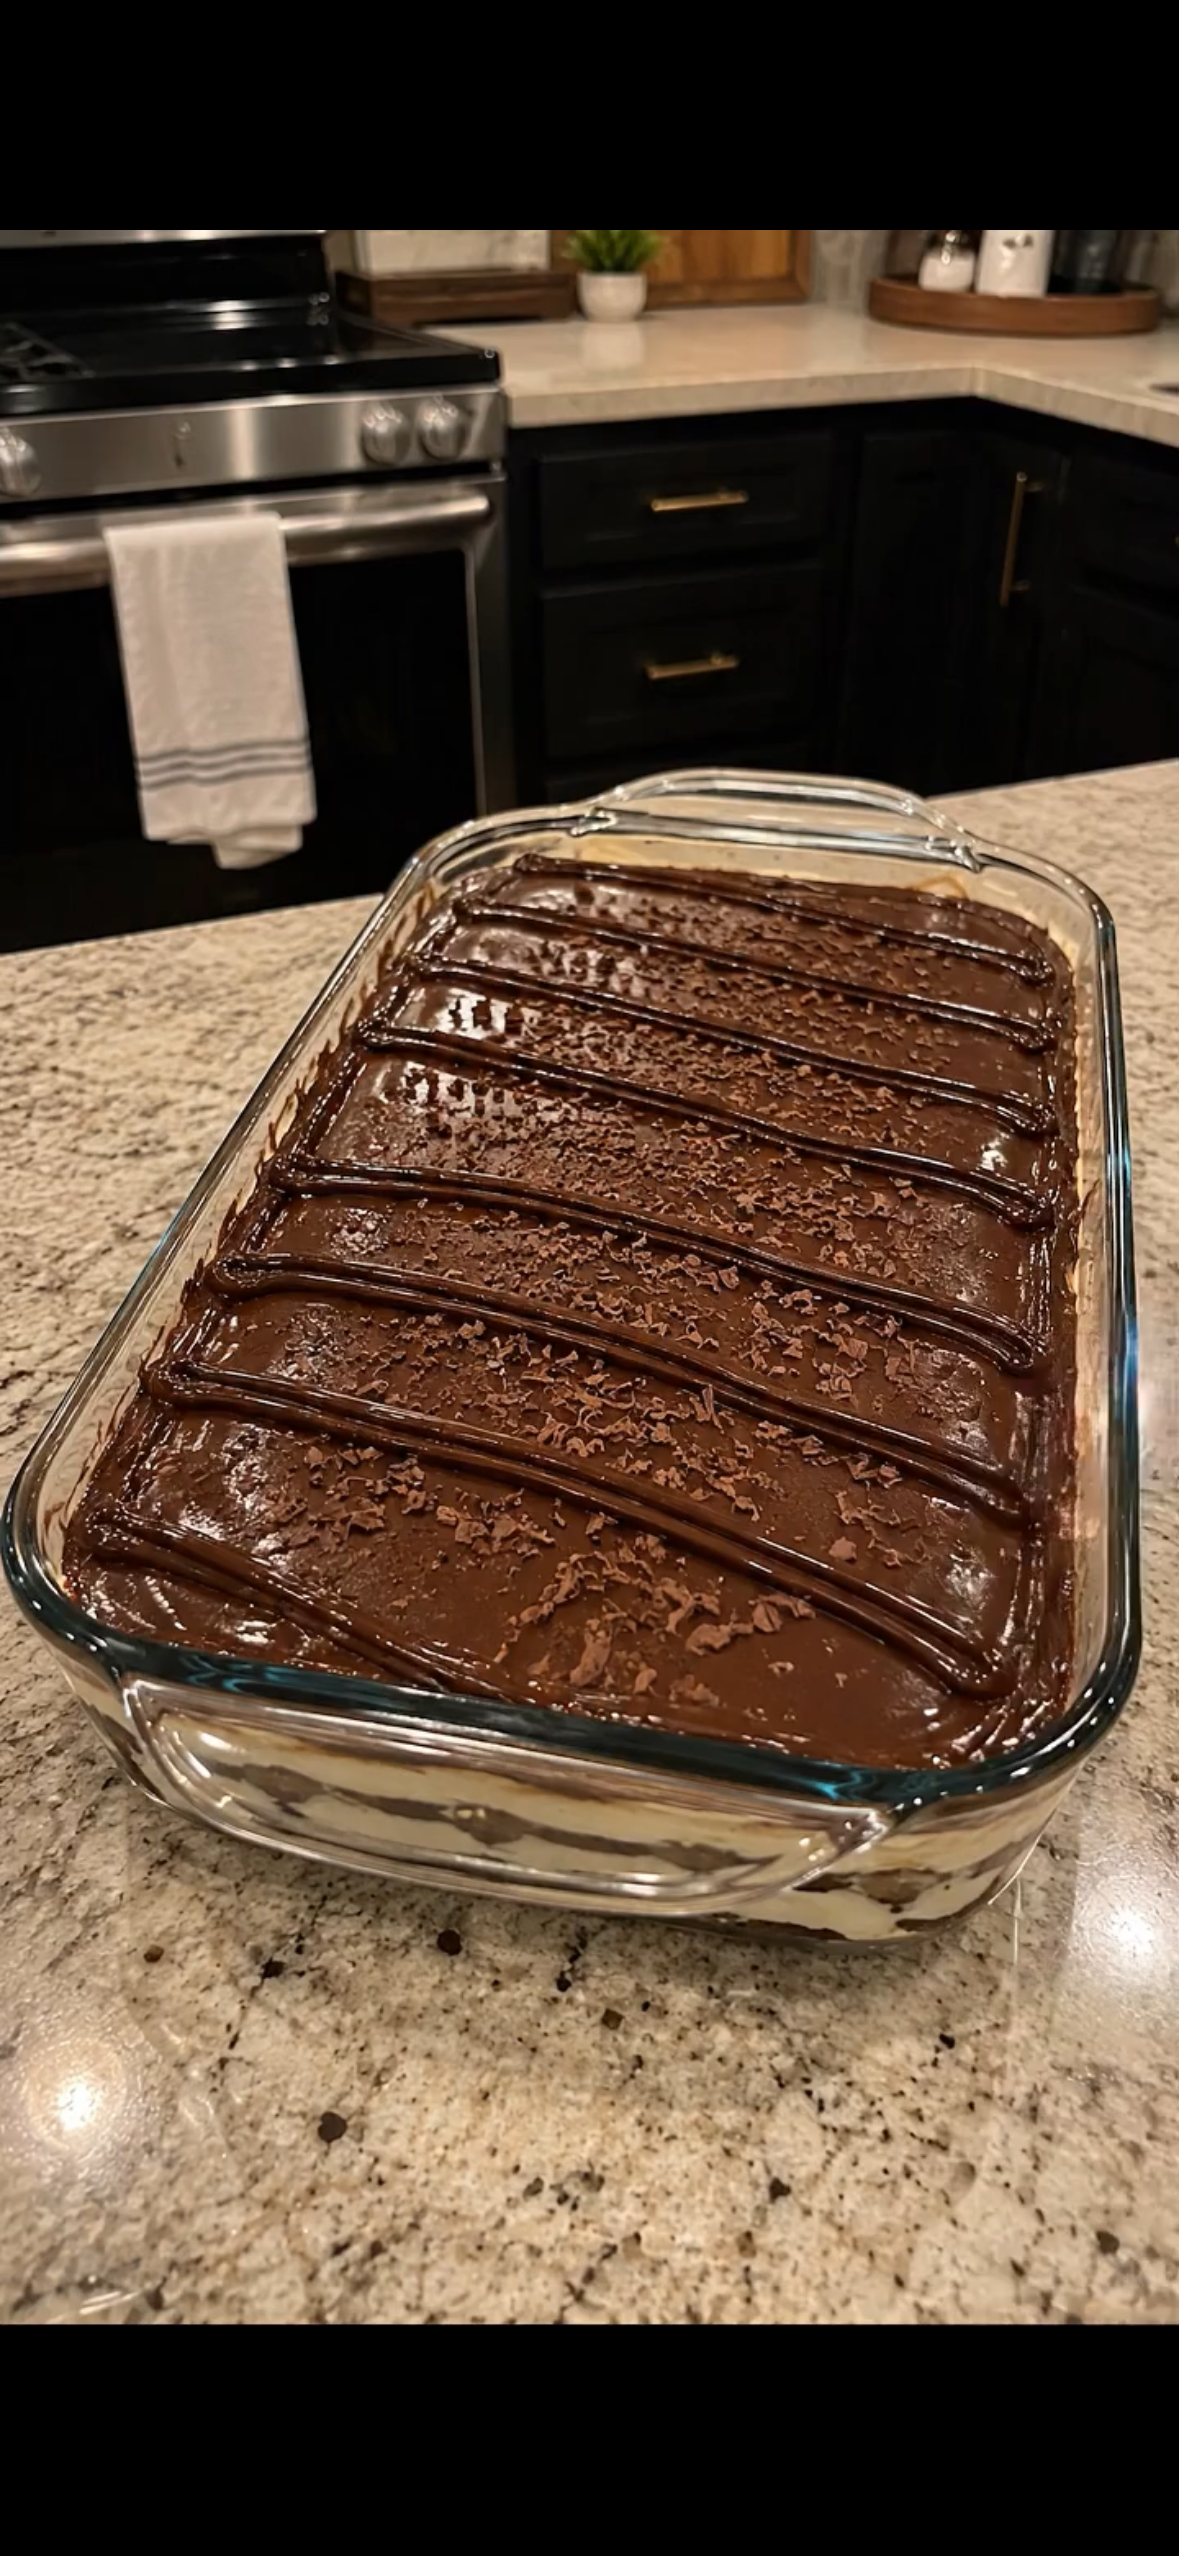
This No-Bake Chocolate Lush Dessert is a rich, creamy, and indulgent layered chocolate dessert that looks impressive but is surprisingly easy to make.
With a buttery cookie crust, a smooth cream cheese layer, silky chocolate pudding, fluffy whipped topping, and a glossy chocolate finish, every spoonful delivers a delicious combination of textures.
This easy dessert recipe is perfect for family gatherings, holidays, potlucks, birthdays, or whenever you want a make-ahead chocolate dessert without turning on the oven.
Recipe Overview
| Category | Details |
| Recipe | No-Bake Chocolate Lush Dessert |
| Prep Time | 30 minutes |
| Chill Time | 4–6 hours |
| Total Time | About 4½–6½ hours |
| Servings | 12–16 |
| Course | Dessert |
| Cuisine | American-inspired |
| Method | No-Bake |
| Difficulty | Easy |
| Best For | Holidays, parties, potlucks, family desserts |
Why You’ll Love This Recipe
This chocolate lush dessert is incredibly creamy and satisfying without requiring complicated baking techniques. Each layer can be prepared separately and assembled directly in a baking dish.
The combination of crunchy chocolate cookies, tangy cream cheese, creamy chocolate pudding, and whipped topping creates a perfect contrast between rich and light textures.
It is also an excellent make-ahead dessert. Preparing it several hours before serving allows the layers to firm up and the flavors to blend beautifully.
Because it is served chilled, this easy no-bake dessert is especially convenient when your oven is already occupied with other dishes.
Ingredients
For the Cookie Crust
| Ingredient | Amount |
| Chocolate sandwich cookies | 36 cookies |
| Unsalted butter, melted | 6 tablespoons |
For the Cream Cheese Layer
| Ingredient | Amount |
| Cream cheese, softened | 8 oz / 225 g |
| Powdered sugar | 1 cup |
| Vanilla extract | 1 teaspoon |
| Whipped topping | 1 cup |
For the Chocolate Pudding Layer
| Ingredient | Amount |
| Instant chocolate pudding mix | 2 packages, 3.9 oz each |
| Cold whole milk | 3 cups |
For the Topping
| Ingredient | Amount |
| Whipped topping | 2–3 cups |
| Semi-sweet or dark chocolate | 3 oz / 85 g |
| Heavy cream | ⅓ cup |
Optional Garnish
| Ingredient | Amount |
| Chocolate shavings | 2–3 tablespoons |
| Mini chocolate chips | 2 tablespoons |
| Chocolate syrup | As needed |
Step-by-Step Instructions
1. Prepare the Cookie Crust
Place the chocolate sandwich cookies into a food processor and pulse until they become fine crumbs.
Pour in the melted butter and pulse again until the mixture resembles wet sand.
Press the cookie mixture firmly into the bottom of a 9 × 13-inch baking dish.
Use the bottom of a measuring cup or glass to create an even, compact layer.
Refrigerate the crust for about 15–20 minutes while preparing the next layer.
2. Make the Cream Cheese Layer
Place the softened cream cheese in a large mixing bowl.
Beat until smooth and creamy, making sure there are no large lumps.
Add the powdered sugar and vanilla extract.
Beat again until the mixture becomes smooth and fluffy.
Gently fold in 1 cup of whipped topping until completely incorporated.
Spread the cream cheese mixture evenly over the chilled cookie crust.
3. Prepare the Chocolate Pudding
Pour the cold milk into a large bowl.
Add both packages of instant chocolate pudding mix.
Whisk continuously for approximately 2 minutes, or until the pudding thickens.
Let the pudding stand for another 2–3 minutes so it reaches a firm, spreadable consistency.
Carefully spread the chocolate pudding over the cream cheese layer.
Use an offset spatula or the back of a spoon to create an even surface.
4. Add the Whipped Topping
Spread 2–3 cups of whipped topping over the chocolate pudding layer.
Smooth the surface gently without pressing too firmly into the pudding.
For an especially creamy chocolate dessert, make sure the whipped topping completely covers the pudding layer.
5. Prepare the Chocolate Topping
Place the chopped chocolate in a heatproof bowl.
Warm the heavy cream in a small saucepan over medium-low heat until it is hot but not boiling.
Pour the warm cream over the chocolate.
Allow it to sit for approximately 2 minutes.
Stir slowly until the chocolate melts and the mixture becomes smooth and glossy.
Let the chocolate mixture cool for several minutes.
6. Decorate the Dessert
Drizzle the cooled chocolate ganache over the whipped topping.
For a look similar to the pictured dessert, pipe several long chocolate lines across the surface.
Sprinkle finely grated chocolate over the top.
You can also add chocolate curls or mini chocolate chips for extra decoration.
7. Chill
Cover the baking dish carefully with plastic wrap or aluminum foil.
Refrigerate for at least 4 hours.
For the best texture, refrigerate overnight.
The longer chilling time allows the layers to become firm enough to slice while giving the flavors time to blend.
8. Serve
Use a sharp knife to cut the dessert into squares.
For cleaner slices, wipe the knife with a warm, damp towel between cuts.
Serve cold and keep the remaining dessert refrigerated.
Best Tips
Make sure the cream cheese is fully softened before mixing. Cold cream cheese can leave small lumps in the filling and make the layer difficult to spread.
Press the cookie crust firmly into the baking dish. A compact crust will hold together much better when the dessert is sliced.
Use cold milk when preparing the instant pudding. Warm or room-temperature milk can prevent the pudding from reaching the ideal consistency.
Do not rush the chilling process. At least four hours is recommended, but overnight refrigeration usually produces the best results.
Allow the chocolate topping to cool before drizzling it over the whipped topping. If it is too hot, it can soften or melt the whipped topping.
For beautiful slices, refrigerate the dessert until completely firm and use a clean knife for each cut.
Best Ingredient Options
Chocolate sandwich cookies provide a classic cookie crust, but chocolate wafer cookies can also be used.
For a richer flavor, use full-fat cream cheese instead of reduced-fat cream cheese.
Whole milk produces a particularly creamy pudding layer, although 2% milk can also work.
For the chocolate topping, semi-sweet chocolate provides a balanced flavor, while dark chocolate creates a more intense chocolate taste.
Homemade whipped cream can replace prepared whipped topping if preferred. Make sure it is whipped to firm peaks so the layers remain stable.
Recipe Variations
For a peanut butter chocolate version, mix ½ cup of creamy peanut butter into the cream cheese layer.
For a chocolate mint dessert, add ¼ teaspoon of peppermint extract to the cream cheese mixture and decorate with chocolate shavings.
For an Oreo-inspired version, use extra chocolate sandwich cookie crumbs between the layers.
For a caramel chocolate variation, drizzle caramel sauce over the cream cheese layer before adding the chocolate pudding.
For a mocha dessert, dissolve 1–2 teaspoons of instant espresso powder into the pudding mixture.
For a triple chocolate version, use chocolate cookies for the crust, chocolate pudding in the center, and dark chocolate ganache on top.
What to Serve With
This rich chocolate dessert pairs beautifully with fresh strawberries, raspberries, or sliced bananas.
A cup of freshly brewed coffee makes an excellent pairing because the slight bitterness balances the sweetness of the dessert.
For a special occasion, serve each portion with a small spoonful of whipped cream and a few chocolate curls.
Vanilla ice cream can also be served alongside the dessert when an extra-indulgent treat is desired.
Make-Ahead Instructions
This is an excellent make-ahead dessert because it actually benefits from several hours of refrigeration.
Prepare the entire dessert up to 24 hours before serving.
Keep it tightly covered and refrigerated until ready to serve.
Add delicate garnishes such as chocolate curls or fresh fruit shortly before serving for the best appearance.
Storage
Store the chocolate lush dessert covered in the refrigerator.
It is best enjoyed within 3–4 days.
Always keep the dessert refrigerated because it contains cream cheese, milk, and whipped topping.
Reheating
This dessert should not be reheated.
Serve it chilled directly from the refrigerator.
If the dessert has been refrigerated overnight, allow it to sit at room temperature for approximately 5–10 minutes before serving if you prefer a slightly softer texture.
Freezing
The assembled dessert can be frozen, although the texture of the whipped topping may change slightly after thawing.
Cover the baking dish tightly with plastic wrap followed by aluminum foil.
Freeze for up to 1 month for the best quality.
Transfer the dessert to the refrigerator and allow it to thaw slowly overnight.
Do not thaw it at room temperature for an extended period.
Common Mistakes to Avoid
Do not use melted butter that is extremely hot when combining it with the cookie crumbs. Allow it to cool slightly first.
Avoid spreading the cream cheese layer over a warm crust. The crust should be chilled enough to remain firm.
Do not use warm milk for the pudding. Cold milk helps instant pudding thicken properly.
Do not pour hot ganache directly onto the whipped topping. Let the chocolate mixture cool first.
Avoid serving the dessert before it has had enough time to set. Cutting it too early can cause the layers to slide together.
Do not leave the finished dessert sitting at room temperature for several hours. Keep it refrigerated until serving.
Nutrition Estimate
| Nutrient | Approx. Per Serving |
| Calories | 430 kcal |
| Carbohydrates | 49 g |
| Protein | 5 g |
| Fat | 24 g |
| Saturated Fat | 13 g |
| Sugar | 32 g |
| Fiber | 2 g |
| Sodium | 330 mg |
Nutrition information is an estimate and will vary depending on the specific brands and ingredients used.
Frequently Asked Questions
Can I make this chocolate dessert the day before?
Yes. In fact, making it the day before is one of the best ways to achieve a firm, beautifully layered dessert.
Can I use homemade whipped cream?
Yes. Use firmly whipped heavy cream sweetened to taste. For the most stable results, make sure the cream is whipped to stiff peaks.
Why is my pudding layer too soft?
The most common causes are using too much milk or not allowing the instant pudding enough time to thicken. Measure the milk carefully and whisk the pudding for the recommended time.
Can I use a different baking dish?
Yes. A similar-sized rectangular or square baking dish can be used. A smaller dish will create thicker layers, while a larger dish will produce thinner layers.
How long does chocolate lush last in the refrigerator?
For the best taste and texture, enjoy it within 3–4 days when properly covered and refrigerated.
Can I make this dessert without the chocolate ganache?
Absolutely. The dessert is delicious with simply whipped topping and chocolate shavings.
Can I add fruit?
Yes. Strawberries, raspberries, cherries, and bananas all pair nicely with chocolate.
Final Thoughts
This No-Bake Chocolate Lush Dessert is the kind of easy dessert recipe that looks elegant enough for a celebration while remaining simple enough for a casual family treat.
The combination of a crunchy chocolate crust, creamy cheesecake-style filling, silky chocolate pudding, fluffy topping, and glossy chocolate drizzle makes every layer delicious.
For the best results, prepare this chocolate dessert several hours ahead and let it chill completely before serving. The finished dessert is creamy, rich, and wonderfully chocolatey from the first bite to the last.