Introduction
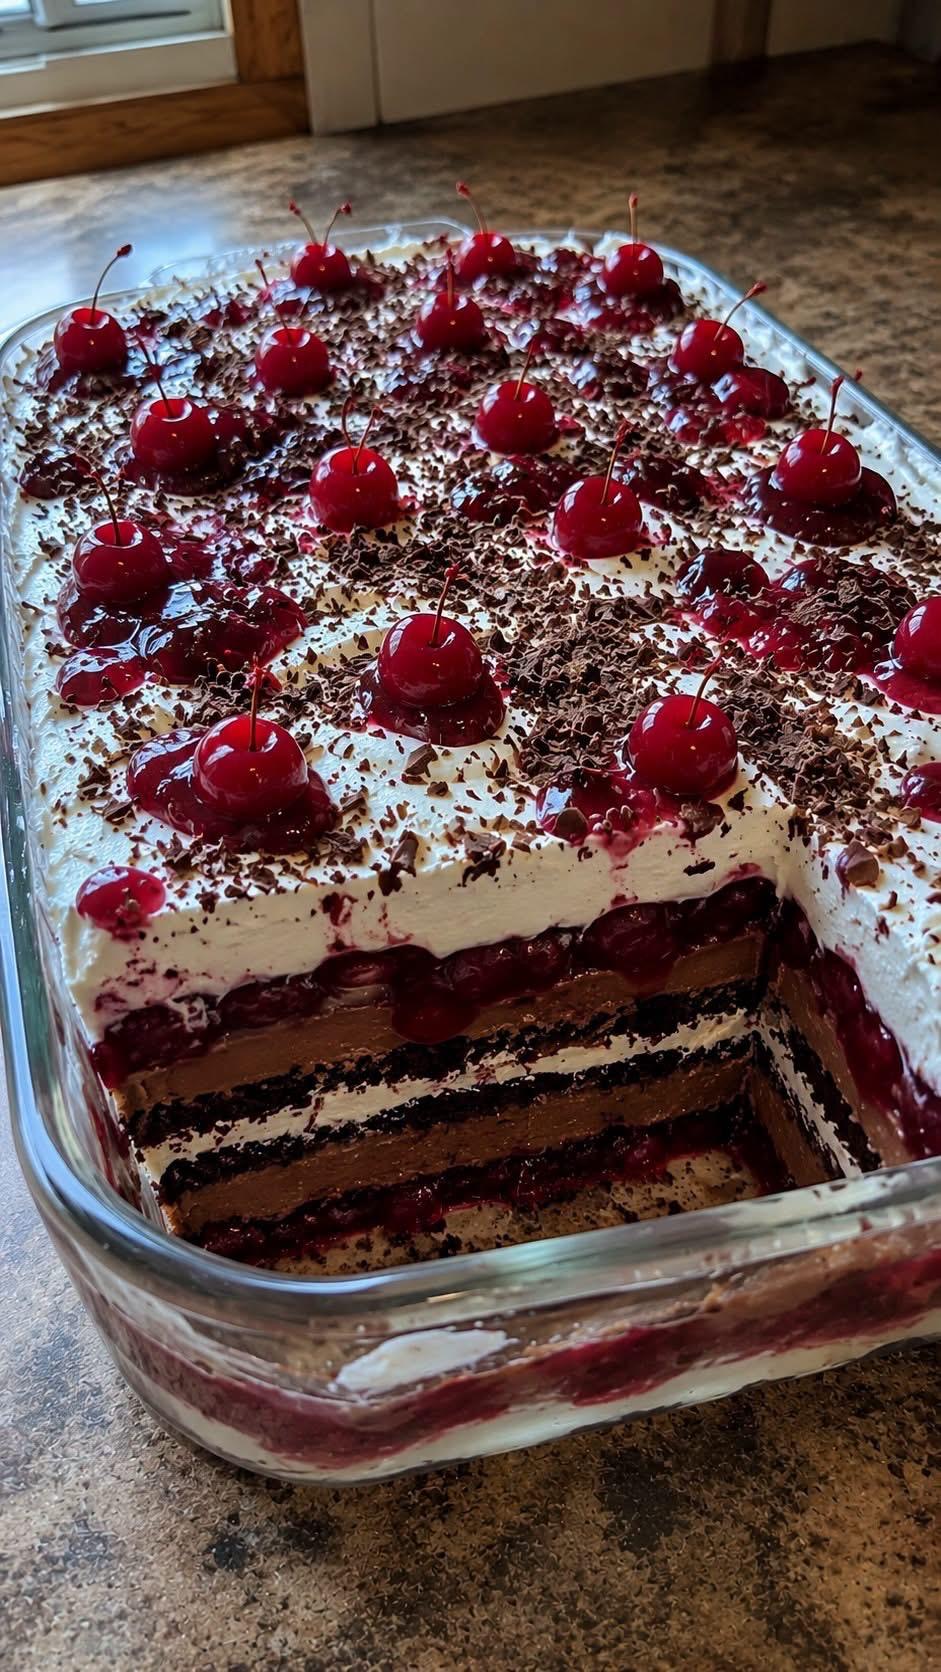
Welcome to the ultimate Decadent Layered Black Forest Dessert, a spectacular no-bake treat that combines rich chocolate, creamy cheesecake, luscious cherries, and fluffy whipped cream in one irresistible dessert.
With its crunchy chocolate cookie crust, silky chocolate cheesecake layer, sweet-tart cherry filling, and light whipped cream topping, every bite delivers the classic flavors of a Black Forest cake in an incredibly easy layered dessert.
Whether you are preparing a holiday dinner, birthday celebration, family gathering, or weekend potluck, this easy no-bake dessert recipe is guaranteed to impress your guests without requiring hours in the kitchen.
Recipe Overview
| Recipe Detail | Information |
| Preparation Time | 30 minutes |
| Cook Time | No baking required |
| Chilling Time | 6 hours |
| Total Time | 6 hours 30 minutes |
| Servings | 15 slices |
| Difficulty | Medium |
| Category | Dessert |
| Method | No-Bake |
Why You Will Love This Recipe
This decadent dessert requires absolutely no baking, making it a wonderful option when you want an impressive dessert without turning on the oven.
The combination of chocolate and cherries creates the signature Black Forest flavor profile. The richness of the chocolate is beautifully balanced by the bright, slightly tart cherry filling.
The contrasting textures make every bite special. You get a crisp chocolate cookie crust, smooth cheesecake filling, juicy cherries, and airy whipped cream.
This is also an excellent make-ahead dessert recipe. Preparing it several hours before serving allows the layers to firm up beautifully while giving the flavors time to blend.
Ingredients
Chocolate Cookie Crust
| Ingredient | Quantity | Notes |
| Chocolate Sandwich Cookies | 36 cookies (400 g) | Crushed with filling |
| Unsalted Butter | 1/2 cup (115 g) | Melted |
Chocolate Cheesecake Layer
| Ingredient | Quantity | Notes |
| Cream Cheese | 16 oz (450 g) | Softened |
| Powdered Sugar | 1 cup (120 g) | Sifted |
| Unsweetened Cocoa Powder | 1/3 cup (35 g) | High-quality cocoa preferred |
| Heavy Whipping Cream | 1 cup (240 ml) | Cold and whipped |
Cherry Filling
| Ingredient | Quantity | Notes |
| Cherry Pie Filling | 2 cans, 21 oz each | About 1.2 kg total |
| Almond Extract | 1/2 teaspoon | Enhances the cherry flavor |
Whipped Cream Topping
| Ingredient | Quantity | Notes |
| Heavy Whipping Cream | 2 cups (480 ml) | Very cold |
| Powdered Sugar | 1/2 cup (60 g) | Sifted |
| Vanilla Extract | 1 teaspoon | Pure vanilla preferred |
| Chocolate Shavings | 1/2 cup (80 g) | Dark or semi-sweet |
| Maraschino Cherries | 15 | With stems if possible |
Step-by-Step Instructions
Prepare the Chocolate Crust
Lightly grease a 9 × 13-inch glass or ceramic baking dish with nonstick cooking spray.
Place the chocolate sandwich cookies in a food processor and pulse until finely crushed.
Transfer the crumbs to a bowl and combine them thoroughly with the melted butter until the mixture resembles moist sand.
Press the mixture firmly and evenly into the bottom of the prepared dish using the bottom of a measuring cup or flat glass.
Place the crust in the freezer for about 15 minutes to firm up while preparing the chocolate cheesecake layer.
Make the Chocolate Cheesecake Layer
Place the softened cream cheese in a large mixing bowl.
Add the powdered sugar and unsweetened cocoa powder.
Beat with an electric mixer until the mixture is completely smooth, creamy, and free of lumps.
Gently fold in 1 cup of previously whipped heavy cream using a rubber spatula.
Mix carefully to maintain the light and fluffy texture.
Spread the chocolate cheesecake mixture evenly over the chilled cookie crust.
Use an offset spatula to create a smooth, level surface.
Add the Cherry Layer
Stir the almond extract into the cherry pie filling.
Carefully spoon the cherry mixture over the chocolate cheesecake layer.
Spread it gently so the cherries cover the entire surface without disturbing the layer underneath.
Prepare the Whipped Cream
Pour the remaining 2 cups of cold heavy cream into a chilled mixing bowl.
Add the powdered sugar and vanilla extract.
Whip on medium-high speed until stiff peaks form.
Be careful not to over-whip the cream, as it can become grainy and eventually turn into butter.
Spread the whipped cream evenly over the cherry layer.
Decorate and Chill
Top the dessert with generous chocolate shavings.
Add the maraschino cherries evenly across the surface.
Cover the dish tightly with plastic wrap.
Refrigerate for at least 6 hours, although chilling overnight will give you the cleanest slices and best texture.
Best Tips
Always allow the cream cheese to reach room temperature before mixing. Softened cream cheese creates a much smoother cheesecake layer.
Use a good offset spatula to smooth each layer. This simple tool makes it much easier to create the beautiful, distinct layers that make this dessert so appealing.
For clean slices, dip a sharp knife in warm water, wipe it dry, and cut the dessert. Clean and warm the knife between slices.
Do not rush the chilling process. The longer the dessert has to set, the easier it will be to slice neatly.
Best Ingredient Alternatives
For a quicker version, use high-quality store-bought whipped topping instead of homemade whipped cream.
You can replace the chocolate sandwich cookies with chocolate graham crackers or chocolate digestive biscuits for a slightly different crust.
For a deeper chocolate flavor, use dark chocolate shavings instead of semi-sweet chocolate.
Fresh or frozen cherries can also be used to make a homemade cherry topping instead of canned cherry pie filling.
Recipe Variations
For a strawberry version, replace the cherry pie filling with fresh strawberries and homemade or prepared strawberry sauce.
For an authentic Black Forest-inspired variation, you can add a small amount of cherry liqueur to the cherry filling if appropriate for your guests.
For a simpler dessert, replace the chocolate cheesecake layer with prepared instant chocolate pudding.
You can also make individual portions by assembling the layers in small dessert cups or glasses. This creates an elegant presentation for parties and special occasions.
What to Serve With
A cup of freshly brewed black coffee is an excellent pairing for this rich chocolate dessert. The slight bitterness of coffee balances the sweetness beautifully.
A cup of Earl Grey or black tea also works wonderfully with the chocolate and cherry flavors.
For a special dinner, serve this dessert after a comforting meal such as roast beef, homemade lasagna, or a hearty casserole.
Make-Ahead Instructions
This dessert is perfect for making ahead.
You can assemble the entire dessert up to 24 hours before serving.
Keep it tightly covered in the refrigerator until you are ready to serve.
Making it the day before also gives the layers enough time to stabilize, resulting in cleaner slices and a more developed flavor.
Storage
Store leftover dessert in the original baking dish, tightly covered with plastic wrap or an airtight lid.
Keep it refrigerated and consume within approximately 4 days for the best quality.
Always return leftovers to the refrigerator promptly after serving.
Reheating
This dessert should not be reheated.
Because it contains whipped cream, cream cheese, and a chilled layered filling, heating it would cause the creamy layers to melt and lose their structure.
Serve it cold directly from the refrigerator.
Freezing
The entire dessert can be frozen if properly protected.
Wrap the dish tightly with two layers of plastic wrap, followed by one layer of aluminum foil.
Freeze for up to 1 month for best quality.
When ready to serve, transfer the dessert to the refrigerator and allow it to thaw slowly for approximately 24 hours.
Common Mistakes to Avoid
Do not serve the dessert before the full chilling period. If it has not chilled for at least 6 hours, the layers may be too soft to hold their shape.
Avoid over-whipping the heavy cream. Stop as soon as stiff peaks form to maintain a smooth and fluffy texture.
Do not skip the initial crust-freezing step. A firm crust helps keep the cookie layer separate from the creamy cheesecake filling.
Avoid spreading the cherry filling too aggressively, as this can disturb the chocolate cheesecake layer underneath.
Nutrition Estimate
| Nutrient | Amount per Serving |
| Calories | 425 kcal |
| Total Fat | 28 g |
| Saturated Fat | 16 g |
| Carbohydrates | 42 g |
| Sugars | 31 g |
| Protein | 5 g |
| Sodium | 240 mg |
Nutrition information is an estimate and can vary depending on the specific brands and ingredients used.
Frequently Asked Questions
Can I use fresh cherries instead of canned cherry pie filling?
Yes. Simmer pitted fresh cherries with sugar, a little lemon juice, and cornstarch until the mixture becomes thick and glossy.
Allow the cherry topping to cool completely before adding it to the dessert.
Why is my crust crumbling?
A crumbly crust usually means the cookie crumbs were not pressed firmly enough into the pan.
Make sure the melted butter is thoroughly mixed into the crumbs and press the mixture firmly into an even layer.
Can I make this dessert the day before?
Absolutely. Preparing it the day before is actually recommended.
The extended chilling time allows the layers to become firmer and makes the dessert much easier to slice.
How can I get perfectly clean layers?
Use an offset spatula to smooth each layer.
For slicing, use a sharp knife warmed under hot water and thoroughly dried. Wipe the knife clean between every cut.
Can I make a lighter version?
You can use reduced-fat cream cheese and a lower-sugar cherry filling.
Keep in mind that changing the ingredients may slightly affect the richness, texture, and stability of the finished dessert.
Conclusion
This Decadent Layered Black Forest Dessert proves that you do not need complicated baking techniques to create an impressive homemade dessert.
The combination of crunchy chocolate cookies, creamy chocolate cheesecake, juicy cherries, fluffy whipped cream, and chocolate shavings creates a spectacular dessert that looks as good as it tastes.
Whether you are searching for an easy no-bake dessert, a make-ahead party dessert, or a decadent chocolate cherry recipe for a special occasion, this layered Black Forest treat is sure to become a favorite.