Introduction
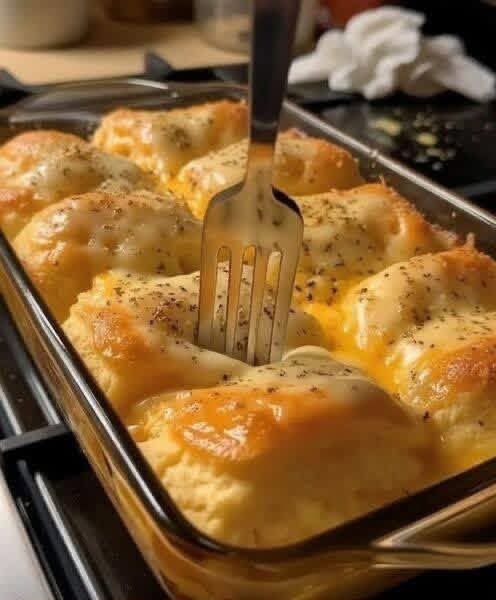
Welcome to the ultimate guide for making the most irresistible homemade comfort food you will ever pull out of your oven. As you can clearly see in the mouth-watering file named image_2.png, these incredibly fluffy, cheese-smothered rolls are baked to absolute golden perfection.
Whether you are hunting for easy dinner recipes, quick appetizer ideas, or a decadent side dish for your holiday table, this baked masterpiece delivers. The combination of soft, pillowy dough, melted cheddar, and rich garlic butter makes this a high-reward culinary experience for any home cook.
Recipe Overview
| Feature | Details |
| Prep Time | 20 minutes |
| Cook Time | 25 minutes |
| Proofing Time | 1 hour |
| Total Time | 1 hour 45 minutes |
| Yield | 12 rolls |
| Category | Appetizers / Side Dishes |
Why You’ll Love This Recipe
You are going to absolutely love how this recipe transforms simple pantry staples into a gourmet baking experience right at home. The visual appeal of the melted cheese stretching as you pull a warm roll from the baking dish makes it an instant crowd-pleaser for family-friendly meals.
Beyond the incredible taste, this dish is surprisingly straightforward and perfect for both novice bakers and seasoned chefs looking for reliable meal prep additions. The buttery, garlic-infused crust combined with a tender crumb ensures that these rolls will become a highly requested favorite for all your weekend gatherings and cozy weeknight dinners.
Ingredients
The Dough
| Ingredient | Measurement (US) | Measurement (Metric) |
| All-Purpose Flour | 3 cups | 360 g |
| Active Dry Yeast | 2 ¼ teaspoons | 7 g (1 packet) |
| Granulated Sugar | 1 tablespoon | 12 g |
| Fine Sea Salt | 1 teaspoon | 5 g |
| Whole Milk (warm) | 1 cup | 240 ml |
| Unsalted Butter (melted) | 3 tablespoons | 42 g |
The Cheesy Garlic Topping
| Ingredient | Measurement (US) | Measurement (Metric) |
| Unsalted Butter (melted) | ¼ cup | 56 g |
| Garlic Powder | 1 teaspoon | 3 g |
| Italian Seasoning | 1 teaspoon | 2 g |
| Sharp Cheddar Cheese | 1 ½ cups | 150 g |
| Mozzarella Cheese | ½ cup | 50 g |
Step-by-Step Instructions
- Activate the Yeast: In a large mixing bowl, combine the warm milk (heated to precisely 110°F) with the granulated sugar and active dry yeast. Allow the mixture to sit undisturbed for 5 to 8 minutes until it becomes frothy and bubbly.
- Form the Dough: Pour the melted butter and salt into the yeast mixture, then gradually mix in the all-purpose flour one cup at a time. Stir with a wooden spoon until a shaggy, cohesive dough begins to form in the center of the bowl.
- Knead the Dough: Transfer the dough to a lightly floured surface and knead it by hand for 5 to 7 minutes. The dough should eventually feel smooth, springy, and only slightly tacky to the touch.
- First Proof: Place the kneaded dough into a greased bowl, cover it tightly with plastic wrap or a warm, damp towel. Let it rise in a warm, draft-free area for 45 to 60 minutes, or until it has completely doubled in size.
- Shape the Rolls: Gently punch the risen dough down to release the trapped air and divide it evenly into 12 equal pieces. Roll each piece into a smooth, tight ball and arrange them evenly in a lightly greased 9×13 inch glass baking dish.
- Second Proof: Cover the baking dish loosely and let the rolls rest for another 20 to 30 minutes. They will puff up beautifully and expand to touch one another, filling the empty spaces in the pan.
- Prepare the Topping: While the rolls are completing their second rise, preheat your oven to 375°F (190°C). In a small bowl, whisk together the melted butter, garlic powder, and Italian seasoning until well combined.
- Add the Cheese and Bake: Generously brush the garlic butter mixture over the tops of the puffed rolls, then cover them evenly with the shredded cheddar and mozzarella cheeses. Bake uncovered for 20 to 25 minutes until the rolls are baked through and the cheese is beautifully melted and golden brown.
- Cool and Serve: Remove the dish from the oven and let the rolls cool in the pan for 5 minutes before serving. Enjoy them warm while the cheese is still beautifully gooey and stretchable.
Best Tips
Achieving the perfect texture relies heavily on the temperature of your milk during the yeast activation phase. If the milk is too hot, it will instantly kill the yeast, but if it is too cold, the dough will take hours to rise, so utilizing a digital food thermometer is highly recommended for accuracy.
To get that incredibly soft, bakery-style finish, avoid over-baking the rolls once the cheese starts bubbling. Keep a close eye on your oven during the final five minutes, as oven temperatures can vary, and you want to pull the dish out the moment the cheese develops a light golden crust.
Best Ingredient Options
For the ultimate flavor profile, taking the time to grate your own cheese from a fresh block is an absolute game-changer. Pre-shredded cheeses in bags are heavily coated in anti-caking agents that prevent them from melting smoothly, which can ruin that beautiful, gooey pull-apart effect you want to achieve.
Using high-quality European butter will also elevate this easy dinner recipe to a much more gourmet level. The higher fat content in premium butter provides a richer, creamier flavor that pairs perfectly with the sharp tang of the cheddar and the aromatic garlic seasoning.
Recipe Variations
You can easily customize these savory pull-apart rolls by adding spicy jalapeño slices or crispy crumbled bacon to the top before baking. This simple modification turns a classic side dish into a highly requested, protein-packed appetizer for game day parties or casual weekend get-togethers.
For a fun twist on pizza night, you can stuff each dough ball with a small cube of mozzarella and a single slice of pepperoni before the second proof. Serve the freshly baked rolls alongside a bowl of warm marinara sauce for dipping, creating an incredibly satisfying and family-friendly meal.
What to Serve With
These rich, cheesy rolls are the perfect companion to hearty comfort foods like a steaming bowl of roasted tomato basil soup or a robust, slow-cooked beef stew. The soft bread acts as the ideal vessel for soaking up every last drop of flavorful broth or sauce left in your bowl.
If you are planning a more elegant dinner party, these rolls pair wonderfully with classic Italian pasta dishes, grilled steaks, or a large, fresh Caesar salad. They add a comforting, homemade touch to upscale menus while keeping your guests completely satisfied and asking for seconds.
Make-Ahead Instructions
If you want to prepare this recipe in advance to save time, you can assemble the rolls in the baking dish right up until the second proof. Simply cover the dish tightly with plastic wrap and place it in the refrigerator overnight to allow for a slow, cold fermentation process that naturally deepens the dough’s flavor.
The next day, remove the dish from the refrigerator and let it sit at room temperature for about an hour so the rolls can puff up. Once they have successfully expanded and lost their chill, you can brush them with the garlic butter, top with cheese, and bake as directed.
Storage
Any leftover rolls should be allowed to cool completely to room temperature before being transferred to an airtight container. They will stay fresh and soft for up to three days when stored on the kitchen counter in a cool, dry place away from direct sunlight.
It is best to avoid storing these cheesy baked goods in the refrigerator. The consistently cold and dry environment inside a fridge causes the bread starches to crystallize rapidly, which will leave your delicious rolls tasting dry, crumbly, and stale much faster than they would on the counter.
Reheating
To bring back that glorious, freshly baked texture, place your leftover rolls on a microwave-safe plate and heat them for just 15 to 20 seconds. This quick burst of heat softens the bread and turns the hardened cheese back into a deliciously gooey, melted topping without turning the dough rubbery.
If you prefer a slightly crispier edge, you can reheat them in an air fryer or a conventional oven set to 325°F (165°C). Simply wrap the rolls loosely in aluminum foil to prevent the cheese from burning, and warm them for about 5 to 7 minutes until they are heated all the way through.
Freezing
These rolls freeze incredibly well, making them fantastic for long-term meal prep planning. Once they are fully baked and completely cooled, wrap the individual rolls tightly in plastic wrap, then place them together inside a heavy-duty, zip-top freezer bag for up to three months.
When you are ready to enjoy them, you do not even need to thaw them first. You can place the frozen rolls directly onto a baking sheet, cover them with foil, and bake at 350°F for 15 minutes, ensuring you always have a quick appetizer or side dish ready at a moment’s notice.
Common Mistakes to Avoid
One of the biggest pitfalls when making homemade bread products is adding far too much flour during the initial kneading phase. While it is tempting to heavily flour your hands and work surface to prevent sticking, this guarantees a tough, dense roll rather than the light, fluffy texture you are trying to achieve.
Another frequent mistake is neglecting to properly grease your glass baking dish before placing the shaped dough inside. Melted cheese naturally seeps down the sides of the rolls as they bake, and if the pan is not well-lubricated, you will have a very difficult time removing them without tearing the delicate bread apart.
Nutrition Estimate
| Nutrient | Amount per Serving (1 Roll) |
| Calories | 210 kcal |
| Total Fat | 11 g |
| Saturated Fat | 7 g |
| Cholesterol | 30 mg |
| Sodium | 280 mg |
| Total Carbohydrates | 23 g |
| Dietary Fiber | 1 g |
| Sugars | 2 g |
| Protein | 6 g |
Frequently Asked Questions
Can I use pre-made pizza dough or crescent rolls to save time? Yes, if you are looking for incredibly quick appetizer ideas, store-bought pizza dough or canned biscuit dough works perfectly. Simply cut the dough into small pieces, roll them into balls, and proceed with the garlic butter and cheese topping before baking.
What type of baking dish is best for this recipe? A 9×13 inch glass or ceramic baking dish is ideal because it distributes heat evenly and allows you to monitor the browning of the bottom crust. If you use a dark metal pan, you may need to reduce the oven temperature by 25 degrees to prevent the bottoms from burning.
Why didn’t my dough rise properly? The most common reasons for dough failing to rise are expired yeast or milk that was heated past 120°F, which kills the active cultures. Always check the expiration date on your yeast packets and make sure your kitchen environment is sufficiently warm for the proofing process.
Final Thoughts
Creating these phenomenal cheesy garlic pull-apart rolls from scratch is a highly rewarding culinary adventure that is guaranteed to impress your family and friends. Once you master this simple, comforting recipe, it will undoubtedly become a permanent staple in your rotation of easy dinner recipes and holiday side dishes.