Introduction
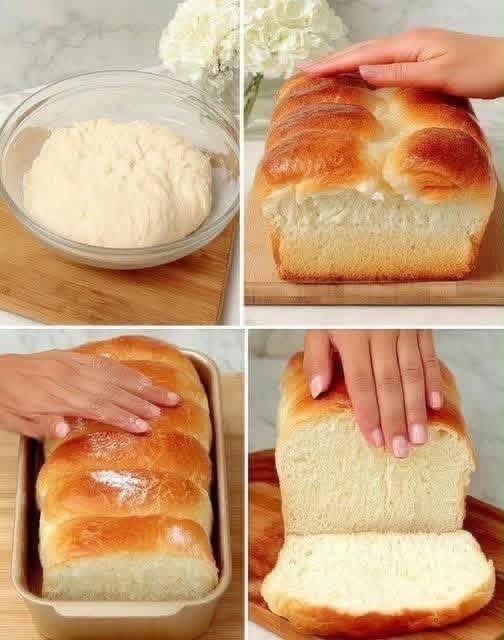
Welcome to the ultimate guide for baking the softest, most pillowy loaf you will ever create in your own kitchen. If you look at the stunning results in image.png, you can clearly see the incredible, cloud-like texture and golden-brown crust we are going to achieve today.
This artisanal bread making method yields a fluffy sandwich bread that effortlessly elevates any home-cooked meal prep routine. The secret lies in a simple heated starter technique, known as tangzhong, that transforms everyday baking into a truly gourmet culinary experience right at home.
Recipe Overview
| Feature | Details |
| Prep Time | 30 minutes |
| Cook Time | 35 minutes |
| Proofing Time | 2 hours |
| Total Time | 3 hours 5 minutes |
| Yield | 1 large loaf (8 slices) |
| Category | Baking / Homemade Bread |
Why You’ll Love This Recipe
You will completely fall in love with how incredibly soft and tender this bread turns out, remaining fresh and springy for days without any harsh artificial preservatives. It is the perfect foundational recipe for anyone looking to master gourmet baking from scratch with minimal stress and maximum reward.
The rich, slightly sweet, and buttery flavor profile makes it a highly versatile choice for both decadent treats and savory creations. Whether you are crafting healthy meal prep sandwiches for the busy work week or simply enjoying a warm, fresh slice smeared with premium organic butter, the melt-in-your-mouth texture is absolutely unmatched.
Ingredients
Tangzhong (Starter)
| Ingredient | Measurement (US) | Measurement (Metric) |
| Water | 3 tablespoons | 43 ml |
| Whole Milk | 3 tablespoons | 43 ml |
| Bread Flour | 2 tablespoons | 14 g |
Main Dough
| Ingredient | Measurement (US) | Measurement (Metric) |
| Bread Flour | 2 ½ cups | 325 g |
| Granulated Sugar | ¼ cup | 50 g |
| Active Dry Yeast | 2 ¼ teaspoons | 7 g (1 packet) |
| Fine Sea Salt | 1 teaspoon | 5 g |
| Whole Milk (warm) | ½ cup | 120 ml |
| Large Egg (room temp) | 1 | 1 |
| Unsalted Butter (soft) | 3 tablespoons | 42 g |
Step-by-Step Instructions
- Make the Tangzhong: In a small saucepan, whisk together the water, whole milk, and bread flour until no lumps remain. Cook over medium-low heat, whisking constantly, until the mixture thickens into a paste that leaves lines at the bottom of the pan (about 3-5 minutes). Remove from heat and let cool to room temperature.
- Activate the Yeast: In the bowl of a stand mixer, combine the warm milk (around 105°F) and active dry yeast. Let it sit for 5 to 10 minutes until perfectly foamy and fragrant.
- Mix the Dough: Add the cooled tangzhong, room-temperature egg, bread flour, sugar, and salt to the yeast mixture. Using a dough hook attachment, knead on low speed until a shaggy dough begins to form.
- Incorporate the Butter: Add the softened butter one tablespoon at a time, allowing each piece to fully blend before adding the next. Continue kneading on medium speed for about 10 to 15 minutes until the dough is incredibly smooth, elastic, and pulls away cleanly from the sides of the bowl.
- First Proof: Form the dough into a smooth ball and place it in a lightly oiled bowl. Cover with a warm, damp towel and let it rise in a draft-free spot for 60 to 90 minutes, or until it has completely doubled in size.
- Shape the Loaf: Punch down the dough to release the air and divide it evenly into three equal portions. Roll each piece out into an oval, fold the long edges toward the center to create a rectangle, and roll it up tightly into a cylinder. Place the three cylinders side-by-side into a greased 9×5 inch loaf pan.
- Second Proof: Cover the pan loosely and let the shaped dough rise for another 45 to 60 minutes. The dough should puff up nicely and reach the rim of your baking pan.
- Bake: Preheat your oven to 350°F (175°C). Gently brush the top of the risen loaf with milk or a light egg wash for a beautiful shine. Bake for 30 to 35 minutes until the crust is deep golden brown and the internal temperature registers 190°F.
- Cool Completely: Remove the bread from the oven and carefully turn it out onto a wire cooling rack. Allow the loaf to cool completely before attempting to slice it, ensuring the delicate crumb structure sets properly.
Best Tips
Always ensure your milk and eggs are brought completely to room temperature before you begin mixing your dough ingredients. This simple yet crucial step ensures the yeast activates properly and yields a much faster, more vigorous rise for your homemade bread.
Use a digital kitchen scale to measure your flour and liquids rather than relying on standard volumetric measuring cups. Precision is highly recommended in artisanal bread making, and utilizing exact gram measurements is the best way to prevent dense, dry, or inconsistent loaves.
Best Ingredient Options
For the absolute best results, invest in a premium, high-quality bread flour rather than settling for standard all-purpose flour. The significantly higher gluten content in bread flour is exactly what provides this fluffy sandwich bread with its signature springy, pull-apart texture.
Opt for high-fat European-style butter and organic whole milk to build a richer, more luxurious flavor profile in your dough. The extra milk fat tenderizes the gluten strands, keeping the bread exceptionally soft and moist for days after baking.
Recipe Variations
You can easily transform this basic dough into a stunning sweet treat by generously swirling cinnamon sugar or premium dark chocolate chips into the dough before the final proof. It creates an incredible, bakery-style breakfast loaf that pairs beautifully with your favorite morning coffee or espresso.
For a savory twist on this classic, try kneading roasted garlic paste, finely chopped fresh herbs, or shredded gourmet gruyere cheese into the dough during the last few minutes of mixing. This elevated savory version is fantastic for serving alongside easy dinner recipes like hearty autumn soups or rich pasta dishes.
What to Serve With
This incredibly versatile bread serves as the ultimate blank canvas for your favorite gourmet sandwich fillings, from classic slow-roasted turkey to trendy, heavily seasoned avocado toast. It turns everyday healthy meal prep lunches into a luxurious culinary experience you will actually look forward to eating.
Thick, hearty slices of this specific loaf make the absolute best French toast or gourmet grilled cheese sandwiches you will ever have the pleasure of tasting. The sturdy yet tender crumb absorbs rich egg custards beautifully and crisps up flawlessly in a hot cast-iron skillet sizzling with melted butter.
Make-Ahead Instructions
You can conveniently prepare the dough the night before and let it experience its first rise very slowly in the refrigerator. This cold fermentation technique not only saves you significant time the next day but also naturally develops a much deeper, more complex, artisanal flavor profile in the yeast.
Storage
Keep your completely cooled loaf sealed in an airtight bread bag or tightly wrapped in high-quality plastic wrap at room temperature for up to four days. Do not store this fresh bread in the refrigerator, as the consistently cold environment will cause the starches to crystallize prematurely and make the bread go stale rapidly.
Reheating
To restore that comforting, freshly baked warmth and texture, simply place a single slice in your toaster on a low setting for a very quick crisp. If you wish to warm up whole sections of the loaf simultaneously, wrap them gently in aluminum foil and warm them in a 300°F oven for approximately ten minutes.
Freezing
Slice the entire loaf uniformly once it has completely cooled to room temperature, then place small squares of parchment paper between each slice to prevent them from freezing together. Store these pre-sliced portions in a heavy-duty, zip-top freezer bag for up to three months, allowing you to easily pull out individual slices exactly when you need them.
Common Mistakes to Avoid
One of the most frequent and detrimental errors in homemade baking is rushing the delicate proofing process, which inevitably leads to a surprisingly dense and heavy final product. You absolutely must let the dough rise until it has truly doubled in visual size, paying attention to the dough rather than the clock, as ambient kitchen temperatures vary wildly.
Resist the urge to add heavy handfuls of extra flour to your work surface, even if the dough feels slightly tacky or sticky during the initial kneading phase. Continuing to knead the dough will naturally develop the gluten structure, making the mass smooth and elastic without compromising its signature pillowy softness and high moisture content.
Nutrition Estimate
| Nutrient | Amount per Serving (1 Slice) |
| Calories | 195 kcal |
| Total Fat | 5 g |
| Saturated Fat | 3 g |
| Cholesterol | 25 mg |
| Sodium | 290 mg |
| Total Carbohydrates | 32 g |
| Dietary Fiber | 1 g |
| Sugars | 7 g |
| Protein | 6 g |
Frequently Asked Questions
Can I use instant yeast instead of active dry yeast? Yes, you can absolutely substitute instant yeast in a one-to-one ratio. You can skip the blooming step and mix the instant yeast directly into your dry ingredients if you prefer.
Do I actually need to use a stand mixer for this recipe? While a stand mixer is highly recommended because this dough begins very wet and sticky, you can certainly knead it entirely by hand. Just be prepared to put in about 20 minutes of vigorous manual kneading to build the required gluten structure.
Why did my bread turn out dense instead of fluffy? Dense bread is almost always the result of adding too much flour during the kneading process, or cutting the proofing times too short. Always measure your flour with a digital scale and let the dough rise in a warm, humid environment until visibly doubled.
Final Thoughts
Mastering this incredible fluffy sandwich bread will completely change the way you view everyday homemade baking. Once you experience the unparalleled softness, impressive spring, and rich buttery flavor firsthand, you will never want to return to standard, store-bought loaves ever again.