Introduction
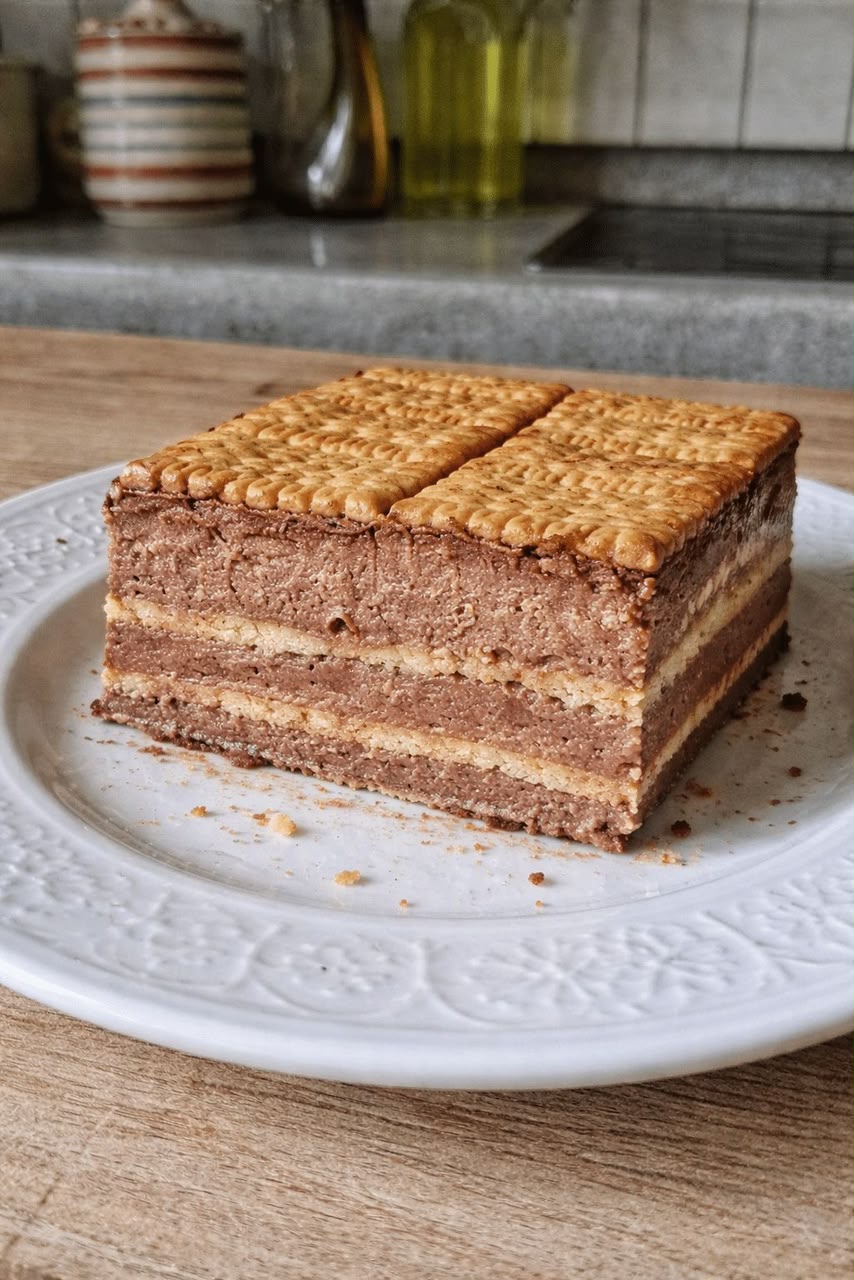
Easy No-Bake Chocolate Biscuit Cake is the perfect dessert when you want something rich, creamy, and impressive without turning on the oven.
This classic refrigerator cake combines crisp tea biscuits with a silky chocolate cream made from mascarpone, cocoa, powdered sugar, and whipped cream. After several hours in the refrigerator, the biscuits soften into tender, cake-like layers while the chocolate filling becomes beautifully creamy and firm.
It is an easy, budget-friendly dessert that works wonderfully for family dinners, weekend treats, birthdays, holidays, and entertaining.
Recipe Overview
| Feature | Details |
| Prep Time | 20 minutes |
| Chill Time | 4–6 hours |
| Total Time | About 4 hours 20 minutes |
| Servings | 8 servings |
| Course | Dessert |
| Cuisine | European-Inspired / International |
| Diet | Vegetarian |
| Difficulty | Easy |
| Method | No-Bake |
Why You’ll Love This Recipe
This dessert requires no oven, no complicated sponge cake, and no advanced baking skills. The refrigerator does most of the work.
The biscuits gradually absorb moisture from the creamy filling, creating soft layers with a cake-like texture.
The chocolate cream is rich and velvety, with a balanced combination of cocoa, vanilla, mascarpone, and whipped cream.
It can be assembled a day or two ahead, making it especially convenient for parties, family gatherings, and holiday meals.
The ingredients are simple and widely available, making this an affordable dessert that can feed a crowd.
Ingredients
Biscuit Layers
| Ingredient | Measurement |
| Plain square tea biscuits, Petit Beurre or Maria biscuits | 40–50 biscuits |
| Whole milk | 1 cup |
| Vanilla extract | 1 teaspoon, optional |
Chocolate Cream
| Ingredient | Measurement |
| Cold heavy whipping cream | 2 cups |
| Mascarpone cheese | 8 oz (225 g) |
| Powdered sugar | 3/4 cup |
| Unsweetened cocoa powder | 1/3 cup |
| Pure vanilla extract | 1 teaspoon |
Optional Decoration
| Ingredient | Measurement |
| Unsweetened cocoa powder | For dusting |
| Chocolate shavings | For garnish |
| Fresh raspberries or strawberries | Optional |
| Chopped toasted hazelnuts | Optional |
Step-by-Step Instructions
Prepare the Baking Dish
Line an 8 × 8-inch square baking dish with parchment paper or plastic wrap.
Leave some overhang along the sides. This will make it easier to lift the chilled cake from the dish later.
Make the Chocolate Cream
Place the softened mascarpone in a large mixing bowl.
Beat the mascarpone on medium speed until smooth and creamy.
Sift together the powdered sugar and cocoa powder.
Add the sifted cocoa mixture and vanilla extract to the mascarpone.
Beat on low speed until everything is incorporated and the mixture is smooth.
Gradually add the cold heavy whipping cream.
Increase the mixer speed and whip until the chocolate cream becomes thick and forms stiff peaks.
Do not over-whip the mixture. Stop as soon as the cream is thick enough to hold its shape.
Prepare the Biscuit Dip
Pour the milk into a shallow bowl.
Add the vanilla extract if desired and stir.
Quickly dip each biscuit into the milk for approximately 1 second per side.
The biscuits should be lightly moistened but still firm enough to handle.
Build the First Layer
Arrange the dipped biscuits tightly across the bottom of the prepared baking dish.
Break a few biscuits into smaller pieces if necessary to fill gaps.
The goal is to create a relatively even biscuit layer.
Add the Chocolate Cream
Spread approximately one-quarter of the chocolate cream evenly over the biscuit layer.
Use an offset spatula or the back of a spoon to smooth the cream toward the edges.
Continue Layering
Repeat the process by adding another layer of milk-dipped biscuits followed by chocolate cream.
Continue alternating the biscuits and chocolate cream until the dish is filled.
Depending on the size of your biscuits and baking dish, you should have approximately 3–4 biscuit layers.
Finish with a layer of chocolate cream for a beautifully creamy top.
Chill the Cake
Cover the baking dish tightly with plastic wrap.
Refrigerate for a minimum of 4–6 hours.
For the best texture, refrigerate the cake overnight.
During this time, the biscuits absorb moisture from the chocolate cream and become soft and cake-like.
Decorate and Serve
Once completely chilled, remove the plastic wrap.
If desired, dust the top with unsweetened cocoa powder.
You can also decorate it with chocolate shavings, chopped toasted hazelnuts, or fresh berries.
Use the parchment or plastic wrap overhang to carefully lift the cake from the baking dish.
Slice with a sharp knife and serve chilled.
For exceptionally clean slices, wipe the knife with a warm, damp cloth between cuts.
Best Tips
Use very cold heavy whipping cream for the chocolate filling. Cold cream whips more easily and produces a more stable texture.
Allow the mascarpone to soften slightly at room temperature before mixing. This helps prevent lumps.
Do not soak the biscuits for too long. A very quick dip is enough because they will continue absorbing moisture while the cake chills.
Sift the cocoa powder and powdered sugar before adding them to the cream. This creates a smoother filling without dry lumps.
For the best results, let the cake chill overnight. The longer resting time allows the biscuit layers to become perfectly tender.
Use a sharp knife for slicing and clean it between cuts for neat, bakery-style portions.
Best Ingredient Options
Petit Beurre and Maria biscuits are excellent choices because they are sturdy, lightly sweet, and soften beautifully in the refrigerator.
You can use graham crackers when tea biscuits are unavailable. They will give the dessert a sweeter honey-like flavor.
For an especially intense chocolate flavor, use high-quality unsweetened cocoa powder.
Mascarpone creates an exceptionally creamy filling, but full-fat cream cheese can be substituted for a slightly tangier flavor.
Dark chocolate shavings can be added to the finished cake for an elegant chocolate finish.
Recipe Variations
Mocha Chocolate Biscuit Cake
Replace the milk used for dipping with cooled strong coffee or espresso for a delicious mocha flavor.
Chocolate Hazelnut Version
Add 2–3 tablespoons chocolate-hazelnut spread to the chocolate cream and sprinkle toasted chopped hazelnuts between the layers.
Chocolate Orange Cake
Add 1 teaspoon finely grated orange zest to the chocolate cream and replace part of the milk with a small amount of orange juice.
Coconut Chocolate Biscuit Cake
Add 1/2 cup unsweetened shredded coconut between the biscuit layers and decorate the top with toasted coconut.
Berry Chocolate Cake
Add thinly sliced strawberries or fresh raspberries between selected biscuit and cream layers.
What to Serve With
Serve chilled slices with freshly brewed coffee or espresso for a classic combination.
Moroccan mint tea is also an excellent pairing, especially when serving the cake after a family meal.
Fresh berries provide a bright, slightly tart contrast to the rich chocolate cream.
For an extra-indulgent presentation, add a small spoonful of lightly sweetened whipped cream alongside each slice.
Make-Ahead Instructions
This dessert is ideal for making ahead.
The assembled cake can be refrigerated for up to 48 hours before serving.
In fact, preparing it the day before often produces an even better texture because the biscuits have more time to soften.
Keep the cake tightly covered while refrigerated to prevent the chocolate cream from absorbing odors from other foods.
Storage
Store the finished cake covered in the refrigerator for up to 4 days.
Keep it chilled until shortly before serving because the whipped cream filling softens as it warms.
Place leftover slices in an airtight container or cover the baking dish tightly with plastic wrap.
Reheating
This is a chilled no-bake dessert, so reheating is not recommended.
Heat will melt the whipped cream and mascarpone filling and can cause the layered structure to collapse.
Simply remove the desired portion from the refrigerator and serve chilled.
Freezing
The assembled cake can be frozen for approximately 1–2 months.
First allow the cake to set completely in the refrigerator.
Wrap it tightly in plastic wrap followed by a layer of heavy-duty aluminum foil.
For the best texture, thaw it overnight in the refrigerator before serving.
You can also serve it partially frozen for a firmer, ice-cream-cake-like consistency.
Common Mistakes to Avoid
Do not oversoak the biscuits. If they become saturated before assembly, they can break apart and create a mushy texture.
Do not skip the chilling period. The refrigerator is essential because the biscuits need time to absorb moisture and the cream needs time to firm.
Avoid over-whipping the cream. Once stiff peaks form, stop mixing to prevent the cream from becoming grainy.
Do not use warm heavy cream. Cold cream produces a much more stable whipped filling.
Avoid slicing the cake immediately after assembling it. The layers need several hours to set properly.
Nutrition Estimate
| Nutritional Component | Approximate Amount per Serving |
| Calories | 410 kcal |
| Total Fat | 28 g |
| Saturated Fat | 16 g |
| Cholesterol | 85 mg |
| Sodium | 120 mg |
| Total Carbohydrates | 35 g |
| Dietary Fiber | 2 g |
| Sugars | 18 g |
| Protein | 6 g |
Nutrition information is an estimate and can vary depending on the specific biscuits, chocolate products, dairy ingredients, and serving size used.
Frequently Asked Questions
Can I use graham crackers instead of tea biscuits?
Yes. Graham crackers are an excellent substitute and provide a slightly sweeter, honey-like flavor.
Why did my chocolate cream turn out grainy?
The cream can become grainy if the heavy cream is over-whipped. Mascarpone that is extremely cold can also make the mixture difficult to smooth. Let the mascarpone soften slightly before mixing and stop whipping once stiff peaks form.
Can I use cream cheese instead of mascarpone?
Yes. Use full-fat cream cheese for the richest and most stable filling. The finished dessert will have a slightly tangier flavor.
How long should the biscuit cake chill?
Allow at least 4–6 hours, but overnight chilling is recommended for the softest, most cake-like biscuit texture.
Can I make this dessert the day before?
Absolutely. This is one of the best make-ahead desserts because the flavor and texture improve as the biscuits absorb moisture from the cream.
Can I add chocolate chips?
Yes. Miniature chocolate chips can be folded into the chocolate cream or sprinkled between the layers for additional chocolate texture.
Can I make individual portions?
Yes. Assemble the layers in individual glasses or small dessert cups instead of a square baking dish. This creates attractive individual no-bake chocolate desserts.
Final Thoughts
Easy No-Bake Chocolate Biscuit Cake is proof that an impressive dessert does not require an oven or complicated baking techniques.
Tender milk-soaked biscuits alternate with rich, velvety chocolate cream to create a chilled dessert that becomes beautifully soft and cake-like after several hours in the refrigerator.
It is affordable, easy to prepare, wonderfully versatile, and perfect for making ahead. Whether you serve it with coffee, Moroccan mint tea, or fresh berries, this chocolate biscuit cake is a simple dessert that can easily become a family favorite.