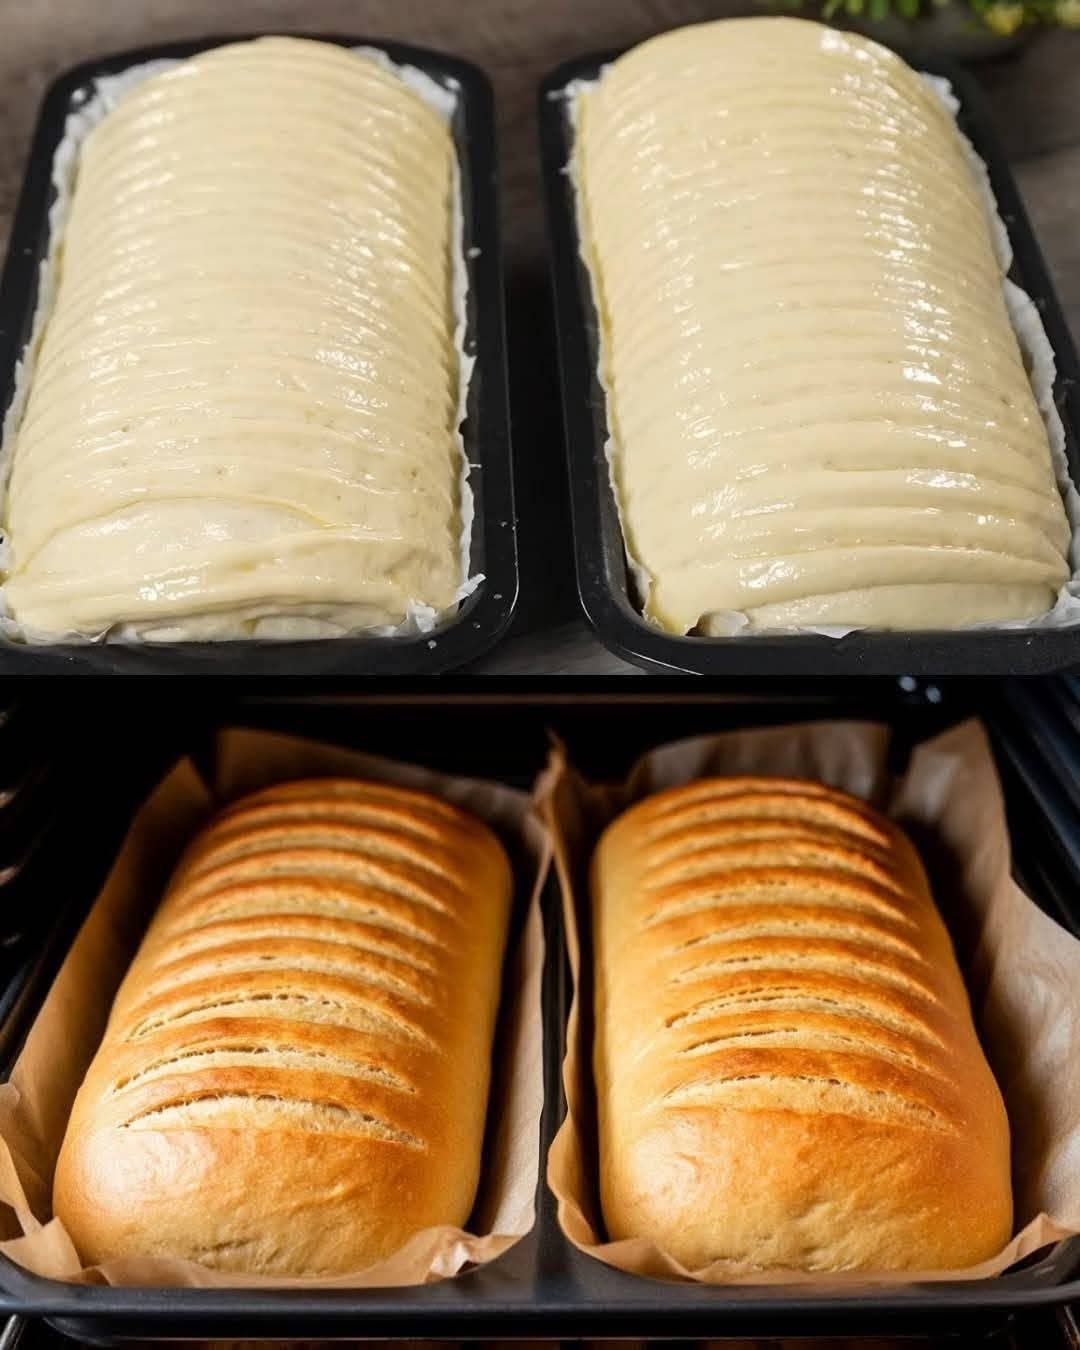
This Pull-Apart Garlic Butter Bread is soft, buttery, and wonderfully golden, with dozens of delicate slices that make every piece easy to pull apart.
The bread is prepared as a soft homemade loaf, sliced almost all the way through, then generously coated with a creamy garlic butter mixture. As it bakes, the butter melts between the layers, creating a tender, flavorful center and a beautifully golden crust.
It is perfect for family dinners, weekend baking, holiday meals, or serving alongside soups, pasta, roasted meats, and salads.
Recipe Overview
| Category | Details |
| Recipe Name | Pull-Apart Garlic Butter Bread |
| Cuisine | American-Inspired |
| Prep Time | 25 minutes |
| Rising Time | 1 hour 15 minutes |
| Bake Time | 25–30 minutes |
| Total Time | About 2 hours 10 minutes |
| Servings | 2 loaves |
| Difficulty | Easy to Moderate |
| Oven Temperature | 350°F (175°C) |
| Best For | Dinner, Side Dish, Holiday Baking |
Why You’ll Love This Recipe
This homemade garlic bread is soft on the inside, golden on the outside, and packed with buttery garlic flavor.
The thin slices create a beautiful pull-apart texture, so you can easily tear off individual pieces without needing to cut the entire loaf.
The dough is enriched with milk, butter, and egg, which gives the bread a soft and tender texture.
The garlic butter melts into the cuts as the bread bakes, making every layer flavorful.
It is also an impressive homemade bread recipe that looks much more complicated than it actually is.
Ingredients
For the Bread Dough
| Ingredient | Amount |
| All-purpose flour | 4 cups (500 g) |
| Warm milk | 1¼ cups (300 ml) |
| Granulated sugar | 2 tbsp |
| Instant yeast | 2¼ tsp (7 g) |
| Large egg | 1 |
| Unsalted butter, melted | 3 tbsp |
| Salt | 1 tsp |
For the Garlic Butter
| Ingredient | Amount |
| Unsalted butter, softened | ½ cup (115 g) |
| Garlic, finely minced | 4 cloves |
| Fresh parsley, chopped | 2 tbsp |
| Parmesan cheese, grated | ¼ cup (25 g) |
| Italian seasoning | ½ tsp |
| Salt | ¼ tsp |
| Black pepper | ¼ tsp |
For Brushing the Top
| Ingredient | Amount |
| Melted butter | 2 tbsp |
| Parmesan cheese | 2 tbsp |
| Fresh parsley | 1 tbsp |
Step-by-Step Instructions
Step 1: Activate the Yeast
Pour the warm milk into a large mixing bowl.
The milk should be warm but not hot, ideally around 100–110°F (38–43°C).
Add the sugar and instant yeast.
Stir gently and let the mixture sit for about 5 minutes.
It should become slightly foamy.
Step 2: Make the Dough
Add the egg and melted butter to the milk mixture.
Stir to combine.
Gradually add the flour and salt.
Mix until a soft dough forms.
The dough should feel slightly tacky but should not be excessively sticky.
Step 3: Knead the Dough
Transfer the dough to a lightly floured work surface.
Knead for approximately 8–10 minutes until smooth and elastic.
You can also use a stand mixer fitted with a dough hook and knead on low to medium speed for about 6–8 minutes.
The finished dough should become soft and spring back slightly when pressed.
Step 4: First Rise
Place the dough in a lightly greased bowl.
Cover with plastic wrap or a clean kitchen towel.
Place it in a warm, draft-free area.
Allow the dough to rise for approximately 60–75 minutes, or until it has doubled in size.
The exact rising time depends on the temperature of your kitchen.
Step 5: Prepare the Garlic Butter
While the dough is rising, prepare the garlic butter.
Add the softened butter, minced garlic, parsley, Parmesan, Italian seasoning, salt, and black pepper to a bowl.
Mix until smooth and evenly combined.
Set aside.
Step 6: Divide the Dough
Once the dough has doubled in size, gently press it down to release excess air.
Divide the dough into 2 equal portions.
Shape each portion into a smooth loaf.
Place each loaf into a parchment-lined loaf pan.
A standard 9 × 5-inch (23 × 13 cm) loaf pan works well.
Step 7: Make the Thin Cuts
Using a sharp knife, make a series of closely spaced cuts across each loaf.
Make the cuts approximately ½ inch (1–1.5 cm) apart.
Do not cut completely through the loaf.
Leave the bottom connected so the bread keeps its loaf shape.
This creates the pull-apart appearance shown in the photo.
Step 8: Add the Garlic Butter
Gently open the cuts slightly.
Spread the garlic butter into the spaces between the slices.
Try to distribute the butter evenly throughout the loaf.
Do not worry if some butter remains on the surface because it will melt during baking.
Step 9: Second Rise
Cover the prepared loaves loosely with a clean kitchen towel.
Allow them to rise again for approximately 20–30 minutes.
The dough should look noticeably puffier.
Meanwhile, preheat the oven to 350°F (175°C).
Step 10: Add the Topping
Brush the top of each loaf with melted butter.
Sprinkle with Parmesan cheese.
Add a little fresh parsley if desired.
The topping will become beautifully golden during baking.
Step 11: Bake
Place the loaf pans in the preheated oven.
Bake at 350°F (175°C) for 25–30 minutes.
The tops should be golden brown.
If the bread becomes dark too quickly, loosely cover the loaves with aluminum foil for the remaining baking time.
For a fully baked loaf, the center should reach approximately 190–200°F (88–93°C).
Step 12: Cool and Serve
Remove the bread from the oven.
Let it cool in the pans for approximately 10 minutes.
Carefully transfer the loaves to a cooling rack.
Serve warm and pull apart the slices with your hands.
Best Tips
Make sure the milk is warm rather than hot. Very hot milk can damage the yeast and prevent the dough from rising properly.
Do not add too much flour. A slightly soft dough produces a much more tender homemade bread.
Knead the dough until it becomes smooth and elastic. Proper kneading helps create the soft, fluffy texture.
When making the cuts, do not slice completely through the loaf.
Spread garlic butter deep into the cuts so the flavor reaches the center of the bread.
Allow the dough enough time to rise. A properly risen dough produces lighter and softer bread.
For the best texture, serve the bread warm while the garlic butter is still melted.
Best Ingredient Options
Flour
All-purpose flour works perfectly for this recipe.
Bread flour can also be used and will produce a slightly chewier loaf with more structure.
Butter
Unsalted butter gives you better control over the salt level.
Salted butter can also be used; simply reduce the added salt slightly.
Garlic
Fresh garlic provides the strongest flavor.
For a milder garlic taste, use 2–3 cloves instead of 4.
Cheese
Parmesan adds a salty, nutty flavor.
You can also use mozzarella, cheddar, Gruyère, or a combination of cheeses.
Recipe Variations
Cheesy Garlic Pull-Apart Bread
Add shredded mozzarella between the slices before baking.
As the bread cooks, the cheese melts into the layers for an extra-cheesy result.
Herb Garlic Bread
Add fresh rosemary, thyme, basil, or extra parsley to the garlic butter.
Spicy Garlic Bread
Add ¼–½ teaspoon of red pepper flakes to the butter mixture.
You can also add a little cayenne pepper.
Cheddar Garlic Bread
Replace the Parmesan with shredded cheddar.
This creates a richer, more savory loaf with a beautiful melted cheese topping.
Creamy Garlic Bread
Mix 2 tablespoons of cream cheese into the garlic butter for an especially rich filling.
What to Serve With
This pull-apart garlic bread is an excellent side dish for pasta.
Serve it with spaghetti, lasagna, baked ziti, or creamy Alfredo pasta.
It also pairs beautifully with tomato soup, creamy soups, stews, and chili.
For a larger dinner, serve it alongside roasted chicken, grilled beef, meatballs, or roasted vegetables.
A fresh green salad is another excellent option because its freshness balances the rich garlic butter.
Make-Ahead Instructions
The dough can be prepared ahead of time.
After kneading, place the dough in a covered bowl and refrigerate for up to 24 hours.
Allow the dough to sit at room temperature for approximately 30–45 minutes before shaping.
You can also prepare the garlic butter up to 3 days ahead.
Keep it covered and refrigerated, then allow it to soften before spreading it into the bread.
Storage
Allow leftover bread to cool completely.
Store it in an airtight container or wrap it tightly in aluminum foil.
Keep at room temperature for up to 2 days.
For longer storage, refrigerate the bread for up to 5 days.
Keep in mind that refrigeration can make homemade bread slightly firmer.
Reheating
For the best texture, reheat the bread in the oven.
Wrap the loaf loosely in aluminum foil and heat at 325°F (165°C) for approximately 10–15 minutes.
For individual slices, heat them in a toaster oven for 3–5 minutes.
You can also microwave individual pieces for approximately 15–20 seconds, although they will not be as crisp.
Freezing
This bread freezes very well.
Allow the baked loaves to cool completely.
Wrap each loaf tightly in plastic wrap, followed by aluminum foil.
Place in a freezer-safe bag or container.
Freeze for up to 3 months.
Thaw overnight in the refrigerator or at room temperature for several hours.
Reheat at 325°F (165°C) until warm.
Common Mistakes to Avoid
Using Hot Milk
Milk that is too hot can damage the yeast.
Always use warm milk around 100–110°F (38–43°C).
Adding Too Much Flour
Too much flour can produce a dense and dry loaf.
Add flour gradually and stop when the dough becomes soft and slightly tacky.
Cutting Completely Through the Loaf
Do not cut all the way through the bottom.
Leaving the base connected creates the pull-apart structure.
Skipping the Second Rise
The second rise helps the bread become lighter and softer.
Allow the shaped loaves to puff up before baking.
Adding Too Much Butter
While garlic butter is essential, excessive amounts can make the bread greasy.
Spread it evenly into the cuts rather than completely soaking the dough.
Overbaking
Overbaking can dry out the bread.
Remove the loaves when they are golden brown and the center is fully baked.
Nutrition Estimate
| Nutrient | Approximate Amount Per Serving |
| Calories | 280–330 kcal |
| Protein | 7–9 g |
| Carbohydrates | 35–40 g |
| Fat | 14–17 g |
| Saturated Fat | 8–10 g |
| Fiber | 1–2 g |
| Sugar | 3–4 g |
| Sodium | 400–500 mg |
| Calcium | 100–150 mg |
Nutrition information is an estimate and can vary depending on the ingredients, brands, and serving size used.
Frequently Asked Questions
Can I make this bread without garlic?
Yes.
Simply replace the garlic with additional herbs and butter for a delicious herb pull-apart bread.
Can I use instant yeast?
Yes.
Instant yeast works very well in this recipe and can be mixed directly with the flour.
Why is my bread dense?
Dense bread is usually caused by too much flour, insufficient kneading, or not allowing the dough enough time to rise.
Make sure the dough doubles in size during the first rise.
How do I get very thin slices?
Use a sharp serrated knife and make shallow cuts approximately ½ inch apart.
Do not press down too hard on the loaf while cutting.
Can I add mozzarella cheese?
Absolutely.
Mozzarella is an excellent addition and creates a deliciously stretchy cheesy garlic bread.
Can I prepare the bread the night before?
Yes.
The dough can be refrigerated overnight.
You can also prepare the garlic butter ahead of time and assemble the bread the following day.
Can I use whole wheat flour?
You can replace part of the all-purpose flour with whole wheat flour.
For a softer loaf, start by replacing about 25% of the flour rather than using 100% whole wheat flour.
Final Thoughts
This Pull-Apart Garlic Butter Bread is soft, buttery, flavorful, and incredibly satisfying.
The beautiful thin slices allow the garlic butter to work its way throughout the loaf, creating tender layers that are perfect for pulling apart and sharing.
With a soft homemade dough, fresh garlic, butter, herbs, and Parmesan, this bread makes an impressive side dish without requiring complicated techniques.
Serve it warm alongside your favorite pasta, soup, roasted meat, or salad for a homemade meal that everyone will want another piece of.