Introduction
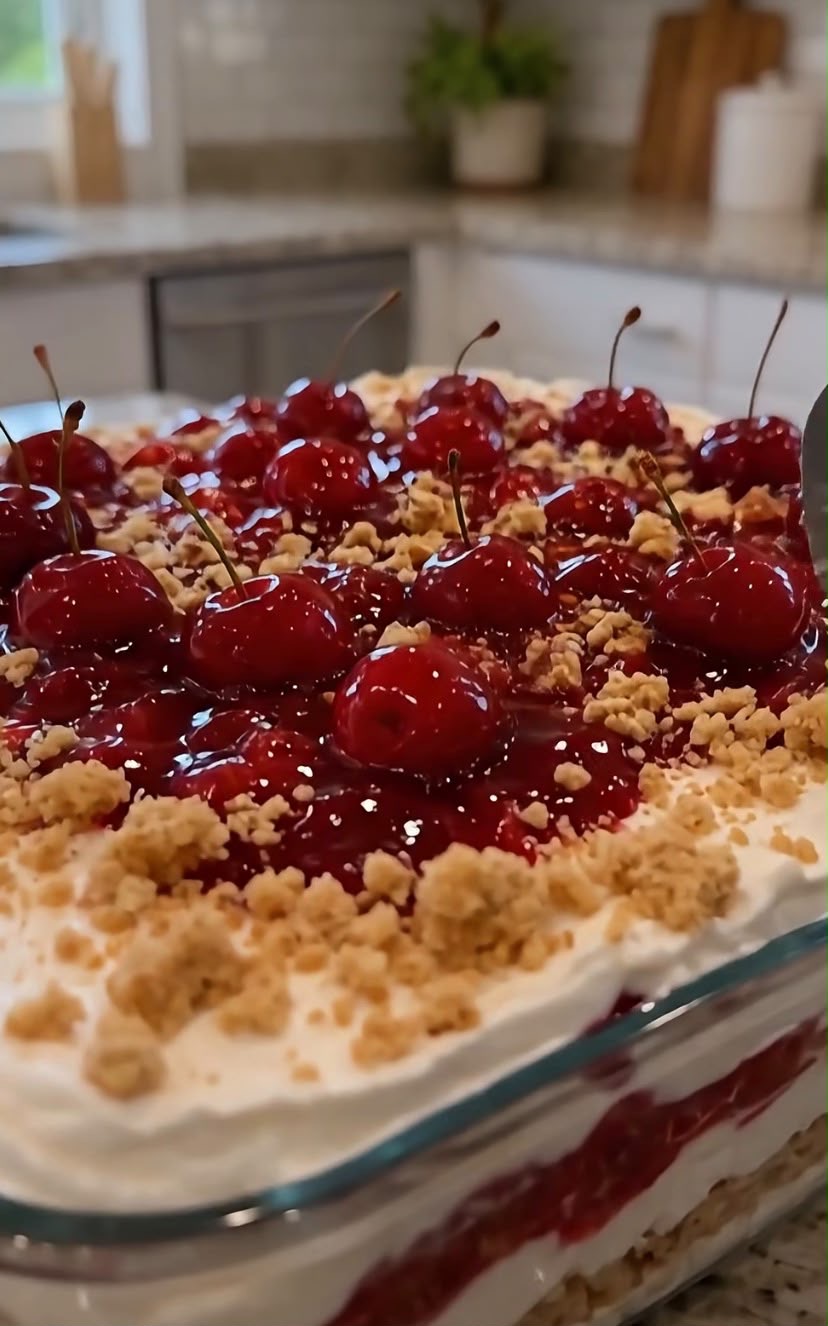
This No-Bake Cherry Cheesecake Lush is a creamy, fruity dessert made with a buttery cookie crust, smooth cheesecake filling, sweet cherry pie filling, and a crunchy crumb topping.
The layers create the perfect combination of creamy, crunchy, and fruity textures. Juicy cherries on top add a beautiful finishing touch.
It is an easy make-ahead dessert that requires no oven, making it perfect for summer gatherings, potlucks, holidays, birthdays, and family dinners.
Recipe Overview
| Category | Details |
| Recipe Name | No-Bake Cherry Cheesecake Lush |
| Course | Dessert |
| Cuisine | American |
| Prep Time | 25 minutes |
| Chill Time | 6 hours |
| Total Time | About 6 hours 25 minutes |
| Servings | 12 |
| Pan Size | 9 × 13-inch |
| Difficulty | Easy |
| Method | No-Bake |
| Best For | Holidays, Parties, Potlucks, Summer Desserts |
Why You’ll Love This Recipe
This cherry cheesecake dessert is incredibly creamy without requiring any baking. The simple no-bake preparation makes it a convenient choice when you want an impressive dessert without spending hours in the kitchen.
The buttery cookie crust provides a slightly crunchy foundation, while the cheesecake layer is smooth, fluffy, and rich.
Sweet cherry pie filling adds a bright fruity flavor and beautiful color between the creamy layers.
The crumb topping gives every serving a little extra crunch and makes the dessert look homemade and inviting.
Because it needs several hours to chill, this is also an excellent make-ahead dessert for entertaining.
Ingredients
For the Cookie Crust
| Ingredient | Amount |
| Graham crackers or digestive biscuits | 2½ cups, finely crushed |
| Unsalted butter, melted | ½ cup (113 g) |
| Granulated sugar | 2 tbsp |
| Salt | ⅛ tsp |
For the Cheesecake Layer
| Ingredient | Amount |
| Full-fat cream cheese, softened | 16 oz (450 g) |
| Powdered sugar | 1 cup |
| Vanilla extract | 2 tsp |
| Heavy whipping cream | 1½ cups |
| Powdered sugar | 3 tbsp |
For the Cherry Layer
| Ingredient | Amount |
| Cherry pie filling | 2 cans, 21 oz each |
| Fresh lemon juice | 1 tbsp |
| Fresh cherries | 12–16, for topping |
For the Crumb Topping
| Ingredient | Amount |
| Graham cracker or digestive biscuit crumbs | ¾ cup |
| Brown sugar | 2 tbsp |
| Unsalted butter, melted | 2 tbsp |
| Chopped walnuts or pecans | ¼ cup, optional |
Step-by-Step Instructions
1. Prepare the Crust
Line a 9 × 13-inch baking dish with parchment paper if you want to make the dessert easier to remove and slice.
Add the crushed graham crackers, sugar, salt, and melted butter to a bowl.
Stir until the crumbs are evenly coated and the mixture resembles wet sand.
2. Press the Crust Into the Dish
Transfer the crumb mixture to the baking dish.
Press it firmly and evenly across the entire bottom of the dish.
Use the bottom of a measuring cup or glass to create a compact, even crust.
Refrigerate the crust for at least 20 minutes while preparing the filling.
3. Prepare the Cheesecake Filling
Place the softened cream cheese in a large mixing bowl.
Beat until completely smooth.
Add the powdered sugar and vanilla extract and continue beating until creamy and lump-free.
In a separate bowl, whip the heavy cream with 3 tablespoons of powdered sugar until stiff peaks form.
Gently fold the whipped cream into the cream cheese mixture.
The finished cheesecake filling should be thick, smooth, and fluffy.
4. Prepare the Cherry Filling
Place the cherry pie filling in a bowl.
Stir in the fresh lemon juice.
The lemon juice adds a slight tang that balances the sweetness of the cherry filling.
5. Prepare the Crumb Topping
Combine the graham cracker crumbs, brown sugar, melted butter, and chopped nuts if using.
Stir until small clusters form.
For a more toasted flavor, spread the mixture on a baking sheet and bake at 350°F (175°C) for about 8–10 minutes.
Allow it to cool completely before using.
If you want the entire dessert to remain completely no-bake, simply use the crumb mixture without baking.
6. Add the Cheesecake Layer
Remove the chilled crust from the refrigerator.
Spread approximately half of the cheesecake mixture evenly over the crust.
Smooth the surface with a spatula.
7. Add the Cherry Layer
Spoon the cherry pie filling over the cheesecake layer.
Gently spread it toward the edges without pressing too hard into the cream layer.
Try to create an even layer of cherries across the dessert.
8. Add the Remaining Cheesecake
Spread the remaining cheesecake mixture over the cherry layer.
Smooth the top carefully with an offset spatula or the back of a spoon.
9. Add the Crumb Topping
Sprinkle the prepared crumb mixture generously over the top.
For the same elegant presentation as the pictured dessert, leave some of the creamy surface visible around the edges.
10. Add Fresh Cherries
Wash the fresh cherries and dry them thoroughly.
Arrange them over the top of the dessert.
You can place them evenly across the surface or create small clusters for a more decorative presentation.
11. Chill
Cover the dish tightly with plastic wrap or a lid.
Refrigerate for at least 6 hours.
For the cleanest slices and firmest texture, refrigerate overnight.
12. Serve
Remove the dessert from the refrigerator just before serving.
Cut into squares using a sharp knife.
For cleaner cuts, wipe the knife with a warm, damp towel between slices.
Serve cold with additional cherries or whipped cream if desired.
Best Tips
Use full-fat brick-style cream cheese for the thickest and creamiest cheesecake layer. Spreadable cream cheese can contain more moisture and may produce a softer filling.
Make sure the cream cheese is fully softened before mixing. This helps create a completely smooth cheesecake layer without lumps.
Do not overmix the whipped cream. Stop as soon as stiff peaks form to maintain a light and fluffy texture.
Press the cookie crust firmly into the dish. A compact crust will hold together better when the dessert is sliced.
Allow the dessert plenty of time to chill. Six hours is the minimum recommended time, while overnight chilling produces the best texture.
Dry fresh cherries thoroughly before placing them on the dessert to prevent excess moisture from collecting on the surface.
Best Ingredient Options
Graham crackers create a classic American cheesecake crust, while digestive biscuits provide a slightly richer and more buttery flavor.
For the best cheesecake texture, use full-fat cream cheese.
Cherry pie filling is convenient and provides a consistent layer of sweet cherry flavor. You can also make homemade cherry pie filling if you prefer.
Fresh lemon juice balances the sweetness of the canned cherry filling and gives the dessert a brighter flavor.
Pecans or walnuts add a delicious nutty crunch to the crumb topping, but they can be omitted for a nut-free dessert.
Recipe Variations
Chocolate Cherry Cheesecake Lush
Use chocolate cookie crumbs for the crust and add a thin drizzle of melted chocolate over the finished dessert.
Fresh Cherry Cheesecake Lush
Replace the canned cherry pie filling with homemade cherry compote made from fresh or frozen cherries.
Black Forest Cheesecake Lush
Add chocolate cookie crumbs, chocolate shavings, and a chocolate drizzle to create a Black Forest-inspired version.
Cherry Almond Cheesecake
Add ½ teaspoon of almond extract to the cheesecake filling and sprinkle sliced almonds over the topping.
Strawberry Cheesecake Lush
Replace the cherry pie filling with strawberry pie filling or homemade strawberry sauce.
Mixed Berry Lush
Use a combination of blueberry, raspberry, and cherry pie fillings for a colorful mixed berry dessert.
What to Serve With
Serve this cherry cheesecake lush cold with a small spoonful of freshly whipped cream.
A cup of hot coffee is an excellent pairing because the bitterness of the coffee balances the sweetness of the dessert.
Tea, iced coffee, or cold milk also works beautifully.
For special occasions, add a few extra fresh cherries and a light dusting of powdered sugar just before serving.
Make-Ahead Instructions
This dessert is ideal for making ahead.
Prepare the entire dessert up to 24 hours before serving and keep it covered in the refrigerator.
For the freshest appearance, add the fresh cherries shortly before serving.
The longer chilling time also allows the crust and cheesecake layers to firm up, making the dessert easier to cut.
Storage
Store leftover cherry cheesecake lush covered in the refrigerator.
It will keep well for approximately 3–4 days.
Keep it chilled whenever it is not being served because the cream cheese and whipped cream layers should remain refrigerated.
Fresh cherries may release some moisture over time, so the topping is best during the first couple of days.
Reheating
This dessert should not be reheated.
Serve it directly from the refrigerator.
If you prefer a slightly softer cheesecake texture, let individual portions sit at room temperature for about 10 minutes before serving.
Freezing
The cheesecake portion can be frozen, although the texture of the cherry filling and whipped cream may change slightly after thawing.
For best results, freeze the dessert without the fresh cherry garnish.
Cover the dish tightly with plastic wrap followed by aluminum foil.
Freeze for up to 1 month.
Thaw overnight in the refrigerator and add fresh cherries immediately before serving.
Common Mistakes to Avoid
Do not use cream cheese straight from the refrigerator. Cold cream cheese can remain lumpy even after beating.
Avoid adding too much liquid to the cheesecake mixture. Excess moisture can prevent the dessert from becoming firm.
Do not rush the chilling process. The layers need several hours in the refrigerator to set properly.
Avoid spreading the cherry filling too aggressively because it can mix into the cheesecake layer.
Do not use warm crumb topping. If you toast the crumbs, let them cool completely before sprinkling them over the cheesecake.
Avoid cutting the dessert before it is fully chilled. This can cause the layers to slide apart.
Nutrition Estimate
| Nutrient | Estimated Amount Per Serving |
| Calories | 455 kcal |
| Protein | 5 g |
| Carbohydrates | 48 g |
| Fat | 27 g |
| Saturated Fat | 15 g |
| Cholesterol | 75 mg |
| Sodium | 300 mg |
| Fiber | 2 g |
| Sugar | 32 g |
| Calcium | 75 mg |
Nutrition information is an estimate and can vary depending on the brands and exact ingredients used.
Frequently Asked Questions
Can I make this cherry cheesecake dessert without baking?
Yes. The entire dessert can be prepared without an oven. For a completely no-bake version, use an unbaked crumb topping instead of toasting it.
How long does cherry cheesecake lush need to chill?
Chill it for at least 6 hours. Overnight refrigeration is recommended for the firmest layers and cleanest slices.
Can I use homemade cherry pie filling?
Absolutely. Homemade cherry pie filling made with fresh or frozen cherries works beautifully and allows you to control the sweetness.
Can I use Cool Whip instead of homemade whipped cream?
Yes. You can substitute approximately 8 ounces of thawed whipped topping for the whipped cream if you prefer a quicker preparation.
Can I make this dessert in a smaller pan?
Yes. A smaller, deeper pan will create thicker layers. You may need to adjust the chilling time slightly.
Can I use frozen cherries?
Yes, especially for homemade cherry filling. Thawing and draining them properly is important so excess liquid does not make the layers watery.
Why is my cheesecake layer too soft?
The most common causes are insufficient chilling, using low-fat or spreadable cream cheese, adding too much liquid, or under-whipping the cream.
Can I make this dessert the day before?
Yes. Making it the day before is actually recommended. Overnight refrigeration gives the layers enough time to firm up and the flavors time to blend.
Final Thoughts
This No-Bake Cherry Cheesecake Lush is the kind of dessert that looks impressive while requiring surprisingly little effort.
The buttery cookie crust, creamy cheesecake filling, sweet cherry layer, and crunchy crumb topping create a delicious combination of textures in every bite.
For the best results, prepare it the day before, keep it refrigerated, and add the fresh cherries shortly before serving.
It is an easy cherry dessert that works beautifully for holidays, potlucks, summer gatherings, and any occasion when you want a creamy no-bake dessert that everyone will enjoy.