Introduction
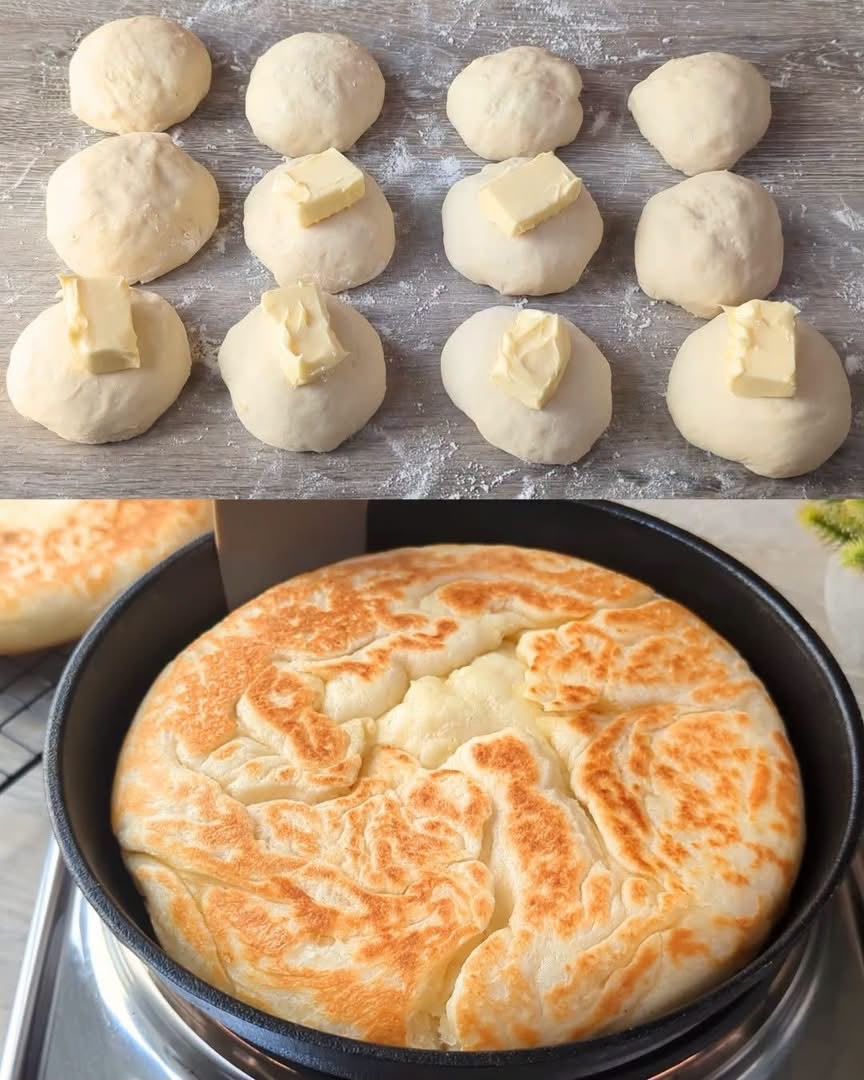
This Flaky Skillet Butter Bread is a beautifully golden, layered flatbread with a crisp exterior and soft, buttery layers inside.
The dough is divided into portions, generously coated with butter, layered, and cooked in a skillet until golden brown.
It is simple to make with basic pantry ingredients and tastes especially delicious while warm.
Serve it for breakfast, alongside soups and stews, or as a homemade bread for family meals.
Recipe Overview
| Category | Details |
| Recipe | Flaky Skillet Butter Bread |
| Preparation Time | 25 minutes |
| Resting Time | 1 hour |
| Cooking Time | 20–25 minutes |
| Total Time | About 1 hour 50 minutes |
| Servings | 8 |
| Cooking Method | Stovetop |
| Difficulty | Easy |
| Texture | Flaky, crisp, soft |
| Best For | Breakfast, side dish, snacks |
Why You’ll Love This Recipe
This homemade flatbread is incredibly satisfying because every bite combines a lightly crisp surface with tender, buttery layers.
The dough uses simple ingredients, making it an affordable homemade bread option for everyday cooking.
The butter creates beautiful layers as the bread cooks, giving it a rich flavor and flaky texture without requiring a complicated baking process.
It is also versatile enough to serve with sweet or savory foods.
Ingredients
For the Dough
| Ingredient | Amount |
| All-purpose flour | 4 cups (500 g) |
| Warm water | 1½ cups (360 ml) |
| Salt | 1 tsp |
| Sugar | 1 tsp |
| Vegetable oil | 2 tbsp |
For Layering
| Ingredient | Amount |
| Unsalted butter, softened | ½ cup (115 g) |
| Vegetable oil | 2 tbsp |
| All-purpose flour | 2 tbsp |
For Cooking
| Ingredient | Amount |
| Butter | 1–2 tbsp per batch |
| Vegetable oil | As needed |
Step-by-Step Instructions
Step 1: Make the Dough
Add the flour, salt, and sugar to a large mixing bowl.
Mix well to distribute the ingredients evenly.
Gradually pour in the warm water while mixing with your hand or a wooden spoon.
Add the vegetable oil and continue mixing until a soft dough forms.
Step 2: Knead the Dough
Transfer the dough to a lightly floured surface.
Knead for approximately 8–10 minutes until the dough becomes smooth, soft, and elastic.
If the dough feels too sticky, add flour 1 tablespoon at a time.
Avoid adding too much flour because a soft dough produces more tender layers.
Step 3: Rest the Dough
Place the dough in a lightly oiled bowl.
Cover it with plastic wrap or a clean kitchen towel.
Let it rest at room temperature for approximately 45–60 minutes.
Resting allows the gluten to relax, making the dough much easier to stretch.
Step 4: Divide the Dough
Lightly oil your work surface.
Divide the dough into 8 equal portions.
Shape each portion into a smooth ball.
Arrange the dough balls on a lightly oiled tray.
Cover and let them rest for another 15–20 minutes.
Step 5: Prepare the Butter Mixture
In a small bowl, combine the softened butter, vegetable oil, and flour.
Mix until smooth.
The small amount of flour helps the butter mixture stay between the layers instead of escaping too quickly during cooking.
Step 6: Flatten the Dough
Take one dough ball and place it on a lightly greased surface.
Using your fingers, gently press and stretch it into a very thin round or rectangle.
The thinner you stretch the dough, the more delicate and flaky the finished bread will be.
Step 7: Add the Butter
Spread a thin, even layer of the butter mixture over the stretched dough.
Fold the dough over itself several times to create layers.
Alternatively, roll the dough into a long strip, then coil it into a spiral.
Tuck the end underneath and gently flatten the coil.
Step 8: Repeat
Repeat the process with the remaining dough balls.
Keep the prepared portions covered while you work so they do not dry out.
Step 9: Flatten Before Cooking
Gently press each layered dough portion into a round approximately 6–7 inches wide.
Do not press too aggressively because you want to preserve the layers.
Step 10: Heat the Skillet
Place a heavy skillet or cast-iron pan over medium heat.
Allow it to heat for approximately 2–3 minutes.
Lightly grease the pan with butter or a small amount of oil.
Step 11: Cook the Bread
Place one flattened dough round into the hot skillet.
Cook for approximately 3–4 minutes, or until the bottom becomes golden brown.
Flip the bread carefully.
Cook the other side for another 3–4 minutes.
Brush the surface lightly with butter while cooking.
Step 12: Create the Golden Crust
Continue flipping every minute or so until both sides are deeply golden and crisp.
Gently press the bread with a spatula while cooking to encourage even browning.
Each bread should take approximately 6–8 minutes in total.
Step 13: Finish the Bread
Remove the cooked bread from the skillet.
Immediately brush it with a little melted butter.
Place it between clean kitchen towels and gently press or clap the sides together to help separate the flaky layers.
Repeat with the remaining dough.
Best Tips
Let the dough rest properly before stretching it. This makes a noticeable difference in how easily the dough spreads.
Keep the dough covered whenever you are not working with it so the surface does not dry out.
Use softened butter rather than cold butter because it spreads more evenly.
Do not use excessive flour while shaping because too much flour can make the bread dry.
Keep the skillet at medium heat. Very high heat can burn the outside before the layers are fully cooked.
For extra flaky bread, stretch the dough very thin before adding the butter mixture.
Best Ingredient Options
Flour
All-purpose flour works perfectly for this recipe.
Bread flour can also be used for a slightly chewier texture.
Butter
Unsalted butter gives you better control over the salt level.
For richer flavor, use high-quality European-style butter.
Oil
Vegetable oil is neutral and works well.
Canola, sunflower, or avocado oil can also be used.
Water
Warm water helps the dough come together smoothly.
The water should be warm to the touch, not hot.
Recipe Variations
For Garlic Butter Bread, add 1–2 finely minced garlic cloves and chopped parsley to the butter mixture.
For Herb Butter Bread, mix dried oregano, thyme, rosemary, or parsley into the butter.
For Cheesy Flaky Bread, sprinkle grated mozzarella or cheddar between the layers before folding.
For Spicy Butter Bread, add chili flakes, paprika, and a pinch of cayenne pepper.
For a sweet version, reduce the salt slightly and serve the finished bread with honey, cinnamon sugar, or jam.
What to Serve With
Serve this warm flaky bread with scrambled eggs, omelets, or breakfast potatoes.
It is also excellent alongside soups, stews, curries, grilled meats, and roasted vegetables.
For a simple snack, serve it with honey, jam, cream cheese, or a savory dipping sauce.
The buttery layers also make it perfect for soaking up sauces and gravies.
Make-Ahead Instructions
The dough can be prepared up to 24 hours ahead.
After kneading, place it in a lightly oiled airtight container and refrigerate.
Allow the dough to sit at room temperature for approximately 30–45 minutes before shaping.
You can also prepare the layered dough portions several hours ahead and keep them covered in the refrigerator.
Storage
Allow cooked bread to cool completely.
Place the bread in an airtight container or resealable bag.
Store at room temperature for up to 2 days.
For longer storage, refrigerate for up to 5 days.
Reheating
For the best texture, reheat the bread in a dry skillet over medium-low heat.
Warm for approximately 1–2 minutes per side.
You can also reheat it in a 350°F (175°C) oven for approximately 5–8 minutes.
A quick air-fryer reheating at 350°F (175°C) for 2–4 minutes also works well.
Freezing
This bread freezes very well.
Allow the cooked bread to cool completely.
Place parchment paper between individual pieces and store them in a freezer-safe bag or container.
Freeze for up to 2 months.
Reheat directly from frozen in a skillet or oven until hot and crisp.
Common Mistakes to Avoid
Do not add too much flour while kneading because the dough needs to remain soft.
Avoid skipping the resting time because tight dough is difficult to stretch.
Do not use cold butter because it can tear the dough and prevent even layering.
Avoid cooking over very high heat because the exterior can burn before the center cooks.
Do not flatten the layered dough too aggressively before cooking because this can reduce the flaky texture.
Keep cooked bread covered with a clean towel while preparing the remaining pieces so it stays soft.
Nutrition Estimate
Nutrition values are approximate and will vary according to the amount of butter and oil used.
| Nutrient | Approx. Per Serving |
| Calories | 330 kcal |
| Protein | 7 g |
| Total Fat | 15 g |
| Saturated Fat | 7 g |
| Carbohydrates | 43 g |
| Fiber | 2 g |
| Sugar | 1 g |
| Sodium | 330 mg |
| Cholesterol | 30 mg |
Frequently Asked Questions
Why is my flatbread not flaky?
The dough may not have been stretched thin enough, or there may not have been enough butter between the layers.
Resting the dough and using a generous but even layer of softened butter helps create better flakes.
Can I use olive oil instead of butter?
Yes.
Olive oil can replace the butter, although the bread will have a different flavor and slightly different texture.
Can I make this without a cast-iron skillet?
Yes.
A heavy nonstick or stainless-steel skillet works well.
Why is my bread hard?
Too much flour, insufficient resting time, or excessive cooking can make the bread tough.
Keep the dough soft and cook over medium heat.
Can I make the dough the night before?
Yes.
Refrigerate the dough in an airtight container and bring it toward room temperature before shaping.
Can I freeze the dough?
Yes.
Wrap individual dough portions tightly and freeze them for up to 1 month.
Thaw overnight in the refrigerator, then allow them to rest at room temperature before shaping.
How do I get more layers?
Stretch the dough very thin, spread butter evenly, and fold or coil it carefully before flattening.
The more delicate layers you create, the flakier the finished bread will be.
Final Thoughts
This Flaky Skillet Butter Bread is a simple homemade bread with an incredibly satisfying combination of crisp, golden edges and soft, buttery layers.
The dough is easy to prepare, and the stovetop cooking method means you do not need an oven.
Serve it fresh from the skillet with breakfast, dinner, soups, stews, or your favorite dips.
For the best results, give the dough plenty of time to rest and keep the skillet at a steady medium temperature.