Introduction
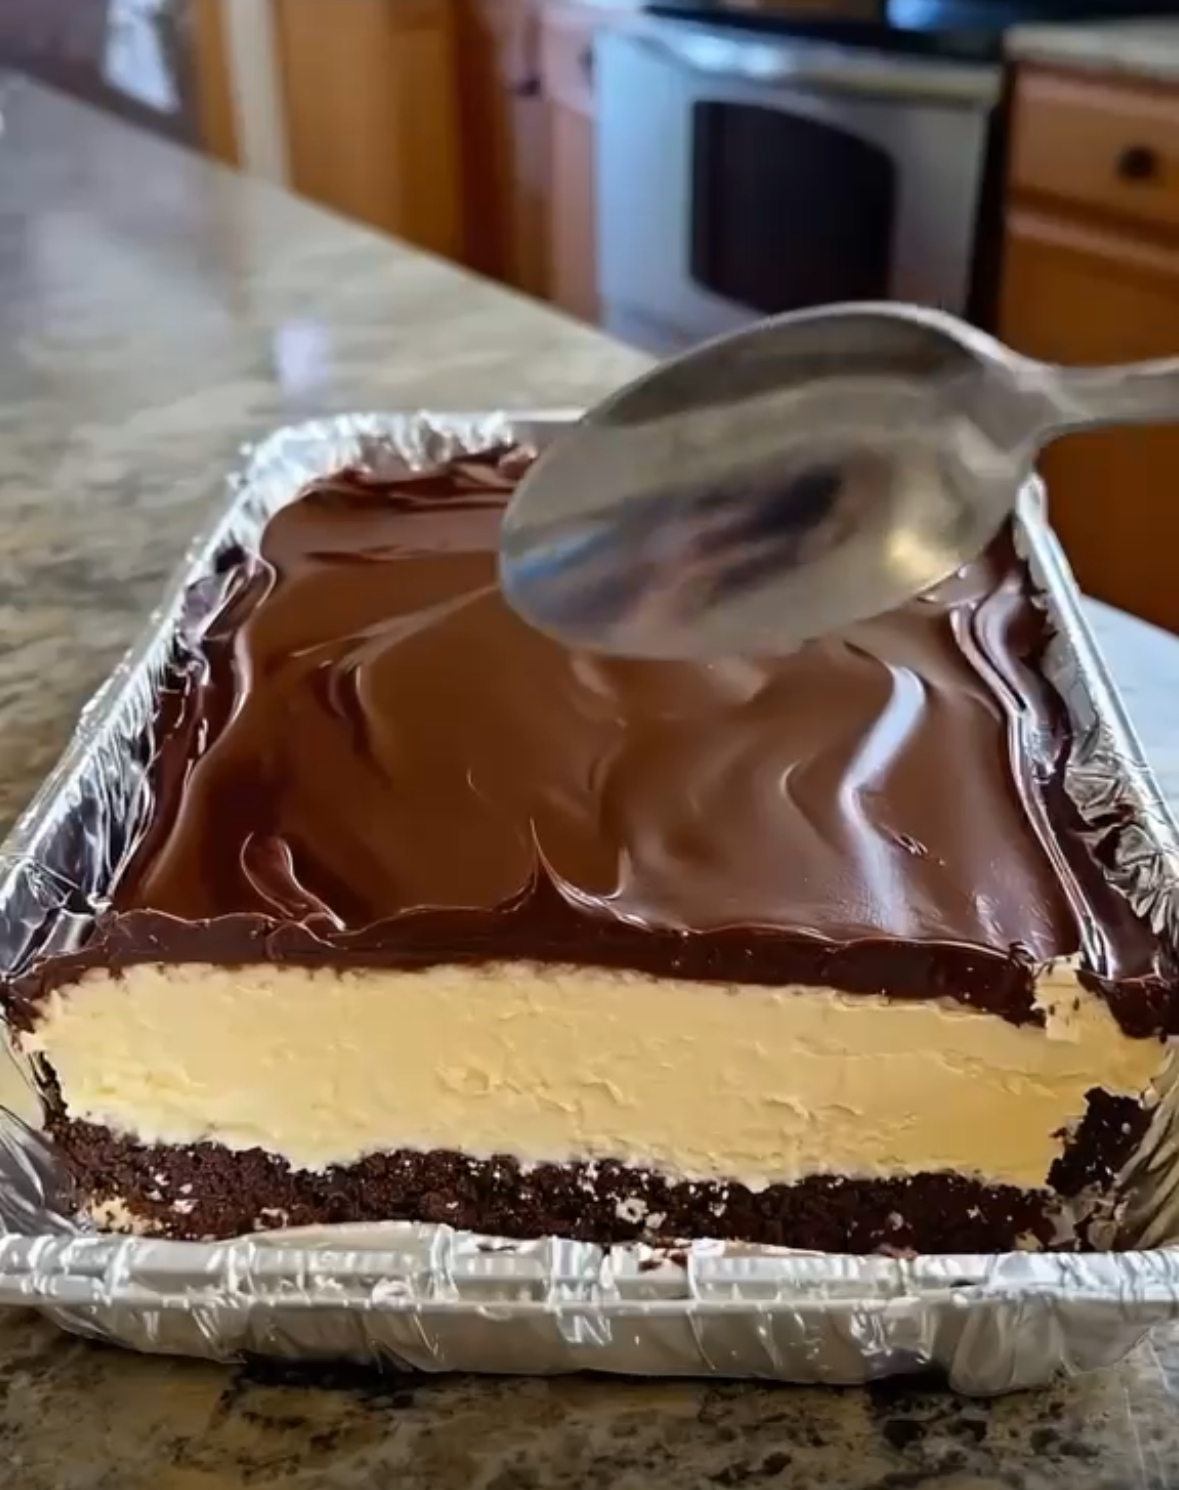
These Chocolate Cheesecake Brownie Bars combine three irresistible layers in one decadent dessert: a rich fudgy brownie base, a smooth and creamy cheesecake layer, and a glossy chocolate ganache topping. The contrast between the dense chocolate crust, velvety cheesecake, and silky ganache makes every bite rich, creamy, and intensely chocolatey.
They are perfect for holidays, family gatherings, birthdays, potlucks, or whenever you want an impressive dessert that can be prepared ahead of time.
Recipe Overview
| Category | Details |
| Recipe Name | Chocolate Cheesecake Brownie Bars |
| Prep Time | 25 minutes |
| Bake Time | 45–55 minutes |
| Chilling Time | 4–6 hours |
| Total Time | About 6 hours 30 minutes |
| Servings | 12–16 bars |
| Difficulty | Intermediate |
| Course | Dessert |
| Cuisine | American |
| Texture | Fudgy, creamy, silky |
| Best Served | Chilled |
Why You’ll Love This Recipe
These bars give you the best parts of a brownie and cheesecake in a single dessert. The brownie base is rich and chocolatey without being overly thick, while the cheesecake layer adds a smooth, creamy contrast.
The chocolate ganache on top makes the dessert especially indulgent. It creates a beautiful glossy finish and adds another layer of deep chocolate flavor.
This recipe is also excellent for making ahead. The cheesecake becomes firmer and easier to slice after several hours in the refrigerator, making these bars a great choice when you are preparing dessert for guests.
Ingredients
For the Brownie Base
| Ingredient | Amount |
| Unsalted butter, melted | ½ cup (113 g) |
| Granulated sugar | ¾ cup (150 g) |
| Brown sugar | ¼ cup (50 g) |
| Large egg | 1 |
| Vanilla extract | 1 teaspoon |
| All-purpose flour | ¾ cup (95 g) |
| Unsweetened cocoa powder | ⅓ cup (30 g) |
| Salt | ¼ teaspoon |
| Chocolate chips | ½ cup (85 g) |
For the Cheesecake Layer
| Ingredient | Amount |
| Full-fat cream cheese, softened | 16 oz (450 g) |
| Granulated sugar | ½ cup (100 g) |
| Large eggs | 2 |
| Vanilla extract | 1 teaspoon |
| Sour cream | ½ cup (120 g) |
| All-purpose flour | 2 tablespoons |
| Salt | Pinch |
For the Chocolate Ganache
| Ingredient | Amount |
| Semi-sweet or dark chocolate, finely chopped | 1 cup (170 g) |
| Heavy cream | ½ cup (120 ml) |
| Unsalted butter | 1 tablespoon |
| Vanilla extract | ½ teaspoon, optional |
Step-by-Step Instructions
1. Prepare the Pan
Preheat your oven to 350°F (175°C).
Line a 9 × 13-inch baking pan with parchment paper, leaving some parchment hanging over the sides. Lightly grease the parchment.
The overhanging parchment will make it much easier to lift the chilled dessert from the pan later.
2. Make the Brownie Batter
In a large bowl, whisk together the melted butter, granulated sugar, and brown sugar until smooth.
Add the egg and vanilla extract and whisk until fully combined.
In a separate bowl, combine the flour, cocoa powder, and salt.
Gradually add the dry ingredients to the wet mixture, stirring just until combined.
Fold in the chocolate chips.
Do not overmix the batter because excessive mixing can make the brownie layer less tender.
3. Bake the Brownie Base
Spread the brownie batter evenly across the prepared pan.
Bake for approximately 10–12 minutes.
The brownie layer should be partially set but does not need to be completely baked because it will continue cooking with the cheesecake layer.
Remove the pan from the oven and allow the base to cool for about 10 minutes.
4. Prepare the Cheesecake Filling
Make sure the cream cheese is completely softened before beginning.
Beat the cream cheese and sugar with an electric mixer on medium speed until smooth and creamy.
Add the eggs one at a time, mixing on low speed after each addition.
Add the vanilla extract and sour cream.
Finally, mix in the flour and salt until just combined.
Avoid overbeating the cheesecake mixture. Too much air incorporated into the batter can contribute to cracks during baking.
5. Add the Cheesecake Layer
Pour the cheesecake mixture over the partially baked brownie base.
Gently spread it into an even layer using a spatula.
Tap the pan lightly on the countertop once or twice to release any large air bubbles.
6. Bake
Return the pan to the oven and bake at 325°F (165°C) for approximately 30–40 minutes.
The cheesecake should look set around the edges while the center still has a slight jiggle.
Do not wait until the center is completely firm. It will continue setting as it cools.
7. Cool Completely
Remove the cheesecake bars from the oven and place the pan on a cooling rack.
Allow them to cool completely at room temperature.
Once cooled, cover the pan and refrigerate for at least 4 hours, preferably overnight.
The cheesecake must be thoroughly chilled before adding and slicing the final dessert.
8. Make the Chocolate Ganache
Place the chopped chocolate in a heatproof bowl.
Heat the heavy cream in a small saucepan over medium heat until it is hot and just beginning to simmer. Do not allow it to boil vigorously.
Pour the hot cream over the chocolate.
Let it sit for approximately 2–3 minutes.
Add the butter and gently stir from the center outward until the chocolate becomes completely smooth and glossy.
Add vanilla extract if desired.
9. Add the Ganache
Pour the slightly cooled ganache over the chilled cheesecake.
Use an offset spatula or the back of a spoon to spread it evenly across the surface.
Allow the ganache to sit for several minutes before returning the pan to the refrigerator.
10. Chill and Slice
Refrigerate the bars for another 30–60 minutes, or until the ganache is set.
Lift the entire dessert from the pan using the parchment paper.
Use a sharp knife to cut it into squares or rectangular bars.
For especially clean slices, dip the knife in hot water, wipe it dry, and then cut. Repeat between slices.
Best Tips
Use full-fat cream cheese for the richest flavor and smoothest cheesecake texture. Reduced-fat cream cheese can contain more moisture and may produce a softer filling.
Make sure the cream cheese and eggs are close to room temperature before mixing. This helps create a smoother cheesecake batter with fewer lumps.
Do not overbake the cheesecake layer. A slight jiggle in the center is exactly what you want when it comes out of the oven.
Allow the dessert to chill thoroughly before cutting. The brownie, cheesecake, and ganache layers become much easier to slice once completely cold.
For the glossy ganache shown in the image, finely chop the chocolate before adding the hot cream. Smaller pieces melt more evenly.
Best Ingredient Options
Chocolate
Semi-sweet chocolate provides a balanced flavor, while dark chocolate creates a richer, more intense dessert.
For a sweeter result, use milk chocolate in the ganache.
Cream Cheese
Full-fat block-style cream cheese is the best option. Avoid using whipped or spreadable cream cheese because its higher moisture content can affect the cheesecake texture.
Cocoa Powder
Use unsweetened cocoa powder for the brownie base. Dutch-process cocoa can also be used for a deeper chocolate flavor.
Sour Cream
Sour cream adds richness and a subtle tang that balances the sweetness. Full-fat Greek yogurt can be substituted if necessary.
Recipe Variations
Double Chocolate Cheesecake Bars
Add an extra ½ cup of chocolate chips to the brownie batter for an even more chocolate-heavy dessert.
Oreo Cheesecake Brownie Bars
Crush chocolate sandwich cookies and sprinkle them over the brownie base before adding the cheesecake layer.
White Chocolate Ganache
Replace the dark or semi-sweet chocolate with white chocolate for a sweeter, creamy topping.
Raspberry Chocolate Cheesecake Bars
Spread a thin layer of raspberry preserves over the brownie base before adding the cheesecake mixture. The tart berries pair beautifully with the chocolate.
Peanut Butter Chocolate Cheesecake Bars
Swirl ½ cup of creamy peanut butter into the cheesecake layer before baking.
Espresso Chocolate Cheesecake Bars
Add 1–2 teaspoons of instant espresso powder to the brownie batter and ganache. It intensifies the chocolate flavor without making the dessert taste strongly of coffee.
What to Serve With
These cheesecake brownie bars are rich enough to serve on their own, but they are especially delicious with a small scoop of vanilla ice cream.
Fresh strawberries, raspberries, or blueberries add a refreshing contrast to the chocolate.
For an extra-indulgent presentation, drizzle individual slices with caramel sauce or chocolate sauce and finish with a small dollop of whipped cream.
Make-Ahead Instructions
These bars are excellent for making ahead because the cheesecake needs several hours to chill.
Prepare the entire dessert 1–2 days before serving and keep it covered in the refrigerator.
For the cleanest presentation, cut the bars shortly before serving.
Storage
Store the cheesecake brownie bars in an airtight container or cover the baking pan tightly with plastic wrap.
Keep refrigerated for up to 5 days.
Because of the cheesecake layer, these bars should not be left at room temperature for extended periods.
Reheating
These bars are designed to be served chilled and do not need reheating.
For a slightly softer texture, allow an individual serving to sit at room temperature for approximately 10–15 minutes before eating.
Freezing
These bars freeze very well.
Cut the completely chilled dessert into individual portions and place them on a parchment-lined tray.
Freeze until firm, then wrap each bar tightly in plastic wrap and place the portions in a freezer-safe container or bag.
Freeze for up to 2–3 months.
Thaw overnight in the refrigerator before serving.
For the best appearance, freeze the bars without additional whipped cream or fresh fruit toppings.
Common Mistakes to Avoid
Overbaking the cheesecake: The center should still have a gentle jiggle when the dessert comes out of the oven.
Using cold cream cheese: Cold cream cheese can leave lumps in the cheesecake filling. Let it soften before mixing.
Overmixing the cheesecake: Excessive mixing incorporates too much air and can contribute to cracks.
Pouring extremely hot ganache over the cheesecake: Let the ganache cool slightly before spreading it over the chilled cheesecake layer.
Cutting too soon: The layers need time to firm up. Chilling overnight gives the cleanest slices.
Using too much ganache: A generous layer is delicious, but an excessively thick topping can overpower the cheesecake. Keep it smooth and even.
Nutrition Estimate
Values are approximate and will vary depending on the ingredients and portion size.
| Nutrient | Approximate Amount Per Bar |
| Calories | 450–520 kcal |
| Protein | 7–9 g |
| Carbohydrates | 45–55 g |
| Fat | 27–32 g |
| Saturated Fat | 16–20 g |
| Fiber | 2–3 g |
| Sugar | 32–40 g |
| Sodium | 250–350 mg |
Frequently Asked Questions
Can I use a smaller baking pan?
Yes. An 8 × 8-inch or 9 × 9-inch pan can be used for thicker bars, but the baking time will need to be adjusted. Start checking the cheesecake layer once the edges are set and the center has a slight jiggle.
Why did my cheesecake crack?
Overbaking, excessive mixing, or sudden temperature changes can cause cracks. Fortunately, the chocolate ganache completely covers the top, so small cracks will not affect the final appearance.
Can I make the brownie layer from a boxed mix?
Absolutely. A boxed brownie mix can be used as a shortcut. Prepare it according to the package directions, bake it partially, then add the cheesecake layer.
Can I use milk chocolate for the ganache?
Yes. Milk chocolate will produce a sweeter and creamier topping. If using very sweet chocolate, you may prefer slightly less cream or a darker chocolate for balance.
How do I get perfectly clean layers?
The key is chilling. Make sure the cheesecake is completely cold before adding the ganache, and allow the finished bars to chill again before slicing with a warm, clean knife.
Can I make these without the brownie base?
Yes. You can replace the brownie layer with an Oreo cookie crust or a simple chocolate cookie crust.
Final Thoughts
These Chocolate Cheesecake Brownie Bars are the perfect dessert for anyone who loves rich chocolate and creamy cheesecake. The fudgy brownie base, smooth cheesecake center, and silky chocolate ganache create three distinct textures and flavors that work beautifully together.
For the best result, make them a day ahead and let them chill overnight. The layers will firm up beautifully, the flavors will develop, and you’ll be rewarded with the clean, decadent slices shown in the photo.