Introduction
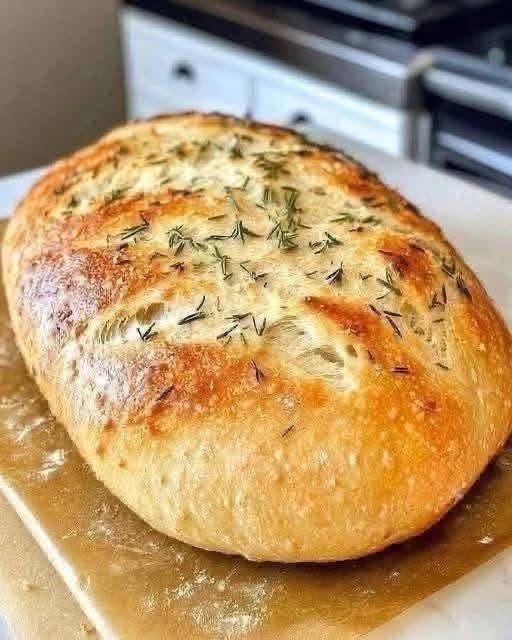
Welcome to your new favorite baking adventure. The beautiful loaf you see in image.png represents the absolute peak of gourmet cooking at home, bringing the bakery experience directly to your countertop.
Baking your own artisan bread is an incredibly rewarding experience that fills your kitchen with mouthwatering aromas. This process requires minimal effort but delivers professional, bakery-quality results every single time.
Whether you are diving into healthy lifestyle food choices or simply looking for easy meal prep solutions, this crusty rosemary loaf fits perfectly into your weekly cooking routine.
Recipe Overview
| Detail | Time / Amount |
| Prep Time | 15 Minutes |
| Rise Time | 2 Hours |
| Cook Time | 45 Minutes |
| Total Time | 3 Hours |
| Yield | 1 Large Loaf (12 Slices) |
Why You’ll Love This Recipe
This recipe takes the intimidation out of baking and makes premium kitchen equipment completely optional. You can achieve a professional-level crust and a soft, airy crumb using basic tools you already own in your kitchen.
The flavor profile is simply outstanding. The fresh rosemary infuses the dough during the resting process, creating a fragrant, savory experience that pairs perfectly with almost any dinner or lunch recipe.
You will also love how incredibly budget-friendly this is. Crafting your own artisan bread saves money while allowing you to control exactly what goes into your healthy recipes, helping you easily avoid all artificial preservatives and additives.
Ingredients
| Ingredient | Amount | Notes |
| 🌾 Bread Flour | 3 cups (360g) | High protein for the best chew |
| 💧 Warm Water | 1.5 cups (350ml) | Between 95°F and 105°F |
| 🞠Active Dry Yeast | 1 tsp (3g) | Ensure it is fresh and not expired |
| 🧂 Fine Sea Salt | 1.5 tsp (9g) | Enhances the overall flavor profile |
| 🌿 Fresh Rosemary | 2 tbsp | Finely chopped |
Step-by-Step Instructions
First, combine your warm water and active dry yeast in a large mixing bowl. Let the mixture sit for about five to ten minutes until it becomes frothy, which proves the yeast is alive and ready for baking.
Next, add your bread flour, fine sea salt, and the chopped fresh rosemary to the yeast mixture. Use a wooden spoon or a dough whisk to mix everything until a shaggy, slightly sticky dough forms.
Cover the bowl tightly with plastic wrap or a damp kitchen towel. Allow the dough to rest and rise at room temperature for at least two hours, or until it has doubled in size and the surface is covered with visible bubbles.
Once the dough has risen, preheat your oven to 450°F (230°C). If you have a Dutch oven, place it inside the oven while it preheats to ensure the cooking environment mimics a professional steam oven.
Turn the dough out onto a heavily floured sheet of parchment paper. Gently shape it into a round loaf using floured hands, then score the top with a sharp knife to allow steam to escape during the bake.
Carefully lift the parchment paper and place the dough into your preheated Dutch oven. Cover with the lid and bake for 30 minutes, then remove the lid and bake for another 10 to 15 minutes until the crust reaches a deep, beautiful golden brown.
Best Tips
Achieving the perfect crust relies heavily on trapping steam during the initial baking phase. Using a preheated Dutch oven is the ultimate technique for artisan baking, as it creates a high-moisture environment that allows the bread to expand fully before the crust hardens.
Temperature control is absolutely critical when working with active yeast. Always ensure your water is warm to the touch but not hot, as temperatures exceeding 120°F (49°C) can instantly kill the yeast and prevent your bread from rising.
Best Ingredient Options
For the absolute best texture, I highly recommend using a premium unbleached bread flour. The higher protein content in bread flour creates stronger gluten strands, resulting in that classic, chewy artisan texture that everyone loves.
If you cannot find fresh rosemary at the market, you can easily substitute dried rosemary. Just be sure to reduce the amount by half, as dried herbs contain much more concentrated flavor oils than their fresh counterparts.
Recipe Variations
If you want to experiment with different flavor profiles, a roasted garlic and thyme version is absolutely phenomenal. Simply fold in an entire head of mashed, sweet roasted garlic and a tablespoon of fresh thyme leaves during the initial mixing stage.
For a savory Mediterranean twist, try incorporating chopped Kalamata olives and sun-dried tomatoes directly into the dough. This creates an incredibly rich loaf that serves as a fantastic base for gourmet sandwiches or elegant appetizer platters.
What to Serve With
This rustic homemade bread is a flawless companion for rich, hearty comfort foods. It is absolutely perfect for dipping into creamy tomato basil soup, soaking up the savory broth of a slow-cooked beef stew, or accompanying a light, healthy summer salad.
It also shines brilliantly on its own as a simple appetizer. Just slice it thick and serve it alongside a high-quality extra virgin olive oil mixed with freshly cracked black pepper and a splash of aged balsamic vinegar.
Make-Ahead Instructions
This recipe is exceptionally well-suited for overnight meal prep. After mixing the dough, you can place the covered bowl directly into the refrigerator for 12 to 18 hours to undergo a slow, cold fermentation process.
This cold fermentation technique not only breaks up your active prep time but also dramatically improves the depth of flavor. It results in a more complex, sourdough-like taste profile that truly elevates your home baking experience.
Storage
To maintain that gorgeous, crispy crust, you should always store your artisan bread at room temperature in a simple paper bag or a specialized wooden bread box. Storing it in a sealed plastic bag will trap moisture and cause the crust to become soft and rubbery very quickly.
It is highly recommended to consume the bread within the first two to three days for the absolute best culinary experience. As an all-natural product with zero artificial preservatives, it will naturally begin to stale faster than commercial store-bought alternatives.
Reheating
To revive a loaf that has started to become slightly stale or soft on the outside, you can easily crisp the crust back to its original glory.
Simply place the whole loaf or individual slices directly on the wire rack of an oven preheated to 350°F (175°C) for about five to ten minutes until warmed through and crunchy.
Freezing
Freezing is the absolute best method for long-term storage of homemade bread. You should wait until the loaf is completely cool, slice it entirely, and then place the slices in a heavy-duty, airtight freezer bag to prevent freezer burn.
By freezing the bread in convenient slices, you can easily remove only what you need for a single meal. The frozen slices can be popped directly into a toaster, making them absolutely perfect for quick, healthy breakfasts on busy mornings.
Common Mistakes to Avoid
One of the most frequent errors in home baking is cutting into the bread while it is still piping hot from the oven. The bread actually continues to bake and set its internal moisture structure while cooling; slicing it too early will result in a gummy, wet texture inside.
Another major mistake is adding way too much flour during the shaping process. It is entirely normal for this high-hydration dough to feel quite sticky, and aggressively incorporating extra flour will make the final loaf incredibly dense and heavy rather than light and airy.
Nutrition Estimate
| Nutrient | Amount per Serving (1 Slice) |
| Calories | 110 kcal |
| Carbohydrates | 22g |
| Protein | 4g |
| Fat | 0.5g |
| Sodium | 290mg |
| Fiber | 1g |
Frequently Asked Questions
Can I make this recipe without a heavy Dutch oven?
Yes, absolutely. You can bake the bread on a heavy baking sheet or a pizza stone. To create the necessary steam, simply place a metal pan filled with a cup of hot water on the bottom rack of your oven right as you put the bread in.
Why didn’t my bread dough rise?
The most common culprit for dough that fails to rise is inactive yeast. This usually happens if the yeast is expired, or if the water used was too hot, which immediately kills the active yeast cultures before they can activate.
Final Thoughts
Mastering the art of easy homemade bread is a transformative skill for any home cook looking to improve their daily meal prep. This simple recipe proves that you do not need years of specialized culinary training to produce something truly spectacular and delicious in your own kitchen.
Enjoy the relaxing process, savor the incredible warm aromas, and take genuine pride in knowing you created this beautiful, healthy loaf entirely from scratch. Happy baking!