Introduction
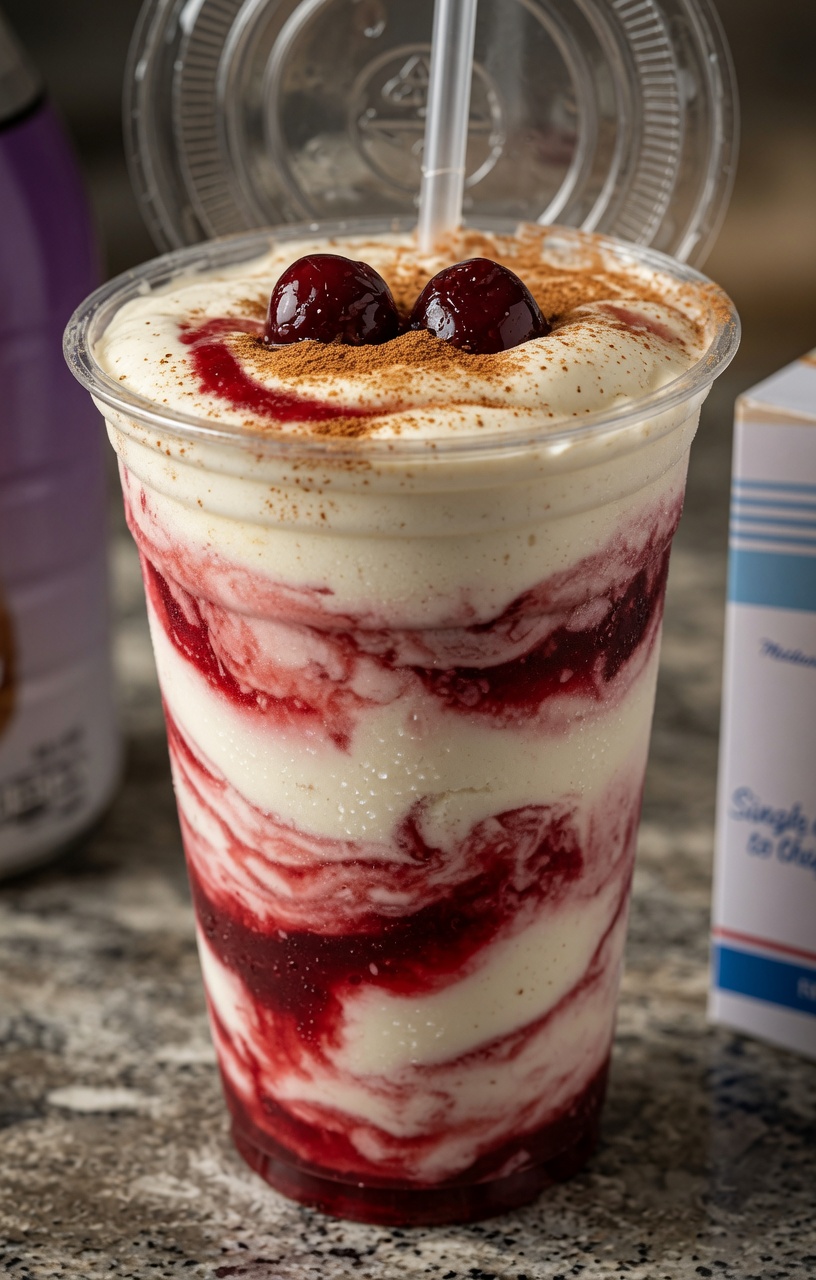
This creamy cherry vanilla dessert cup is a beautiful no-bake treat made with layers of smooth vanilla cream and vibrant cherry filling. The combination of rich creaminess, fruity cherry flavor, and a light cinnamon finish creates an easy homemade dessert that looks impressive while requiring minimal effort.
Perfect for parties, holidays, family gatherings, or an easy make-ahead dessert, these individual dessert cups are simple to prepare and easy to customize. The layered presentation also makes this recipe ideal for anyone looking for an attractive dessert for entertaining.
Recipe Overview
| Category | Details |
| Prep Time | 20 minutes |
| Cook Time | 10 minutes |
| Chilling Time | 2–4 hours |
| Total Time | About 2 hours 30 minutes |
| Yield | 6 dessert cups |
| Difficulty | Easy |
| Method | No-bake layered dessert |
| Cuisine | American-inspired |
Why You’ll Love This Recipe
This cherry vanilla dessert is incredibly easy to prepare, making it a perfect choice when you want a delicious homemade dessert without spending hours in the kitchen.
The creamy vanilla layer balances the sweet and slightly tart cherry filling beautifully, creating a delicious contrast of flavors in every spoonful.
Because the dessert is assembled in individual cups, it is perfect for dinner parties, celebrations, potlucks, and special occasions.
The recipe can also be prepared ahead of time, allowing you to enjoy a stress-free dessert when your guests arrive.
Ingredients
For the Creamy Vanilla Layer
| Ingredient | Quantity |
| Heavy whipping cream | 2 cups |
| Cream cheese, softened | 8 oz |
| Powdered sugar | ½ cup |
| Vanilla extract | 1 teaspoon |
| Sour cream or Greek yogurt | ½ cup |
For the Cherry Filling
| Ingredient | Quantity |
| Pitted cherries, fresh or frozen | 2 cups |
| Granulated sugar | ⅓ cup |
| Lemon juice | 1 tablespoon |
| Cornstarch | 1 tablespoon |
| Water | 2 tablespoons |
For the Topping
| Ingredient | Quantity |
| Fresh cherries | 6 |
| Ground cinnamon | ½ teaspoon |
| Optional whipped cream | As needed |
Step-by-Step Instructions
Prepare the Cherry Filling
Add the cherries, granulated sugar, and lemon juice to a saucepan over medium heat.
Cook for approximately 5–7 minutes, stirring occasionally, until the cherries begin to soften and release their juices.
In a small bowl, mix the cornstarch with the water until smooth.
Pour the cornstarch mixture into the saucepan and continue cooking for 1–2 minutes, stirring constantly, until the cherry mixture thickens.
Remove from the heat and allow the cherry filling to cool completely before assembling the dessert cups.
Prepare the Vanilla Cream
Place the softened cream cheese, powdered sugar, and vanilla extract in a large mixing bowl.
Beat until smooth and creamy.
Add the heavy whipping cream and continue mixing until the mixture becomes thick and fluffy.
Gently fold in the sour cream or Greek yogurt until the cream is smooth and well combined.
Assemble the Dessert Cups
Add a layer of the vanilla cream to the bottom of each serving cup.
Spoon a layer of cooled cherry filling over the cream.
Add another layer of vanilla cream.
Continue alternating the layers until the cups are filled.
Use a spoon or piping bag to create a smooth final layer of cream on top.
Chill and Garnish
Refrigerate the dessert cups for at least 2 hours before serving.
Before serving, top each cup with a fresh cherry and a light dusting of ground cinnamon.
Serve chilled.
Best Tips
Make sure the cream cheese is softened to room temperature before mixing. This helps create a smooth, lump-free vanilla cream.
Allow the cherry filling to cool completely before layering. Warm cherry filling can soften the cream and make the layers less defined.
For the best texture, chill the dessert for at least 2 hours before serving.
Use clear dessert cups or glasses to show off the beautiful cherry and vanilla layers.
Do not overmix the cream after it becomes thick and fluffy, as this can affect the final texture.
Best Ingredient Options
Fresh cherries provide a bright and natural flavor, but frozen pitted cherries are an excellent option when fresh cherries are not available.
For a richer dessert, use full-fat cream cheese and heavy whipping cream.
Greek yogurt can be used instead of sour cream for a slightly lighter and tangier flavor.
If you prefer a sweeter dessert, you can adjust the amount of powdered sugar according to your taste.
Recipe Variations
Chocolate Cherry Dessert Cups
Add a layer of chocolate cookie crumbs or chocolate pudding between the vanilla cream and cherry filling.
Black Forest-Inspired Dessert Cups
Add chocolate cake pieces, chocolate shavings, or a chocolate mousse layer for a dessert inspired by the classic Black Forest combination.
Cherry Cheesecake Cups
Add crushed graham crackers to the bottom of each cup to create a cheesecake-style dessert.
Almond Cherry Dessert Cups
Add a small amount of almond extract to the cream mixture for a delicious cherry-almond flavor combination.
What to Serve With
These creamy cherry dessert cups are delicious served on their own as an elegant individual dessert.
They also pair beautifully with coffee, tea, or a glass of cold milk.
For special occasions, serve them alongside chocolate cookies, shortbread, or a light fruit platter.
Make-Ahead Instructions
These dessert cups can be prepared up to 24 hours in advance.
Assemble the layers, cover the cups, and store them in the refrigerator until ready to serve.
For the best presentation, add the fresh cherry garnish and cinnamon topping shortly before serving.
Storage
Store the dessert cups covered in the refrigerator for up to 3 days.
Keep them chilled until serving because the cream layer becomes softer when left at room temperature for extended periods.
Reheating
This dessert should not be reheated.
Serve it directly from the refrigerator for the best texture and flavor.
Freezing
Freezing is not recommended because the cream mixture may change texture after thawing.
For the freshest results, prepare the dessert up to one day in advance and store it in the refrigerator.
Common Mistakes to Avoid
Adding hot cherry filling to the cream layer can cause the dessert to become runny and affect the appearance of the layers.
Using cold cream cheese straight from the refrigerator can result in lumps in the vanilla cream.
Overmixing the heavy cream may cause the mixture to become grainy.
Filling the cups too quickly without allowing the cherry layer to settle can create messy layers.
Skipping the chilling time can result in a softer dessert that does not hold its shape as well.
Nutrition Estimate
| Nutrient | Estimated Amount Per Serving |
| Calories | 390–450 kcal |
| Protein | 5–7 g |
| Carbohydrates | 35–45 g |
| Fat | 25–30 g |
| Sugar | 25–35 g |
| Fiber | 1–2 g |
Nutrition values are approximate and may vary depending on the specific ingredients and portion sizes used.
Frequently Asked Questions
Can I use frozen cherries?
Yes. Frozen pitted cherries work very well in this recipe. Allow them to thaw slightly before cooking, and adjust the cooking time if necessary.
Can I make this dessert without cream cheese?
Yes. You can replace the cream cheese with mascarpone or use additional whipped cream for a lighter texture.
How long should the dessert chill?
For the best texture, chill the dessert for at least 2 hours. Overnight chilling is also possible.
Can I use cherry pie filling?
Yes. Store-bought cherry pie filling can be used to save time, although homemade cherry filling provides a fresher flavor.
Can I make this recipe less sweet?
Yes. Reduce the sugar in the cherry filling or use less powdered sugar in the cream mixture according to your preference.
Final Thoughts
This creamy cherry vanilla dessert cup is an easy, elegant, and delicious no-bake dessert that combines smooth vanilla cream with sweet-tart cherry flavor. With its beautiful layers, simple preparation, and make-ahead convenience, it is an excellent choice for entertaining or satisfying a sweet craving at home.
The recipe is easy to customize with chocolate, cheesecake crumbs, almond flavor, or other fruit fillings, making it a versatile dessert that can be adapted for almost any occasion.