Introduction
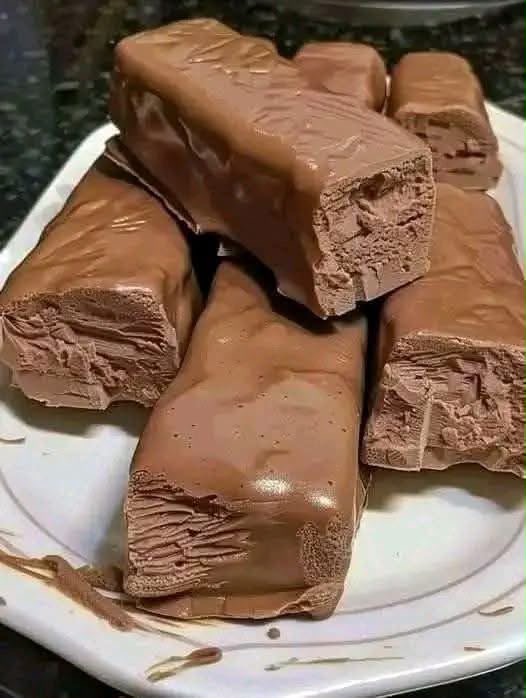
These Homemade Chocolate Ice Cream Bars are rich, creamy, and wonderfully chocolatey, with a smooth frozen center covered in a thin chocolate coating.
They are surprisingly easy to make at home and require only a handful of simple ingredients. The result is a delicious frozen dessert with a texture similar to a classic chocolate-coated ice cream bar.
This easy chocolate dessert is perfect for hot summer days, family gatherings, parties, or whenever you’re craving something cold and indulgent.
Recipe Overview
| Category | Details |
| Recipe | Homemade Chocolate Ice Cream Bars |
| Preparation Time | 20 minutes |
| Freezing Time | 6–8 hours |
| Total Time | About 6–8 hours |
| Servings | 8 bars |
| Difficulty | Easy |
| Cuisine | American-inspired |
| Texture | Creamy, smooth, and firm |
| Best For | Dessert, summer treats, parties |
Why You’ll Love This Recipe
These homemade ice cream bars have an incredibly creamy texture without requiring an ice cream maker. The chocolate flavor comes from both cocoa powder and melted chocolate, giving the frozen filling a rich and satisfying taste.
The chocolate coating adds a delicious contrast to the soft ice cream center. Once frozen, the coating becomes crisp and lightly cracks when you bite into it.
This is also a great make-ahead dessert. You can prepare the bars several days before serving and keep them stored in the freezer until you’re ready for a quick homemade treat.
Ingredients
Chocolate Ice Cream Filling
| Ingredient | Amount |
| Heavy whipping cream | 2 cups |
| Sweetened condensed milk | 1 cup |
| Unsweetened cocoa powder | ⅓ cup |
| Semi-sweet chocolate, melted | 4 oz |
| Vanilla extract | 1 tsp |
| Salt | ¼ tsp |
Chocolate Coating
| Ingredient | Amount |
| Semi-sweet or milk chocolate | 8 oz |
| Coconut oil | 2 tbsp |
Step-by-Step Instructions
1. Prepare the chocolate
Melt the 4 ounces of chocolate in a microwave-safe bowl in 20–30 second intervals, stirring between each interval.
Continue until smooth, then allow it to cool slightly.
2. Make the chocolate mixture
In a large bowl, whisk together the sweetened condensed milk, cocoa powder, vanilla extract, and salt.
Add the slightly cooled melted chocolate and whisk until completely smooth.
3. Whip the cream
Pour the cold heavy cream into a separate bowl.
Using an electric mixer, whip the cream on medium-high speed until medium-stiff peaks form.
Be careful not to overwhip it.
4. Combine the mixtures
Gently fold about one-third of the whipped cream into the chocolate mixture.
Add the remaining whipped cream and fold carefully until everything is evenly combined.
The mixture should remain light and fluffy.
5. Freeze
Line a loaf pan or rectangular freezer-safe container with parchment paper.
Pour in the chocolate mixture and smooth the surface.
Cover tightly with plastic wrap or a lid.
Freeze for at least 6–8 hours, preferably overnight.
6. Cut the bars
Remove the frozen chocolate ice cream from the pan.
Let it sit at room temperature for approximately 3–5 minutes so it becomes slightly easier to cut.
Cut into 8 rectangular bars.
Work quickly so the ice cream doesn’t soften too much.
7. Prepare the chocolate coating
Melt the remaining chocolate with the coconut oil.
Stir until completely smooth.
Allow the mixture to cool slightly. It should be liquid but not hot.
8. Coat the ice cream bars
Dip each frozen bar into the melted chocolate, coating it completely.
Place the coated bars on a parchment-lined tray.
The chocolate coating should set quickly because the bars are frozen.
9. Freeze again
Return the coated bars to the freezer for at least 30 minutes before serving.
Keep them frozen until you’re ready to enjoy them.
Best Tips
Use very cold heavy cream when whipping it. Cold cream reaches a better volume and creates a lighter ice cream texture.
Allow the melted chocolate to cool slightly before combining it with the other ingredients. Adding very hot chocolate can affect the texture of the mixture.
Don’t overmix the whipped cream. Gentle folding keeps the mixture airy and creamy.
Work quickly when coating the frozen bars. The colder the ice cream remains, the faster the chocolate coating will set.
For clean cuts, use a sharp knife warmed under hot water and wiped completely dry before slicing.
Best Ingredient Options
Chocolate: Semi-sweet chocolate gives a balanced flavor, while milk chocolate creates a sweeter and creamier dessert. Dark chocolate works well if you prefer a richer, less sweet flavor.
Cocoa powder: Use unsweetened cocoa powder for a deep chocolate flavor. Dutch-process cocoa can also be used.
Heavy cream: Full-fat heavy whipping cream produces the creamiest texture.
Coconut oil: A small amount of coconut oil helps create a thin chocolate shell that hardens quickly around the frozen bars. Refined coconut oil has a more neutral flavor.
Recipe Variations
For double chocolate bars, add mini chocolate chips to the ice cream mixture before freezing.
For a peanut butter version, swirl smooth peanut butter into the chocolate mixture before freezing.
For mint chocolate bars, add ½ teaspoon of peppermint extract and use dark chocolate for the coating.
For a hazelnut version, swirl chocolate-hazelnut spread into the ice cream before freezing and sprinkle chopped toasted hazelnuts over the chocolate coating.
You can also add crushed cookies to the filling for a delicious chocolate cookie ice cream bar.
What to Serve With
These chocolate ice cream bars are delicious on their own, but they can also be served with fresh strawberries, raspberries, or sliced bananas.
For an extra indulgent dessert, drizzle the bars with melted peanut butter or chocolate before serving.
A cup of hot coffee or espresso makes an excellent pairing with the rich chocolate flavor.
Make-Ahead Instructions
These ice cream bars are ideal for making ahead.
Prepare and freeze the bars up to 3 days before serving for the best quality.
Once coated with chocolate, keep them in an airtight freezer-safe container with parchment paper between layers.
Storage
Store the chocolate ice cream bars in an airtight freezer-safe container.
Keep them frozen at 0°F (-18°C) or below.
For the best texture and flavor, enjoy them within 2–3 weeks.
Avoid repeatedly thawing and refreezing the bars, as this can create ice crystals and affect the creamy texture.
Reheating
These bars should not be reheated.
Remove one from the freezer and let it sit at room temperature for approximately 3–5 minutes before serving.
This short resting time makes the ice cream slightly softer and easier to bite.
Freezing
The bars need at least 6–8 hours of freezing time to become completely firm.
Overnight freezing is recommended, especially if you want clean, sturdy bars that are easy to dip in chocolate.
Keep the bars frozen while preparing the chocolate coating.
Common Mistakes to Avoid
Using warm cream: Warm cream will not whip properly. Always use cold heavy cream.
Overwhipping the cream: Stop once medium-stiff peaks form. Overwhipped cream can become grainy and affect the final texture.
Using hot melted chocolate: Let melted chocolate cool slightly before mixing it into the ice cream base.
Not freezing long enough: Soft ice cream will be difficult to cut and coat. Give it plenty of time to freeze completely.
Making the coating too thick: A very thick chocolate layer can become difficult to bite through when frozen. Coconut oil helps create a thinner shell.
Leaving the bars out too long: Because these are homemade ice cream bars without commercial stabilizers, they soften relatively quickly at room temperature.
Nutrition Estimate
Approximate values per bar.
| Nutrient | Estimated Amount |
| Calories | 390 kcal |
| Protein | 5 g |
| Carbohydrates | 36 g |
| Fat | 27 g |
| Saturated Fat | 18 g |
| Fiber | 3 g |
| Sugar | 29 g |
| Sodium | 80 mg |
| Calcium | 120 mg |
Nutrition information is an estimate and will vary depending on the chocolate and other ingredients used.
Frequently Asked Questions
Can I make these without an ice cream maker?
Yes. This recipe is designed to be made without an ice cream machine. The whipped cream provides a light and creamy texture while the condensed milk adds sweetness and richness.
How long do the bars need to freeze?
Freeze the ice cream mixture for at least 6–8 hours. Overnight is even better.
Can I use milk chocolate?
Yes. Milk chocolate creates a sweeter and creamier flavor. If using very sweet chocolate, you can slightly reduce the amount of condensed milk.
Why is my chocolate coating too thick?
The chocolate may be too cool or may not contain enough fat. Adding a little coconut oil helps create a thinner coating that hardens smoothly over the frozen ice cream.
Can I make smaller bars?
Absolutely. Cut the frozen slab into 10–12 smaller pieces for bite-sized chocolate ice cream treats. Smaller portions will also be easier to coat.
Can I add nuts?
Yes. Chopped almonds, hazelnuts, peanuts, or pistachios can be sprinkled over the chocolate coating before it completely sets.
Final Thoughts
These Homemade Chocolate Ice Cream Bars are an easy way to create a rich frozen chocolate dessert at home.
The creamy chocolate center and crisp chocolate shell make a delicious combination, while the simple preparation means you don’t need complicated equipment.
Keep a batch in the freezer for a refreshing homemade dessert whenever a chocolate craving strikes.