*Introduction
If you are constantly searching for incredibly easy breakfast recipes and quick family meals that require absolutely no yeast or rising time, these magnificent stovetop buns are the ultimate solution.
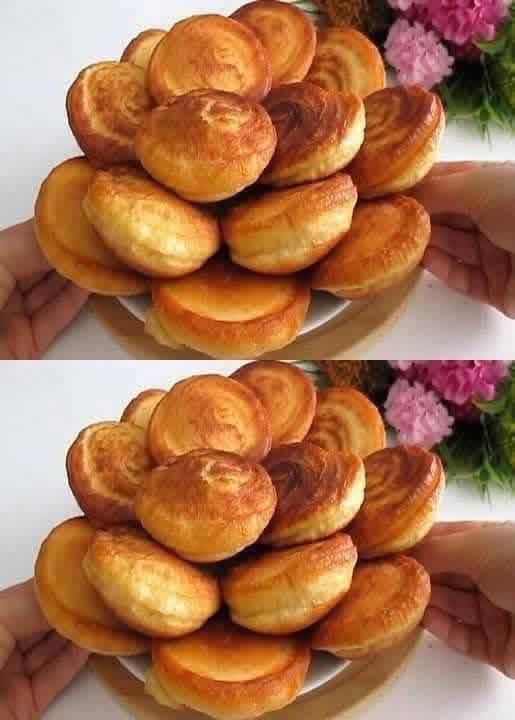
As you can clearly see in image_7.png, these beautifully golden, puffed pan breads boast a stunning, caramelized crust and a remarkably tender, airy interior that practically melts in your mouth.
Creating a homemade bread recipe from scratch is a fantastic way to stretch your grocery budget, making this the perfect comfort food for incredibly busy mornings or a lazy weekend brunch.
Recipe Overview
| Detail | Information |
| Prep Time | 10 Minutes |
| Cook Time | 15 Minutes |
| Total Time | 25 Minutes |
| Servings | 12 Buns |
| Calories | 145 kcal per bun |
Why You’ll Love This Recipe
Finding quick snacks and budget-friendly meal ideas that absolutely everyone in your household will eagerly devour can be highly challenging, but these simple yogurt buns are an instant crowd-pleaser.
This brilliant homemade bread relies entirely on standard pantry staples you likely already have in your kitchen, making it a fantastic asset for stress-free weekly meal planning.
Because everything cooks rapidly in a single non-stick skillet directly on your stovetop, you will spend significantly less time doing dishes and much more time enjoying your delicious, healthy comfort food.
Ingredients
| Ingredient | Measurement | Preparation Notes |
| All-Purpose Flour | 3 cups (360g) | Spooned and leveled gently for accuracy |
| Plain Whole Milk Yogurt | 1.5 cups (360g) | Room temperature for easy mixing |
| Baking Powder | 1 tablespoon | Ensures a rapid, fluffy rise without yeast |
| Granulated Sugar | 1 tablespoon | Adds a very subtle sweetness to the dough |
| Salt | 1 teaspoon | Enhances the overall flavor profile |
| Large Egg | 1 whole egg | Brought to room temperature |
| Vegetable Oil | 3 tablespoons | Used exclusively for pan-frying the dough |
Step-by-Step Instructions
Step 1: In a large glass mixing bowl, vigorously whisk together the plain whole milk yogurt, the room-temperature egg, the granulated sugar, and the salt until completely smooth.
Step 2: Gradually add the leveled all-purpose flour and the baking powder to the wet ingredients, using a sturdy wooden spoon to stir until a soft, shaggy dough begins to form.
Step 3: Turn the dough out onto a lightly floured kitchen surface and gently knead it with your hands for about three minutes until it becomes smooth and just slightly tacky.
Step 4: Divide the kneaded dough evenly into twelve equal portions, and carefully roll each individual piece into a perfectly smooth, round ball using the palms of your hands.
Step 5: Gently flatten each dough ball into a small disc that is approximately half an inch thick, ensuring they are uniform in size so they cook at the exact same rate.
Step 6: Heat the vegetable oil in a large non-stick skillet over medium-low stovetop heat until the oil is shimmering but not smoking.
Step 7: Carefully place three or four dough discs into the hot skillet, being incredibly careful not to overcrowd the pan, and cover with a tight-fitting lid.
Step 8: Cook the covered buns for exactly 3 to 4 minutes on the first side until they puff up beautifully and develop a rich golden-brown color on the bottom.
Step 9: Gently flip each bun using a silicone spatula, replace the lid, and cook for an additional 3 minutes until the second side is equally golden and the center is cooked completely through.
Step 10: Remove the finished pan buns to a wire cooling rack or a paper towel-lined plate, and immediately serve them warm for the absolute best culinary experience.
Best Tips
The absolute most important secret to achieving the beautiful, even browning seen in image_7.png is to diligently control your stovetop heat and keep it strictly at a medium-low setting.
If your pan is too hot, the exterior of the dough will unfortunately burn very quickly while the inside remains completely raw and unpleasantly gummy.
Always make sure to use the lid while pan-frying, as this specifically traps the steam and helps the baking powder activate, resulting in the incredibly thick, fluffy texture you desire.
Best Ingredient Options
For the absolute most tender crumb and richest flavor, using a full-fat plain Greek yogurt or traditional whole milk yogurt is highly recommended over any fat-free alternatives.
Investing in a premium, unbleached all-purpose flour will provide a noticeably superior structure and a much more authentic, bakery-style chew to the finished bread.
If you want to cook these with a slightly richer, more savory flavor profile, you can easily substitute the vegetable oil in the skillet for clarified butter or premium ghee.
Recipe Variations
For a remarkably savory twist that compliments easy dinner recipes perfectly, you can easily fold freshly minced garlic and chopped fresh parsley directly into the raw dough before kneading.
If you are craving an intensely satisfying, gooey surprise, simply press a small cube of sharp cheddar cheese right into the center of each dough ball before flattening them into discs.
To transform this simple bread into an incredible sweet breakfast treat, add a dash of pure vanilla extract to the yogurt and toss the freshly fried buns in a cinnamon-sugar mixture while they are still piping hot.
What to Serve With
Because these fluffy stovetop buns are incredibly versatile, serving them warm with a generous smear of salted European butter and a premium fruit jam makes for an unforgettable morning meal.
They are also the absolute perfect companion for mopping up rich, savory broths, making them an excellent side dish for hearty beef stews or creamy tomato bisque.
For a rapid, high-protein lunch idea, you can easily slice these soft buns directly in half and use them to build incredible mini sandwiches filled with roasted turkey or chicken salad.
Make-Ahead Instructions
This highly efficient recipe is absolutely perfect for advanced meal prep, allowing you to completely mix and knead the dough the entire night before you actually plan to cook it.
Simply wrap the large dough ball very tightly in high-quality plastic wrap and store it safely in the coldest part of your refrigerator for up to 24 hours.
When you are finally ready to prepare your meal, pull the dough out of the fridge and let it rest at normal room temperature for about twenty minutes before shaping and frying.
Storage
To ensure these magnificent homemade pan buns retain their incredible moisture, always allow them to cool completely down to room temperature before storing them.
Place the completely cooled bread into a high-quality airtight storage bag or glass container directly on your kitchen counter, where they will remain wonderfully soft for up to three full days.
Reheating
For a remarkably quick and easy fix, wrap a single bun in a slightly damp paper towel and heat it in your microwave on medium power for exactly 15 seconds until warmed thoroughly.
If you prefer a slightly crispier exterior, you can effortlessly slice the bun in half and pop it directly into your standard countertop toaster just like an English muffin.
Freezing
These freshly cooked stovetop buns freeze incredibly well, making them an essential and highly convenient staple for your long-term food storage strategies.
Wrap the fully cooled buns individually in heavy-duty aluminum foil, place them inside a sealed freezer-safe bag, and keep them safely frozen for up to three months.
Common Mistakes to Avoid
One of the most frequent errors in making this quick bread is aggressively over-kneading the dough, which develops too much gluten and sadly results in a tough, incredibly dense hockey puck.
Another very common mistake is rolling the dough discs far too thin, which completely prevents them from rising properly and destroys the beautiful, fluffy center shown in the image.
Finally, attempting to fry the dough in a completely dry skillet without enough oil will immediately cause the outside to scorch and stick to the pan rather than achieving that glorious golden crust.
Nutrition Estimate
| Nutrient | Amount per Serving (1 Bun) |
| Total Calories | 145 kcal |
| Total Fat | 4g |
| Saturated Fat | 1g |
| Cholesterol | 18mg |
| Sodium | 190mg |
| Total Carbohydrates | 23g |
| Dietary Fiber | 1g |
| Sugars | 3g |
| Protein | 4g |
Frequently Asked Questions
Q: Can I use active dry yeast instead of baking powder for this stovetop recipe? A: No, this specific recipe is strictly engineered to rely on the rapid chemical reaction between the baking powder and the acidic yogurt; using yeast would require entirely different liquid ratios and hours of rising time.
Q: Why did my pan buns turn out completely raw in the very center? A: Raw centers almost always happen if your stovetop burner was turned up too high, causing the outside to brown rapidly before the internal temperature could reach a safe, fully cooked level.
Q: Can I bake these directly in the oven instead of using a frying pan? A: While stovetop frying provides the signature texture, you can absolutely bake them on a parchment-lined baking sheet at 190°C (375°F) for about 15 minutes, though they will not be quite as golden.
Final Thoughts
Mastering simple, yeast-free baking right in your own kitchen is an absolutely wonderful way to bring immense joy, incredible convenience, and premium flavor to your family table.
With just a handful of basic pantry staples and a few minutes of your time, you can easily produce a gorgeous batch of these golden pan buns that genuinely rival any professional bakery.
Enjoy the incredibly satisfying, highly rewarding process of stovetop baking, and get completely ready to watch this warm, fluffy bread instantly disappear the moment you serve it!