Introduction
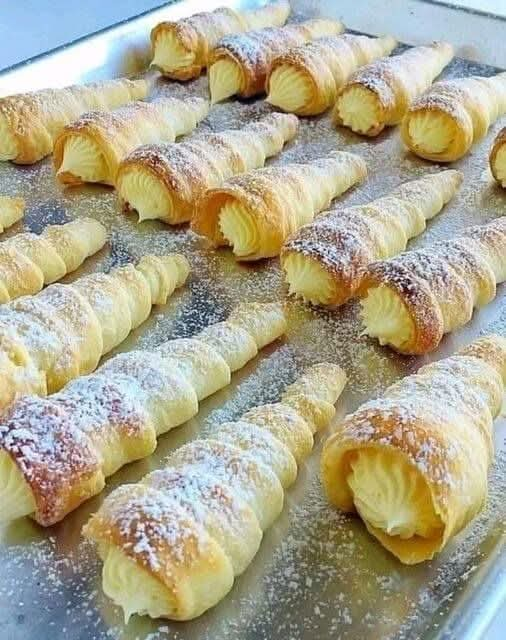
A cream horn is a delightful and indulgent pastry treat that originates from Europe. Its crisp, flaky pastry shell is paired with a rich.
creamy filling, making it a popular choice for afternoon tea or as a dessert to impress guests.
The delicate layers of the dough are baked to a golden brown, and once cooled, they are generously filled with a smooth.
sweet cream. Cream horns can be a little time-consuming to prepare, but the end result is well worth the effort.
Ingredients
For the pastry:
Puff pastry sheets (store-bought or homemade)Melted butter (for brushing)
For the filling:
Whipping cream
Powdered sugar
Vanilla extract
For decoration (optional):
- Chopped nuts, chocolate shavings, or powdered sugar
Instructions
Begin by preheating your oven to around 400°F (200°C) and preparing a baking sheet lined with parchment paper. If you’re using store-bought puff pastry.
take it out of the fridge and let it come to room temperature. If you’re working with homemade puff pastry, make sure it is well chilled before using it. Next, cut the puff pastry into long strips about 1 inch wide.
Take each strip and wrap it around a cream horn mold (which can be found at most kitchen supply stores) or make your own mold using aluminum foil.
Make sure to overlap the edges slightly as you wrap the pastry, ensuring it sticks together as it bakes.
Once you’ve wrapped all the pastry strips around the molds, brush the surface of the dough lightly with melted butter.
Bake the pastry shells in the preheated oven for about 15-20 minutes, or until they are golden brown and puffed up. Allow them to cool completely on a wire rack before attempting to fill them.
While the pastry shells are cooling, prepare the filling. In a mixing bowl, whip the cream until stiff peaks form.
Then, gently fold in powdered sugar and vanilla extract, adjusting the sweetness to your taste. If you’d like, you can add a bit of mascarpone cheese or cream cheese for a richer flavor.
Once the pastry shells have cooled, carefully remove them from the molds. Use a piping bag or a spoon to fill each pastry horn with the whipped cream mixture, ensuring that each horn is filled evenly.
If you like, you can decorate the filled cream horns by sprinkling them with powdered sugar or rolling the edges in chopped nuts or chocolate shavings for extra flavor and texture.
How to Make
Making cream horns at home is a fun and rewarding process. The first step involves preparing the puff pastry, which is the key to achieving that light.
crisp texture. Whether you’re using store-bought or homemade pastry, make sure to handle it carefully to avoid it becoming too warm or sticky.
After cutting the dough into strips, the wrapping process is crucial. Ensure the pastry overlaps slightly as you wrap it around the mold to guarantee it holds its shape while baking.
Baking the pastry shells at the right temperature is essential for that golden, crispy finish. It’s important not to open the oven door too soon to prevent the pastry from deflating.
Once baked, let them cool completely before filling to prevent the cream from melting or getting too runny. As for the filling, you can adjust.
the sweetness and flavor by experimenting with different additions, like citrus zest, coffee, or even a splash of liqueur for a twist on the classic recipe.
When filling the cream horns, it’s best to use a piping bag for precision. This will allow you to fill each horn evenly and avoid making a mess.
Don’t rush this step—take your time to ensure that the creamy filling reaches every corner of the pastry. Once filled.
decorating the cream horns can be as simple or elaborate as you like. A dusting of powdered sugar works perfectly, but if you’re feeling creative.
you can add a sprinkle of cocoa powder, melted chocolate drizzle, or finely chopped pistachios for a unique touch.
Tips
When working with puff pastry, it’s important to keep it cold at all times. If it starts to warm up and become too soft.
it can lose its flaky texture during baking. If needed, refrigerate the pastry again for a few minutes before continuing to work with it.
For a more refined presentation, make sure to pipe the cream filling neatly into each horn, as this will help create a more professional look.
Using a star tip on your piping bag will also give the filling a lovely, decorative texture.
If you’re looking to add extra flavor to the cream filling, consider adding a splash of almond extract.
coffee essence, or citrus zest to the whipped cream mixture. These small changes can elevate the flavor profile of the dessert.
If you don’t have cream horn molds, you can create your own using aluminum foil. Simply roll a piece of foil into a cone shape and wrap it in a bit of parchment paper for easy.
removal after baking. This can be a great way to make cream horns without specialized equipment.
Another tip for perfect cream horns is to make sure your oven is fully preheated before placing the pastry inside.
Puff pastry needs a burst of heat to achieve its signature rise, and starting with a hot oven is essential for the best results.
To ensure the pastry stays crisp, serve your cream horns as soon as they are filled. If they sit for too long, the cream can begin to soften the delicate pastry shell, diminishing its texture.
Finally, don’t be afraid to get creative with your fillings or decorations. You can experiment with different flavors of whipped cream, or even use flavored custard or mascarpone.
Adding colorful decorations like edible flowers or sprinkles can make the cream horns even more visually appealing.
Conclusion
In conclusion, cream horns are a delicious and versatile pastry that can be easily made at home with a few simple ingredients. While they may take a bit of time and effort.
the end result is a flaky, creamy treat that’s sure to impress anyone lucky enough to enjoy one. With the right techniques and a little creativity.
you can craft beautiful cream horns that are as delightful to look at as they are to eat.
These homemade cream horns are perfect for special occasions, family gatherings, or just as an indulgent dessert to treat yourself. So gather your ingredients, follow the steps, and enjoy the deliciousness of this classic pastry in your own kitchen.