Homemade Dinner Rolls
Introduction
There’s something truly comforting about the aroma of fresh, warm dinner rolls wafting through the kitchen.
These soft, fluffy, golden rolls are a timeless addition to any meal, whether you’re serving up a holiday feast or a simple weeknight dinner.
Making them at home might seem intimidating at first, but with the right approach and a little patience, anyone can achieve bakery-style rolls in their own oven.
Ingredients
4 cups all purpose flour plus extra for dusting
2 teaspoons yeast
3 tablespoons sugar
1 1/4 cups warm milk
1/4 cup oil
2 eggs
1/2 teaspoon salt
Instructions
Begin by activating the yeast. In a bowl, combine warm milk and sugar, then sprinkle the yeast over the top. Let it sit until the mixture becomes frothy, indicating that the yeast is alive and active.
In a large mixing bowl, combine the flour and salt. Add the yeast mixture, beaten eggs, and softened butter. Mix until the ingredients start coming together into a sticky dough.
Transfer the dough onto a floured surface and knead it thoroughly until it becomes smooth and elastic. This process helps develop the gluten, which gives the rolls their structure and softness.
Place the kneaded dough into a greased bowl, cover it with a clean kitchen towel or plastic wrap, and let it rise in a warm place until it doubles in size. This usually takes about an hour or two, depending on your kitchen’s temperature.
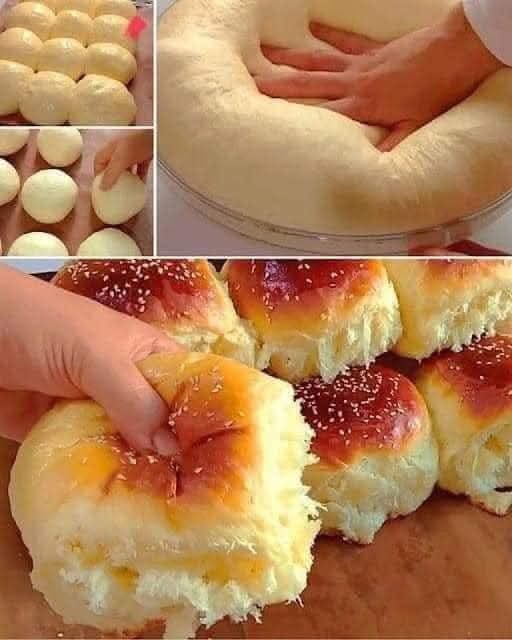
Once the dough has risen, punch it down to release the air. Divide it into equal-sized portions and shape each portion into a ball for a uniform look and even baking.
Arrange the dough balls in a greased baking dish, making sure they’re slightly touching. This allows them to rise and bake together, giving that classic pull-apart texture and golden, buttery tops.
Cover the baking dish and let the rolls rise again until puffy. Preheat your oven, then bake until the tops are golden brown. For an extra glossy finish, brush them with melted butter right after removing from the oven.
How to Make
Start by preparing all your ingredients and ensuring they are at room temperature, especially the milk, butter, and eggs. This helps the yeast work more effectively and creates a smoother dough.
Activate the yeast by dissolving it in warm milk with a bit of sugar. This step is crucial for ensuring your dough will rise properly and develop the desired fluffiness in the finished rolls.
Mix the dry and wet ingredients together gradually to form a sticky dough. Using a stand mixer with a dough hook can make this easier, but kneading by hand works just as well with a bit of elbow grease.
The kneading process should take around ten minutes until the dough becomes smooth and elastic. Don’t rush this part—proper kneading is key to soft, airy rolls.
Allow the dough to rise in a warm, draft-free area until it doubles in volume. Covering it properly will help retain moisture and warmth, encouraging consistent fermentation.
Shape the rolls with gentle hands to avoid deflating the dough. Keeping the size uniform ensures even baking and a pleasing presentation when served.
Finally, bake the rolls until golden, keeping an eye on them toward the end. Depending on your oven, baking times may vary slightly. Once baked, a brush of butter adds a beautiful sheen and extra flavor.
Variations
For a cheesy twist, fold shredded cheddar or mozzarella into the dough before shaping the rolls. This adds a gooey surprise to each bite and pairs well with soups and pasta dishes.
You can make sweet dinner rolls by adding a bit more sugar and a touch of vanilla extract. These make excellent breakfast rolls, especially when served with jam or honey.
Try using whole wheat flour for a healthier version. You might need to adjust the liquid content slightly, as whole wheat flour tends to absorb more moisture.
Herbed rolls are another flavorful variation. Mix in dried herbs like rosemary, thyme, or oregano into the dough for a fragrant and savory touch.
Garlic butter rolls are a hit at any dinner table. Brush melted garlic butter over the rolls before and after baking for a rich, aromatic finish.
For a festive variation, shape the rolls into small knots or braids. This adds a decorative flair perfect for holiday tables or special gatherings.
You can also stuff the rolls with bits of cooked sausage, ham, or vegetables to create a filled bread roll that works great as a snack or appetizer.
Tips
Always use warm—not hot—liquid to activate the yeast. If the milk is too hot, it can kill the yeast, preventing your dough from rising.
Measure your ingredients accurately, especially flour. Too much flour can make the rolls dense and dry, while too little may make them too sticky to shape.
Allow enough time for each rise. Rushing the process may lead to flat or underdeveloped rolls. Let the dough double in size during each proof for best texture.
If you’re short on time, you can do the first rise in the refrigerator overnight. This slow fermentation enhances flavor and can make next-day baking more convenient.
Avoid overbaking, as this can dry out the rolls. They’re done when the tops are golden brown and they sound slightly hollow when tapped.
Brushing the rolls with melted butter immediately after baking locks in moisture and gives them a glossy, appetizing finish.
Leftover rolls can be stored in an airtight container and reheated in the oven to restore their softness. A quick toast or a microwave steam trick can also bring them back to life.
Conclusion
Homemade dinner rolls are more than just a side dish—they’re a symbol of comfort, care, and culinary pride. Whether you’re a seasoned baker or just starting out, mastering this recipe will bring warmth and joy to countless meals with family and friends.
Once you experience the magic of baking your own rolls from scratch, you may never go back to store-bought. With a simple set of ingredients and a bit of love, these fluffy, golden treasures will always have a place at your table.