Great! Here’s a structured write-up for your homemade stain remover:
Introduction
Stains are the bane of every laundry day, especially those stubborn, set-in marks that refuse to budge no matter how many products you try.
From food splatters to grass smears and everything in between, it’s easy to feel defeated when your favorite shirt or pants ends up looking permanently damaged.
Fortunately, there’s a homemade solution that truly delivers results, even on the toughest stains.
Ingredients
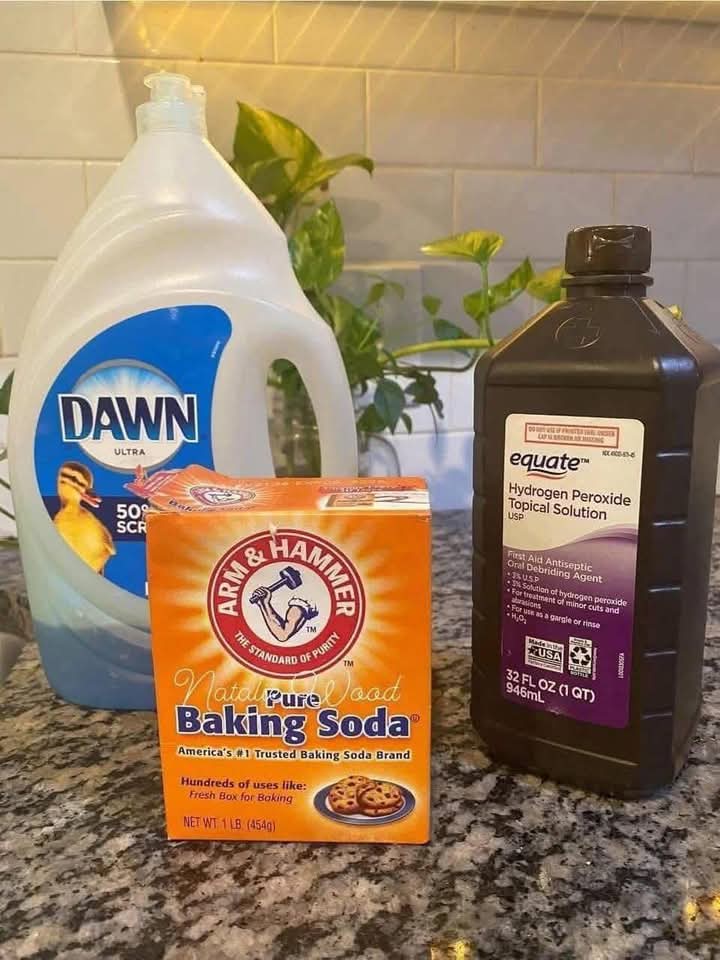
The mixture is:
1 tsp. Dawn dishwashing detergent
3-4 tablespoons of hydrogen peroxide
couple tablespoons of baking soda.
Scrub on with a scrubbing brush
Instructions
Start by measuring out one teaspoon of Dawn dishwashing detergent. This brand works best because it has strong grease-cutting properties that help break down oily or sticky residues.
If you’re using a different dish soap, make sure it’s one known for its cleaning power rather than a gentle or moisturizing formula.
Next, add three to four tablespoons of hydrogen peroxide. This ingredient acts as a natural bleaching agent.
lifting pigments and brightening fabrics without the harshness of chlorine bleach. Be careful not to use this mixture on dark or brightly colored fabrics without testing it first, as it could lighten them.
Scoop in a couple of tablespoons of baking soda. Baking soda not only deodorizes but also acts as a mild abrasive, helping to physically lift the stain from the fibers as you scrub.
Together, the baking soda and peroxide also create a fizzing reaction that aids in loosening grime.
Mix the ingredients in a bowl or cup until you get a paste-like consistency. This blend should be thick enough to stick to fabric but spreadable for coverage.
If it’s too dry, add a bit more peroxide; if too wet, sprinkle in more baking soda.
Apply the mixture directly onto the stained area using your fingers or a spoon. Make sure to cover the entire stain with a generous layer.
Let it sit for at least 10 to 15 minutes to give the active ingredients time to break down the stain.
Take a scrubbing brush and gently work the paste into the fabric. Use circular motions and a steady hand to avoid damaging delicate material.
You’ll often see the stain lifting during this step, especially for fresh or surface-level marks.
Once scrubbed, launder the clothing as usual. For persistent stains, you can repeat the process before drying.
Air-drying is best for checking if the stain is gone since heat from a dryer can set a stain permanently.
How to Make
Begin by gathering all your materials in one place. You’ll need your Dawn detergent, hydrogen peroxide.
baking soda, and tools like a small bowl, spoon, and brush. Having everything within arm’s reach makes the process more efficient and less messy.
Pour the teaspoon of Dawn into your mixing bowl. This acts as the foundation of your solution and helps emulsify oils and dirt.
Make sure it’s a clean bowl, free of any leftover residues from other cleaning agents that could alter the mixture.
Add the hydrogen peroxide next. Measure out three to four tablespoons, depending on how strong you want your blend.
The more peroxide you use, the more powerful the stain-lifting effect will be—ideal for deeply set stains.
Spoon in two tablespoons of baking soda. This balances the liquid with a solid element, turning the mixture into a gritty paste.
You can adjust this ratio if you prefer a thicker or thinner consistency based on your scrubbing needs.
Stir the mixture thoroughly. Use the back of the spoon to press and blend the baking soda so that it doesn’t clump. A smooth but textured paste is the goal, with no dry powder left at the bottom.
If you’re preparing a spray version, add a cup or two of water to thin the mixture and pour it into a spray bottle. Shake well before each use, as the ingredients can settle or separate over time.
Store the remaining mixture in an airtight container if you made a larger batch. It’s best used fresh.
but it can last a few days if kept sealed in a cool, dry place. Be sure to label the container clearly and keep it out of reach of children.
Variations
If you don’t have Dawn dish soap, you can substitute with another strong, grease-fighting detergent.
Just ensure it doesn’t contain added moisturizers, which could reduce its effectiveness against stains.
For a more natural approach, use castile soap in place of dishwashing liquid. While it may not cut through grease as aggressively, it’s gentler on skin and eco-friendly.
To create a scented version, add a drop or two of essential oils like lavender, lemon, or tea tree. These won’t just make your clothes smell great—they also add antimicrobial properties to your cleaner.
If you’re treating white clothing, increase the peroxide content slightly for extra brightening. Be cautious when doing this with colors, as it may lead to slight fading if overused.
For delicate fabrics like silk or wool, use a diluted version with more water and skip the scrubbing brush. Gently blot the stain instead with a soft cloth to prevent damage.
Make a dry scrub by leaving out the peroxide and mixing only baking soda and dish soap. This version is great for thick fabrics like rugs or car upholstery where moisture can be an issue.
Combine with vinegar (never with peroxide simultaneously) for a deep pre-soak. Apply the baking soda and soap mix, then spray vinegar over the top for a fizzing reaction that lifts grime on contact.
Tips
Always test the solution on a small, hidden section of the fabric first. This will help you avoid unwanted discoloration or damage, especially with delicate or dark materials.
Don’t allow the mixture to dry completely on the fabric before washing, as the baking soda can harden and become difficult to rinse out fully. Keep it damp if you need to let it sit for longer.
Use a firm but gentle scrubbing motion when applying. A toothbrush works well for small spots, while a larger brush can cover wide areas like furniture cushions or pant legs.
Avoid using hot water when laundering treated items, as heat can set any remaining stain. Stick to cold or warm water cycles until you’re sure the stain is gone.
If you’re working on a very old or set-in stain, repeat the application two or three times. Patience and persistence usually pay off without the need for harsh chemicals.
Store your homemade stain remover in a labeled spray bottle if you make a liquid version. Always shake before use, as natural ingredients tend to separate over time.
Clean your scrubbing brush after each use to avoid spreading old residues onto new stains. Rinse it thoroughly and let it air dry.
Conclusion
This DIY stain remover is a powerful, cost-effective solution to your toughest laundry challenges. With just a few common ingredients and a little elbow grease, you can restore stained clothes, linens, and more to their original glory. No need to rely on pricey commercial products that often fall short of their promises.
By creating your own stain-fighting formula, you not only save money but also gain the satisfaction of knowing exactly what’s in your cleaner. It’s safe, simple, and surprisingly effective—proving once again that sometimes, the best solutions really do come from your own kitchen.
Would you like me to format this into a printable or blog-friendly version?