Introduction
There’s something magical about freshly baked bread, and this easy sandwich bread recipe is the perfect way to bring that magic into your kitchen.
Soft, fluffy, and incredibly delicious, this bread comes together with just a handful of ingredients and minimal effort.
No kneading, no eggs, and no butter required—just a simple process that guarantees bakery-quality bread every time.
Ingredients
To make this simple sandwich bread, you’ll need:
3 ½ cups (440g) all-purpose flour
1 ½ cups (360ml) warm water
2 tsp sugar
1 ½ tsp salt
2 ¼ tsp (1 packet) instant yeast
These basic ingredients come together to create a soft and light loaf that’s perfect for any occasion.
You won’t need anything fancy—just staple pantry ingredients that you probably already have at home.
Instructions
Start by combining the warm water, sugar, and instant yeast in a bowl. Let the mixture sit for 5 to 10 minutes until it becomes foamy.
This is a crucial step as it activates the yeast, which helps the bread rise and gives it that perfect texture.
Once your yeast mixture is bubbly, it’s time to add the flour and salt. Stir everything together until the dough starts to come together.
Don’t worry if the dough is sticky; that’s completely normal and actually part of what makes this bread so soft and airy.
Now, cover the dough with a clean towel or plastic wrap and let it rise for about an hour, or until it has doubled in size.
This rise is key to developing the texture, so be patient and give the dough time to do its thing.
Once the dough has risen, gently punch it down to release any air bubbles. Then, transfer it to a greased loaf pan, smoothing the top to ensure an even rise.
Cover the pan again and let the dough rise for another 30 minutes. This second rise will help ensure the loaf stays soft and light once baked.
While the dough is rising, preheat your oven to 375°F (190°C). This will ensure the bread bakes evenly and reaches the perfect golden brown color.
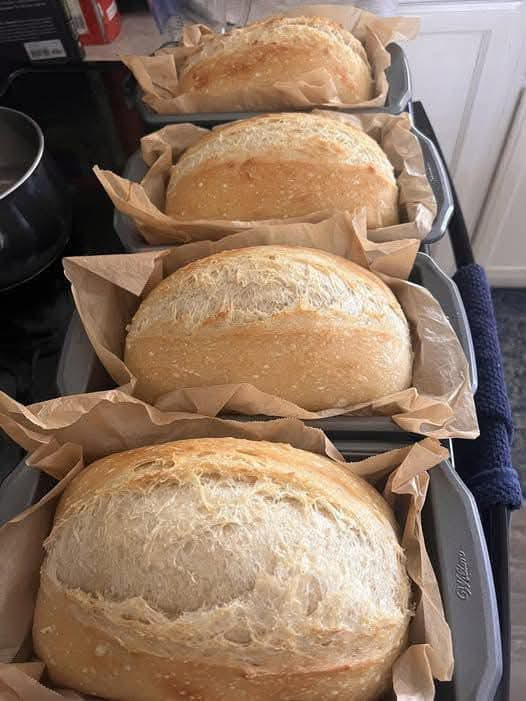
After the second rise, it’s time to bake the bread. Place the loaf in the oven and bake for about 30 to 35 minutes.
Keep an eye on it as it bakes—when the top turns golden brown and you can hear a hollow sound when tapping the bottom, it’s ready.
Once it’s done baking, remove the loaf from the oven and let it cool on a wire rack. This will allow the bread to firm up and make slicing easier. Let it cool completely before slicing for the best texture.
When your loaf has cooled, slice it up and enjoy! Whether you’re making sandwiches or just eating it with a bit of butter, this bread will quickly become a favorite.
How to Make
How to Make Soft and Fluffy Sandwich Bread
Creating your own sandwich bread at home is a rewarding experience that fills your kitchen with delightful aromas and yields a soft.
fluffy loaf perfect for various uses. Here’s a step-by-step guide to making this simple, no-knead, no-eggs, no-butter sandwich bread.
1. Activate the Yeast
Begin by combining warm water and sugar in a bowl. Sprinkle the instant yeast over the water-sugar mixture and stir gently to dissolve.
Allow the mixture to sit for 5 to 10 minutes until it becomes foamy. This step ensures that the yeast is active and ready to help the bread rise.
2. Prepare the Dough
In a separate large bowl, combine the all-purpose flour and salt. Once the yeast mixture is frothy, pour it into the flour-salt mixture. Stir with a wooden spoon or spatula
until a sticky dough forms. The dough will be quite sticky, but that’s perfectly normal and contributes to the bread’s soft texture.
3. First Rise
Cover the bowl with a clean kitchen towel or plastic wrap. Place it in a warm, draft-free area and let the dough rise for about 1 hour, or until it has doubled in size.
This process allows the yeast to ferment, producing gases that make the bread light and airy.
4. Shape the Dough
After the first rise, gently punch down the dough to release any air bubbles. Transfer it to a lightly floured surface and shape it into a loaf by folding.
the sides towards the center and then rolling it tightly. This shaping technique helps create a uniform crumb structure.
5. Second Rise
Grease a loaf pan lightly and place the shaped dough seam-side down into the pan. Cover it loosely with lightly greased plastic wrap or a kitchen towel.
Let the dough rise for another 30 minutes, or until it has risen about 1 inch above the edge of the pan.
This second rise ensures the bread achieves the desired softness and volume.
6. Preheat the Oven
While the dough is undergoing its second rise, preheat your oven to 375°F (190°C). A properly preheated oven ensures even baking and helps the bread develop a golden-brown crust.
7. Bake the Bread
Once the dough has completed its second rise, place the loaf in the preheated oven. Bake for 30 to 35 minutes, or until the top is golden brown and the loaf sounds hollow when tapped.
If you have an instant-read thermometer, the internal temperature should reach about 190°F (88°C) when the bread is fully baked.
8. Cool the Bread
Remove the loaf from the oven and let it cool in the pan for about 10 minutes. Then, transfer it to a wire rack to cool completely.
Allowing the bread to cool prevents it from becoming soggy and ensures that the texture sets properly.
9. Slice and Serve
Once the bread has cooled completely, use a serrated knife to slice it. Enjoy it as is, or toast the slices for added flavor.
This homemade sandwich bread is perfect for sandwiches, toast, or simply enjoying with a pat of butter.
10. Storage
Store any leftover bread in a plastic bag or airtight container at room temperature. It will remain fresh for up to 3 days.
For longer storage, consider freezing the bread and thawing slices as needed.
By following these steps, you can enjoy fresh, homemade sandwich bread that’s soft, fluffy, and free from kneading, eggs, and butter. Happy baking!
Variations
Exploring variations of your homemade sandwich bread can lead to delightful new flavors and textures, enhancing your baking repertoire. Here are several ideas to customize your loaf:
1. Whole Wheat Addition
Incorporate whole wheat flour into your bread for a richer flavor and added nutritional benefits. Replacing half of the all-purpose flour with whole wheat flour yields a tender loaf with a subtle nutty taste.
This adjustment not only boosts fiber content but also imparts a wholesome aroma to your bread.
2. Honey Wheat Twist
For a touch of natural sweetness, consider adding honey to your dough. Mixing in a tablespoon of honey complements the yeast’s flavors and contributes to a soft crumb.
This variation is particularly popular for sandwiches featuring nut butters or grilled fillings.
3. Sweet Brown Bread
Introduce molasses or brown sugar to create a sweet brown bread reminiscent of the popular Outback Steakhouse version.
This variation offers a deep, caramel-like sweetness and a moist texture, making it an excellent choice for hearty sandwiches or toast.
4. Herb-Infused Loaf
Elevate the flavor profile by adding fresh or dried herbs to your dough. Ingredients like rosemary, thyme, or oregano infuse the bread with aromatic qualities.
making it a perfect accompaniment to Mediterranean-inspired fillings or as a side to soups and salads.
5. Seeded Crust
Enhance both texture and visual appeal by incorporating seeds such as sesame, sunflower, or poppy seeds.
Sprinkling seeds on top before baking adds a delightful crunch and nutty flavor, while mixing them into the dough can provide a consistent texture throughout the loaf.
6. Milk Enrichment
Substituting water with milk results in a softer crumb and a slightly richer taste. Using milk at room temperature, as opposed to warm water.
can also influence the bread’s texture and flavor, contributing to a tender crumb and a subtle sweetness.
7. Sourdough Starter
Integrate a sourdough starter to introduce a mild tanginess and complex flavors. This natural leavening agent requires a longer fermentation period.
but imparts a distinctive taste and chewy texture, appealing to those who appreciate artisanal breads.
8. Sweet Variants with Dried Fruits and Nuts
For a sweeter loaf, fold in dried fruits like raisins, cranberries, or apricots, along with nuts such as walnuts or pecans.
This combination adds bursts of sweetness and crunch, making the bread suitable for breakfast toast or as a snack on its own.
9. Olive and Cheese Combination
Incorporate chopped olives and shredded cheese into the dough for a savory twist.
This variation is excellent for Mediterranean-inspired sandwiches or served alongside antipasto platters, offering a delightful blend of salty and rich flavors.
10. Multigrain Blend
Combine various flours, such as rye, spelt, or semolina, with the all-purpose flour to create a multigrain loaf.
This blend introduces diverse flavors and textures, catering to those who enjoy a heartier bread with complex tastes.
11. Sweet Cinnamon Swirl
Add a cinnamon-sugar swirl to your bread for a comforting, aromatic experience. Rolling the dough with a cinnamon-sugar mixture before baking.
creates a marbled effect and infuses each slice with a warm, spicy sweetness, perfect for breakfast or dessert.
By experimenting with these variations, you can tailor your sandwich bread to suit different tastes and occasions, ensuring that each loaf is a delightful and personalized creation.
Tips
To get the best results with this bread, it’s important to use warm water, not hot. If the water is too hot.
it can kill the yeast, and if it’s too cold, the yeast won’t activate properly. Aim for water that’s warm to the touch, about 110°F (43°C).
Make sure you let the dough rise in a warm, draft-free area. If your kitchen is chilly, consider turning on the oven for a minute or two.
turning it off, and then placing the dough inside to rise. The warmth will help activate the yeast and speed up the process.
When transferring the dough to the loaf pan, make sure the surface is smooth and even. This will help ensure the bread rises evenly during its second rise and bakes into a nice, uniform loaf.
If the dough is sticking to your hands, lightly flour your hands or use a silicone spatula to handle it.
This will prevent the dough from sticking to everything while still maintaining its sticky, airy texture.
Be sure to let the bread cool completely before slicing. While it’s tempting to cut into it right away.
letting it cool allows the texture to set, giving you perfect slices without the bread becoming too dense.
If you want a softer crust, cover the bread with a kitchen towel as it cools. This will keep the crust from getting too hard and help maintain its softness.
If you need to store the bread, place it in a plastic bag or wrap it tightly in plastic wrap. It should stay fresh for about 3-4 days.
For longer storage, you can freeze the bread and thaw it as needed.
Conclusion
Making your own sandwich bread is incredibly satisfying, and this no-knead, no-fuss recipe makes it easier than ever.
With just a few ingredients and minimal effort, you’ll have a soft, fluffy loaf that’s perfect for sandwiches, toast, or just enjoying on its own.
Once you try this recipe, you’ll never go back to store-bought bread. The process is simple, the results are delicious, and the best part is that you can customize it to suit your tastes. Happy baking!