Introduction
Soft, fluffy buns are a delight for any meal, whether served as a side or as the base for a delicious sandwich.
The warm, slightly sweet taste of freshly baked buns, coupled with their light and airy texture, can elevate any dish.
This recipe offers a simple and effective method to create soft buns from scratch, perfect for any occasion.
With just a few key ingredients, you can make a batch of homemade buns that will fill your kitchen with the irresistible aroma of freshly baked bread.
Ingredients
Ingredients
Butter for brushing on top of buns after baking
1 cup milk (can use 2 cups milk if preferred)
1 cup water
2 tablespoons sugar
10g packet yeast
6 cups flour
1 teaspoon salt
1/4 cup oil
1 egg
1 heaped tablespoon butter or margarine
Egg wash (1 egg and a splash of milk)
Instructions
Begin by adding 1 cup of warm milk and 1 cup of warm water to a bowl. You can increase the milk if you want a richer flavor, but the original proportions work perfectly.
Stir in 2 tablespoons of sugar and sprinkle in a 10g packet of yeast. Mix gently and let it sit for about 10 minutes, allowing the yeast to activate. This step ensures that your buns rise beautifully during baking.
In a separate bowl, sift 6 cups of flour and add a teaspoon of salt to the flour mixture. Stir it together to distribute the salt evenly.
Once the yeast mixture has bubbled up, add a quarter cup of oil and 1 egg to the yeast mixture. Stir well to combine all the ingredients.
Next, gradually add the flour mixture into the yeast mixture, stirring continuously. At first, the dough will be quite sticky.
This is perfectly normal. As you continue to mix and knead, the dough will start to come together. Add a heaped tablespoon of butter or margarine, and knead the dough on a lightly floured surface for about 15 to 20 minutes.
Don’t worry if the dough feels sticky at first—it will become smoother and less sticky as you knead.
Once the dough is smooth, lightly grease the dough and the bowl with oil. Place the dough in the bowl.
cover it, and let it rise in a warm spot for 45 minutes, or until it has doubled in size. This rise time is essential to achieving that soft, airy texture.
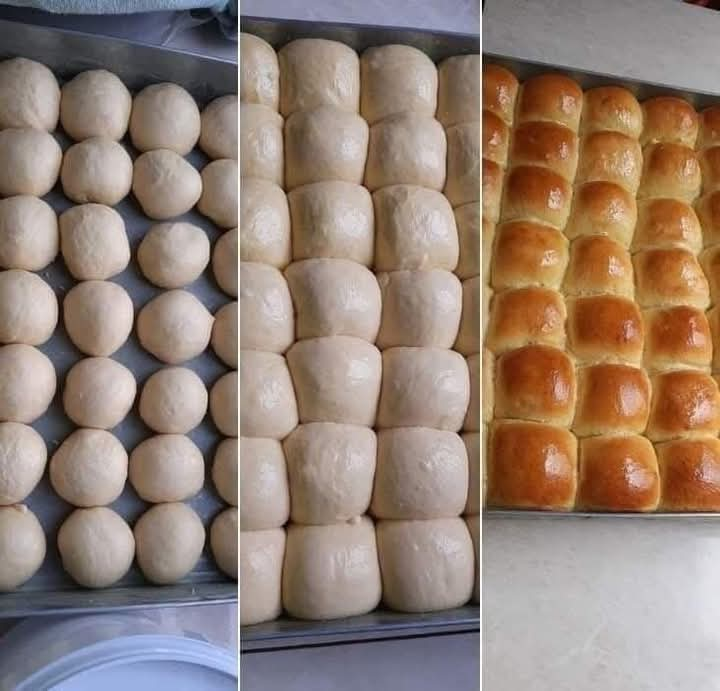
After the dough has risen, punch it down to release the air and flatten it out. Divide the dough into small, golf-ball-sized portions and place them in a buttered baking dish.
Cover the dish and allow the buns to rise for another 30 minutes.
While the buns are rising, preheat your oven to 180°C. After the second rise, brush the tops of the buns with an egg wash made of a beaten egg and a splash of milk.
Bake the buns for about 20 minutes, or until they are golden brown and fully cooked. Once they are done, remove them from the oven and brush the tops with some butter to give them a glossy finish.
How to Make
To make these soft buns, start by warming the milk and water. Adding sugar and yeast to the warm liquid activates the yeast, which is crucial for making the buns rise.
Once the yeast mixture is ready, sift the flour and mix it with salt to ensure the buns have an even texture. Combine the flour with the yeast mixture, and gradually add oil, egg, and butter.
Knead the dough for about 15 to 20 minutes to develop its structure, ensuring it becomes less sticky as you go.
Allow the dough to rise in a warm place for about 45 minutes, giving the yeast enough time to work its magic.
Once risen, divide the dough into small portions and place them in a buttered dish to rise once more. After the second rise, an egg wash gives the buns a golden finish, and baking.
them in a preheated oven will yield a soft, fluffy batch in about 20 minutes. The final touch of butter on top makes these buns irresistible.
Variations
While this recipe is a classic, there are several ways to customize your soft buns. For a sweeter twist, you can add cinnamon or vanilla to the dough.
making them perfect for breakfast or dessert. You could also incorporate chocolate chips or dried fruit like raisins or cranberries for added flavor and texture.
For a savory version, try adding garlic powder, dried herbs, or grated cheese to the dough before kneading.
This creates a rich, savory bun that pairs beautifully with soups or as a side dish for pasta.
Another variation is to experiment with whole wheat flour instead of all-purpose flour. This will create a heartier bun with a slightly nutty flavor, perfect for a more rustic meal.
If you want to make mini slider buns, simply reduce the size of each portion before baking. This variation is perfect for small sandwiches or as a fun appetizer at parties.
You could also experiment with adding seeds or oats to the tops of the buns before baking for extra texture and flavor.
If you’re feeling adventurous, try using coconut milk or almond milk instead of regular milk for a dairy-free version.
This not only makes the buns suitable for those with dietary restrictions but also imparts a unique flavor.
Adding honey or maple syrup instead of sugar could give the buns a lovely natural sweetness.
For a more decadent version, you could add a cream cheese filling or a sweet jam in the center of the buns before baking.
turning them into a delicious treat. The possibilities are endless, so feel free to get creative with your bun variations.
Tips
To ensure your buns turn out soft and fluffy, be sure to use warm, not hot, milk and water. If the liquid is too hot, it can kill the yeast and prevent the dough from rising properly.
Always let the yeast mixture sit for the full 10 minutes to ensure it’s properly activated.
Kneading the dough for the full 15 to 20 minutes is key to developing the right texture. Don’t rush this process, as kneading helps the dough become smooth and elastic.
If the dough feels too sticky, a light dusting of flour can help, but avoid adding too much as it can alter the texture.
Make sure to let the dough rise in a warm, draft-free environment. If your kitchen is cold, you can place the bowl in an oven with just.
the light on or near a warm stove to help speed up the rising process.
If you’re short on time, you can also let the dough rise in the fridge overnight. This slow rise can enhance.
the flavor of the buns and give you a head start for the next day. After the overnight rise, bring the dough to room temperature before shaping and baking.
Use a soft brush to apply the egg wash. This ensures an even coating and a beautiful, glossy finish.
Don’t forget to brush the buns with butter right after they come out of the oven for an added layer of softness and flavor.
Keep an eye on the buns while they bake. Ovens can vary, so start checking around 15 minutes. If the tops are golden brown, they’re ready.
If you’re unsure whether the buns are fully baked, you can tap the bottom of one. If it sounds hollow, the buns are done.
Conclusion
Making soft buns at home is a rewarding experience that yields delicious, comforting results.
With just a few basic ingredients and simple steps, you can create a batch of buns that are perfect for any meal or occasion.
Once you’ve mastered this recipe, you’ll find that there’s nothing quite like the taste of homemade bread straight from the oven.
Whether you enjoy them with a hearty stew or as a soft sandwich base, these buns are sure to become a favorite in your kitchen. Don’t be afraid to experiment with different variations and toppings to make them your own!